background image

16

www.allmand.com

Operating The Tower Lights


WARNING

Looking at illuminated light fixtures 

could result in serious injury.  Never 

look directly at illuminated light fixtures.

Turning The Lights On

1. Unlatch and open the control panel 

door.

2. Turn the main circuit breaker (

A

Figure 13) to the ON position.

3. Select the preferred mode of opera-

tion: Timer / Manual or Photocell.  

See 

Light Operation Mode

.

4. Turn the Tower / Light switch (

B

Figure 13) to the LIGHT position.

5. Turn the individual light switches 

(

C

, Figure 13) (1 - 4) to ON (if set to 

OFF).


NOTE: If the mode of operation is set 

to Photocell or Timer, the lights will 

not come on until dark (photocell) or 

until the time selected (timer).

Turning The Lights Off

•  If in Manual Mode, turn manual mode 

off.  See 

Light Operation Mode

.

•  If in Photocell or Timer mode, the 

lights will turn off automatically in 

ambient light (photocell) or at the time 

selected (timer).

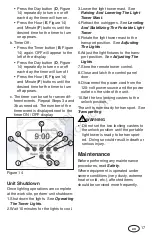
Figure 13

C

A

B

Light Operation Mode

The tower lights can be controlled man-

ually, by photocell, or by timer.

Manual Operation

1. Turn the Photocell / Timer switch (

B

Figure 13) to the TIMER position.

2. Press the OVR button (

G

, Figure 

14) on the timer module to turn on 

Manual mode. Press again to turn off.

Photocell Operation

Turn the Photocell / Timer switch (

B

Figure 13) to the PHOTOCELL position. 

The lights will automatically come on in 

the absence of ambient light.

NOTE: For most consistent operation, 

avoid locating the unit in a shadowed 

area, and orient the unit so the control 

box faces north.

Timer Operation

Turn the Photocell / Timer switch (

B

Figure 13) to the TIMER position.

To set the timer:

1. Reset the timer module (first time 

use):

a. With a blunt object press and 

release the Reset button (

I

, Figure 

14). The timer screen (

C

) will flash.

b. Press the Clock (

A

, Figure 14) and 

Hour (

E

) buttons simultaneously. 

The time will reset to 12:00am.

2. Set the clock:

a. If currently in Daylight Savings 

Time, press the +1h button (

H

Figure 14). (If not, bypass this step.)

b. Press and hold the Clock button 

(

A

, Figure 14) while simultaneously 

pressing the Day (

D

), Hour (

E

) and/

or Minute (

F

) buttons until the cor-

rect day and time appears.

3. Set the Timer

a. Timer On: 

•  Press the Timer button (

B

, Figure 

14) once. ON will appear to the 

left of the display.

Not for 

Reproduction

Содержание Night-Lite E Series

Страница 1: ...nd Bros Inc Holdrege NE USA All rights reserved Part No 117633 Revision A en fr es Manual del operador Serie E Night Lite Torre de iluminaci n port til con cabrestante manual Operator s Manual S rie E...

Страница 2: ...gation Any reference in this manual to left or right shall be determined by looking at the unit from the control box end If uncertain about any of the information in the manual contact Allmand service...

Страница 3: ...r or replace dam aged wiring before operating the unit WARNING Unsafe Operation Hazard Never permit anyone to install or operate the equipment without prop er training Read and understand this Operato...

Страница 4: ...ccumulated dirt and debris away from the body of the equip ment and its components before you inspect the equipment or perform preventative maintenance procedures or repairs Operating equipment with a...

Страница 5: ...ight tower during lowering and raising operations Part No 118076 1 B WARNING Do not look directly at illuminated light fixtures Part No 118076 2 C Light Tower Transport Alignment Part No 107459 D Elec...

Страница 6: ...dispositif se conforme la section 15 du r glement de la FCC Le fonctionnement est assujetti aux conditions suivantes 1 Ce dispositif ne doit pas g n rer d interf rences nuisibles et 2 ce dispositif do...

Страница 7: ...n in winch that could result in minor to moderate injury Make sure pawl engages gear Apply silicone to ratchet pawl and spacer CAUTION ATTENTION La neige et la glace pourraient causer une condition in...

Страница 8: ...s is intended for use as a stationary lighting device to illuminate large areas Identify the features and controls of the machine by comparing Figures 2 and 3 with the tables following See Operation f...

Страница 9: ...ight tower on the inside of the control panel door 2 Check that all safety decals are leg ible and in place on the portable light tower See Safety Decals in the Operator Safety section 3 Check that th...

Страница 10: ...or serious injury When elevating or lifting the portable light tower always keep clear of the area around and under the light tower and do not allow others in the area General Lifting Guidelines Befo...

Страница 11: ...DANGER Electrocution Hazard Raising the light tower mast in the presence of electrical power lines will result in death or serious injury Always check for overhead wires and obstructions before raisi...

Страница 12: ...vel and stable surface and deploy the outriggers before raising the portable light tower 1 Position the portable light tower on an adequate work site See Work Site Safety Considerations Use the level...

Страница 13: ...e light tower mast before stow ing the outriggers 2 Fully raise the stabilizer jack foot by turning the jack handle clockwise 3 Fold the handle 4 Remove the stabilizer jack locking pin rotate the jack...

Страница 14: ...ight fixtures to swing and could result in minor to moderate injury Be careful to rotate the tower slowly and be aware of the light fixtures while rotating the tower 1 Shut down the lights See Operati...

Страница 15: ...n raising or lowering the light tower mast Raising the Light Tower Mast 1 Before raising the light tower mast adjust the tower lights to the desired work position See Adjusting The Lights 2 Turn the t...

Страница 16: ...1 Turn the Photocell Timer switch B Figure 13 to the TIMER position 2 Press the OVR button G Figure 14 on the timer module to turn on Manual mode Press again to turn off Photocell Operation Turn the...

Страница 17: ...nutes for the lights to cool 3 Lower the light tower mast See Raising And Lowering The Light Tower Mast 4 Retract the outriggers See Leveling And Stabilizing The Portable Light Tower 5 Rotate the ligh...

Страница 18: ...air or water steam pressure washers Do not pressure clean electrical com ponents as this may cause damage Clean the portable light tower to remove all dust dirt or other foreign material Clean the lig...

Страница 19: ...o operate the product This device complies with part 15 of the FCC Rules Operation is subject to the following two conditions 1 This device may not cause harmful interference and 2 this device must ac...

Страница 20: ...nada s license exempt RSSs Operation is subject to the following two conditions 1 This device may not cause interfer ence and 2 This device must accept any interfer ence including interference that ma...

Страница 21: ...21 en N o t f o r R e p r o d u c t i o n...

Страница 22: ...a la izquierda que se haga en este manual deber determinarse mirando la unidad desde el extremo de la caja de control Si no est seguro acerca de la infor maci n de este manual comun quese con el Depar...

Страница 23: ...de operaci n no segura Nunca permita que alguien instale u opere el equipo si no cuenta con la capacitaci n adecuada Lea y comprenda este manual del operador antes de operar la torre de iluminaci n p...

Страница 24: ...izados Limpie toda la suciedad y los residuos acumulados del cuerpo del equipo y sus componentes antes de inspeccionarlo o de realizar procedimientos de man tenimiento preventivo o reparaciones Operar...

Страница 25: ...e iluminaci n cuando esta se baje y eleve N de pieza 118076 1 B ADVERTENCIA No mire directamente las luminarias encendidas N de pieza 118076 2 C Alineaci n de transporte de la torre de iluminaci n N d...

Страница 26: ...du r glement de la FCC Le fonctionnement est assujetti aux conditions suivantes 1 Ce dispositif ne doit pas g n rer d interf rences nuisibles et 2 ce dispositif doit accepter toute interf rence y com...

Страница 27: ...ice could cause an uncontrolled condition in winch that could result in minor to moderate injury Make sure pawl engages gear Apply silicone to ratchet pawl and spacer CAUTION ATTENTION La neige et la...

Страница 28: ...posi tivo de iluminaci n fijo en reas grandes Para identificar las caracter sticas y con troles de la m quina compare las figu ras 2 y 3 con las tablas que se presentan a continuaci n Consulte Operaci...

Страница 29: ...2 Verifique que todas las calcoman as de seguridad sean legibles y est n en su lugar en la torre de iluminaci n port til Consulte las Calcoman as de seguri dad en la secci n Seguridad del opera dor 3...

Страница 30: ...erte Cuando eleve o levante la torre de iluminaci n port til siempre mantenga despejada el rea alrededor y bajo la torre de iluminaci n y no permita que otras personas est n en el rea Pautas generales...

Страница 31: ...ar el m stil de la torre de ilumi naci n en presencia de l neas de alta tensi n provocar lesiones graves o la muerte Siempre revise los cables a re os y las obstrucciones antes de subir o bajar el m s...

Страница 32: ...despliegue los balancines antes de elevar la torre de iluminaci n port til 1 Ubique la torre de iluminaci n port til en un lugar de trabajo adecuado Consulte Consideraciones de seguridad del lugar de...

Страница 33: ...mango del gato a la derecha para elevar completamente el pie del gato del estabilizador 3 Pliegue el mango 4 Retire el pasador de bloqueo del gato del estabilizador gire el gato hasta la posici n de...

Страница 34: ...radas Aseg rese de girar la torre lentamente y est pendiente de las lumi narias cuando la gire 1 Apague las luces Consulte Operaci n de las luces de la torre Espere 10 minutos para que las luces se en...

Страница 35: ...erca de la torre de iluminaci n port til cuando suba o baje el m stil Elevaci n del m stil de la torre de ilumi naci n 1 Antes de subir el m stil de la torre de iluminaci n ajuste las luces de la torr...

Страница 36: ...zador Operaci n manual 1 Coloque el interruptor de la c lula fotoel ctrica temporizador B figura 13 en la posici n del TEMPORIZADOR 2 Presione el bot n OVR G figura 14 en el m dulo del temporizador pa...

Страница 37: ...e el apagado de la unidad 1 Apague las luces Consulte Operaci n de las luces de la torre 2 Espere 10 minutos para que las luces se enfr en 3 Baje el m stil de la torre de iluminaci n Consulte Elevaci...

Страница 38: ...vocar quemaduras graves AVISO Tenga precauci n al utilizar aire comprimido o lavadoras de vapor o agua a presi n No limpie a presi n los componentes el ctri cos ya que esto puede da arlos Limpie la to...

Страница 39: ...FCC se le advierte que los cambios o las modificaciones realizadas al producto que no cuentan con la aprobaci n expresa de Briggs Stratton podr an anular su autori dad para operar dicho producto Este...

Страница 40: ...tas de licencia de Industry Canada La operaci n est sujeta a las siguientes dos condiciones 1 Este dispositivo no puede provocar inter ferencia y 2 este dispositivo debe aceptar cualquier interferenci...

Страница 41: ...21 es N o t f o r R e p r o d u c t i o n...

Страница 42: ...epuis le bo tier de commande Si vous tes incertain de toute information dans le manuel contacter le Service la cli ent le Allmand au 1 800 562 1373 ou nous contacter via notre site web www allmand com...

Страница 43: ...permettre personne d installer ou de faire fonctionner l quipement sans une formation ad quate Lire et comprendre ce manuel d utilisation avant d utiliser ou d entretenir la tour d clairage portable a...

Страница 44: ...accumul s dans la carrosserie de l quipement et de ses composants avant d inspecter l quipement ou d effectuer un entretien ou des r parations Faire fonc tionner l quipement avec de la salet et des d...

Страница 45: ...n dant qu on la soul ve ou l abaisse N de pi ce 118076 1 B AVERTISSEMENT Ne jamais regarder directement des luminaires allum s N de pi ce 118076 2 C Positionnement de la tour d clairage pour le transp...

Страница 46: ...tion 15 du r glement de la FCC Le fonctionnement est assujetti aux conditions suivantes 1 Ce dispositif ne doit pas g n rer d interf rences nuisibles et 2 ce dispositif doit accepter toute interf renc...

Страница 47: ...ce could cause an uncontrolled condition in winch that could result in minor to moderate injury Make sure pawl engages gear Apply silicone to ratchet pawl and spacer CAUTION ATTENTION La neige et la g...

Страница 48: ...comme appareil d clairage fixe pour illuminer de grandes zones Identifier les caract ristiques et commandes de la machine en comparant les figures 2 et 3 avec les tableaux suivants Voir Fonctionnemen...

Страница 49: ...du tableau de commande de la tour d clairage portable 2 V rifier que tous les autocollants de s cu rit sont lisibles et en place sur la tour d clairage portable Voir Autocollants de s curit dans la s...

Страница 50: ...vation ou du levage de la tour d clairage portable toujours se tenir l cart de la zone autour et sous la tour d clairage et ne pas laisser les autres entrer dans la zone Lignes directrices g n rales...

Страница 51: ...max DANGER Risque d lectrocution Soulever le m t de la tour d clairage en pr sence de lignes de tension entra nera la mort ou de graves bles sures Toujours v rifier les c bles et les obstructions au...

Страница 52: ...bras stabilisateurs avant de lever la tour d clairage portable 1 Positionner la tour d clairage portable sur un emplacement ad quat Voir Consid rations de s curit sur le chantier Utiliser un niveau co...

Страница 53: ...vant de ranger les longerons 2 Soulever compl tement le pied du v rin stabilisateur en tournant la poign e du v rin dans le sens horaire 3 Plier la manivelle 4 Retirer la goupille de verrouillage du v...

Страница 54: ...tra ner des blessures l g res mod r es Faire tourner lentement la tour en tant con scient de la pr sence des luminaires lorsque la tour tourne 1 teindre les lumi res Voir Fonctionnement de la tour d c...

Страница 55: ...e la tour d clairage portable lorsqu on l ve ou qu on abaisse le m t Lever le m t de la tour d clairage 1 Avant de soulever le m t de la tour d clairage ajuster les lumi res de la tour la position vou...

Страница 56: ...t par cellule photo lectrique ou par minuterie Fonctionnement manuel 1 Mettre le commutateur de la cellule pho to lectrique ou de la minuterie B Figure 13 la position MINUTERIE 2 Appuyer sur le bouton...

Страница 57: ...chantier ex cuter l arr t de l appareil 1 teindre les lumi res Voir Fonctionnement de la tour d clairage 2 Attendre 10 minutes que les luminaires refroidissent 3 Abaisser le m t de la tour d clairage...

Страница 58: ...tre prudent lors de l utilisation d air compri m ou de laveuses pression l eau ou la vapeur Ne pas nettoyer des composants lectriques sous pression ils risqueraient d tre endommag s Nettoyer la tour d...

Страница 59: ...on au produit que Briggs Stratton n a pas approuv e express ment pourrait annuler votre autorit d utiliser le produit Ces dispositifs se conforment la section 15 du r glement de la FCC Le fonctionneme...

Страница 60: ...Le fonctionnement est assujetti aux deux conditions suivantes 1 Ce dispositif pourrait ne pas causer d interf rences et 2 Ce dispositif ne doit pas g n rer d interf rences incluant les interf rences p...

Страница 61: ...21 fr N o t f o r R e p r o d u c t i o n...

Страница 62: ...22 www allmand com N o t f o r R e p r o d u c t i o n...

Страница 63: ...23 fr N o t f o r R e p r o d u c t i o n...

Страница 64: ...N o t f o r R e p r o d u c t i o n...

Отзывы: