background image


GX1050 Technical Manual


Page 21 


15. Once completed the properties of the TEAM (LAG) that has just been created will 

appear.  A new Network Connections Icon corresponding to the LAG group is created.  
You have now completed the Link Aggregate Group configuration.   


16. Reboot the system and install GigE Sample Viewer. 

Содержание GX1050C

Страница 1: ...GX1050 GX1050C Allied Vision Technologies Canada Inc 101 3750 North Fraser Way Burnaby BC V5J 5E9 Canada Technical Manual 700056A April 7 2010...

Страница 2: ...echanical 9 Connections 10 Cleaning the Sensor 16 Adjusting the C mount 17 Network Card Configuration 18 GigE Sample Viewer and Filter Driver 22 Trouble Shooting 23 Addendum 26 GX IO Schematic 27 User...

Страница 3: ...utilisateurs au Canada Cet appareil num rique est conforme aux normes classe A pour bruits radio lectriques sp cifi es dans le R glement sur le brouillage radio lectrique Life support applications Th...

Страница 4: ...dtroda Germany Tel 49 36428 677 0 Fax 49 36428 677 28 e mail info alliedvisiontec com Allied Vision Technologies Canada Inc 101 3750 North Fraser Way Burnaby BC V5J 5E9 Canada Tel 1 604 875 8855 Fax 1...

Страница 5: ...maged if handled incorrectly KEEP SHIPPING MATERIAL Poor packaging of this product can cause damage during shipping VERIFY ALL EXTERNAL CONNECTIONS Verify all external connections in terms of voltage...

Страница 6: ...GX1050 Technical Manual Page 6 Canada Inc will not warranty parts which have been damaged through the obvious misuse of this product...

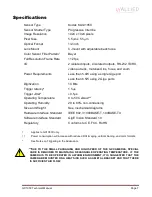
Страница 7: ...Trigger Jitter 0 5 s Operating Temperature 0 to 50 Celsius Operating Humidity 20 to 80 non condensing Size and Weight See mechanical diagrams Hardware Interface Standard IEEE 802 3 1000BASE T 100BASE...

Страница 8: ...edge falling edge any edge level high level low Exposure Time 10 microseconds to 60 seconds in 1 microsecond increments Gain 0 to 34dB Region of Interest ROI independent x and y control with 1 pixel...

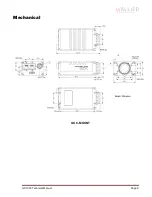
Страница 9: ...GX1050 Technical Manual Page 9 Mechanical GX C MOUNT...

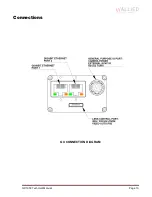
Страница 10: ...GX1050 Technical Manual Page 10 Connections GX CONNECTION DIAGRAM...

Страница 11: ...OUT 2 GENERAL PURPOSE IO PORT AS SEEN FROM BACK OF CAMERA The General Purpose I O port uses a Hirose HR10A 10R 12PB connector on the camera side The mating cable connector is Hirose HR10A 10P 12S This...

Страница 12: ...nce the connection for EXTERNAL POWER should be physically close to the POWER GROUND connection SYNC INPUTS 1 and 2 The input signals allow the camera to be synchronized to some external event These s...

Страница 13: ...ND USER SYNC OUT USER TRIGGER CIRCUIT T4 CAMERA CIRCUIT T2 TLP281 4GB 1 2 16 15 T3 IF 5mA CAMERA LOGIC SIGNAL 3 3V CAMERA LOGIC SIGNAL SYNC OUT SIGNAL T1 Various USER VCC values and load values for th...

Страница 14: ...ower ground If these signals are used in the system care must be taken to prevent ground loop problems USER GROUND This connection provides the user ground reference and return path for the isolated s...

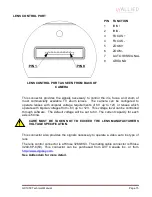
Страница 15: ...6V up to 12V or lenses which operate with bipolar voltages from 6V up to 12V This voltage level can be controlled through software The default voltage will be set to 6V The current capacity for each...

Страница 16: ...ly using a small flat head screw driver Clean both sides of the IR filter using the same techniques as explained below for the sensor window DO NOT TOUCH ANY OPTICS WITH FINGERS OIL FROM FINGERS CAN D...

Страница 17: ...loose unthread the ring a few turns from the camera face A wrench suitable for this procedure can be provided by AVT Canada Inc P N 11 0048A Image to Infinity Use a c mount compatible lens that allow...

Страница 18: ...a single data channel 1 Install a dual port network card in the host computer To achieve full camera performance you should use a Gigabit Ethernet card that supports Jumbo frames of at least 9KB size...

Страница 19: ...ou installed the AVT Prosilica GigE filter driver this step is not required 8 Perform Steps 1 8 for the other Ethernet adapter port that will be dedicated to the GX camera network 9 The next section w...

Страница 20: ...which the GX camera will be connected These ports will form our LAG or TEAM Click Next to continue 13 Choose Static Link Aggregation Click Next to continue 14 The LAG group will now be configured You...

Страница 21: ...properties of the TEAM LAG that has just been created will appear A new Network Connections Icon corresponding to the LAG group is created You have now completed the Link Aggregate Group configuratio...

Страница 22: ...r Verify that the Green LED is a solid green Run Sample Viewer It will take a few seconds for the camera to be recognized especially if your camera is in DHCP mode If the camera does not appear after...

Страница 23: ...r cabling known to work Configure your NIC as outlined in Gigabit Ethernet Setup For Windows It should have an IP address of 169 254 x x Subnet Mask 255 255 0 0 This is the AutoIP address range If you...

Страница 24: ...net as your NIC Camera is not listed or flashing Camera Unavailable There may be multiple NICs on your system set to the same subnet The camera can not know which card to resolve to Change the IP addr...

Страница 25: ...er event to capture frames Packets are incoming but all dropping Be sure you have JumboFrames enabled on your NIC Otherwise decrease your PacketSize setting to 1500 All packets completing as normal bu...

Страница 26: ...GX1050 Technical Manual Page 26 Addendum...

Страница 27: ...1 10W IF 5mA TLP281 4GB 1 2 16 15 TLP281 4GB 3 4 14 13 5V TO 24V IF 5mA VDD 3 3 442R 442R 5V TO 24V IF 5mA 100K SYNC OUT 4 CAMERA LOGIC SYNC OUT 4 D S G MMBF4393LT1G 3 3V LOGIC SYNC OUT 1 D S G MMBF43...

Страница 28: ...SIDE USER GND SYNC OUT 2 EXTERNAL POWER SYNC OUT 4 1K NOTES 1 CAMERA POWER 5V TO 24V 2 CAMERA POWER DOES NOT NEED TO BE THE SAME AS USER VCC 3 CAMERA GND DOES NOT NEED TO CONNECT TO USER GND 4 USER VC...

Страница 29: ...ZOOM FOCUS COMMON HIROSE 3240 8P C 50 1 2 3 4 5 6 7 8 TV ZOOM LENS UNIPOLAR TYPE ZOOM IRIS IRIS TV ZOOM LENS BIPOLAR TYPE HIROSE 3240 8P C 50 1 2 3 4 5 6 7 8 IRIS COMMON COMMON COMMON COMMON NOTES 1...

Страница 30: ...ion VIDEO AUTO IRIS LENS HIROSE 3240 8P C 50 1 2 3 4 5 6 7 8 LENS POWER POWER GROUND POWER GROUND VIDEO SIGNAL 12V_POWER JEITA CONNECTOR 1 2 3 4 LENS GROUND 1 2 3 4 12V POWER 1 2 3 4 5 6 7 8 9 10 11 1...

Страница 31: ...GX1050 Technical Manual Page 31 Trigger Timing Diagram...

Страница 32: ...n the next Exposure cycle can begin such that the Exposure will end after the current Readout o Interline Time is the time between sensor row readout cycles o Imaging is high when the camera image sen...

Страница 33: ...ring cycle time whereby the camera image sensor is exposing and reading out simultaneously then the User Trigger signal should be applied as soon as a valid Trigger Ready is detected o In this case Tr...

Страница 34: ...GX1050 Technical Manual Page 34 Camera Controls For the latest up to date camera controls see AVT Camera and Driver Attributes pdf at http www alliedvisiontec com...

Отзывы: