background image

6

A R 7 2 0   R O U T E R   Q U I C K   S T A R T   G U I D E

Getting Connected

3

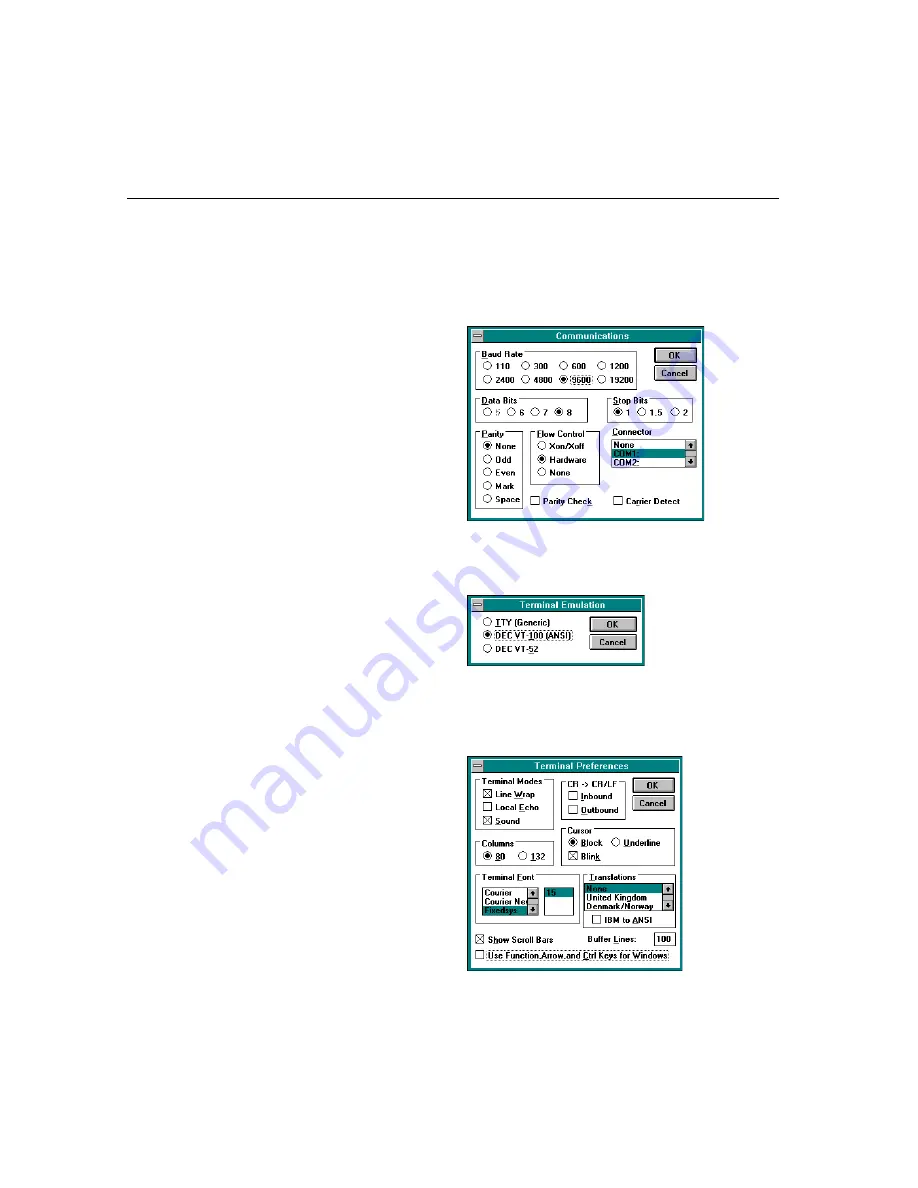
   Select “Terminal Emulation” from the Settings menu. In the

Terminal Emulation dialog box check “DEC VT-100  (ANSI)” and
click “OK”.

4

   Select “Terminal Preferences” from the Settings menu. In the

Terminal Preferences dialog box uncheck “Local Echo”, “CR ->
CR/LF”, and “Use Function, Arrow, and Ctrl Keys for Windows”.
Set other parameters as required, then click “OK”.

This section describes how to connect the AR720 router to
different physical devices and networks. Before you start, you
should be aware that the AR720 router refers to its physical
interfaces as 

ports

 and these are numbered, starting at 0. Ports

on the base unit are numbered first, followed by ports on PICs
(

Port Interface Cards

) in Bay 0 and Bay 1. For example, eth0 is the

first Ethernet port and syn1 is the second synchronous port.

USING WINDOWS TERMINAL  OR WINDOWS

HYPERTERMINAL AS THE  CONSOLE

You can use a PC running terminal emulation software as the
manager console, instead of a terminal. There are many terminal
emulation applications available for the PC, but the most readily
available are the Terminal and HyperTerminal applications
included in Microsoft

®

 Windows™ 3.1 and Windows 95,

respectively. In a normal Windows™ installation Terminal is
located in the Accessories group. In Windows 95 HyperTerminal
is located in the Start > Programs > Accessories menu.

The key to using terminal emulation software successfully with
the AR720 router is to configure the communications
parameters in the terminal emulation software to match the
default settings of the console port on the router. The following
procedures describe how to configure Windows™ Terminal  and
HyperTerminal for the default console port settings on the
AR720 router, but the same principles apply to other terminal
emulation programs.

To configure Windows™ Terminal, follow these steps:

1

   In Windows 3.1, double-click the Terminal icon in the

Accessories group in Program manager.

2

   Select “Communications” from the Settings menu. The

Communications dialog box is displayed.

Set “Baud Rate” to 9600, “Data Bits” to 8, “Stop Bits” to 1,
“Parity” to None, “Flow Control” to Hardware and “Connector”
to the COM port on the PC used to connect to the router.
Uncheck the “Parity Check” and “Carrier Detect” checkboxes.
Click “OK” to accept the new settings and close the dialog box.

Содержание AR720

Страница 1: ...Simply connecting the world AR720 ROUTER QUICK START GUIDE Software Release 2 3 1...

Страница 2: ...written notice The information provided herein is subject to change without notice In no event shall AlliedTelesyn be liable for any incidental special indirect or consequential damages whatsoever inc...

Страница 3: ...to a Basic Rate S T ISDN Service 9 Connecting to a Basic Rate U ISDN Service 9 Connecting to a Primary Rate ISDN Service 10 Connecting a Terminal or Modem 10 Documentation andTools CD ROM 12 Using th...

Страница 4: ...etwork Many small offices and home offices require fast and efficient access to a central office to check email access a database or download a file The AR720 supportsWindows Novell and Apple Macintos...

Страница 5: ...etworking via Frame Relay Point to Point Protocol and X 25 Basic Rate and Primary Rate access to Integrated Services Digital Network ISDN services with dial on demand bandwidth on demand and channel a...

Страница 6: ...for the PC but the most readily available are the Terminal and HyperTerminal applications included in Microsoft Windows 3 1 and Windows 95 respectively In a normal Windows installation Terminal is lo...

Страница 7: ...yperTerminal group Double click the Hypertrm exe icon 2 In the Connection Description dialog box enter a name for the connection e g AR720 and select an icon from the scrolling list Click OK 3 In the...

Страница 8: ...Ethernet LAN via an AUI interface use a transceiver ETHERNET PORTS FD LNK RX C R 100 COL 0 1 TX Connect the LAN to the Ethernet port on the rear panel of the AR720 using the supplied CAT 5 cable Data...

Страница 9: ...d is shipped with the standard 100 termination jumpers removed This is appropriate for most situations where the local building wiring provides the ISDN termination Your distributor or reseller can ad...

Страница 10: ...to the PRI interface on the rear panel of the AT AR020 PRI E1 T1 PIC If the router is being connected to a 75 network an external balun is required Contact your distributor reseller or ISDN service p...

Страница 11: ...of how to change the communications settings for the terminal or modem If the terminal or modem is to be used with communications settings other than the default settings the asynchronous port must be...

Страница 12: ...ortcuts and commands from the Document menu to page through the document Click on a bookmark thumbnail or hypertext link to jump to a specific section or topic Use the Search command to search for key...

Страница 13: ...command SET Q931 0 SPID1 spid SPID2 spid This section describes how to configure ISDN on the AR720 router using the command line interface ISDN on the router requires minimal user configuration other...

Страница 14: ...AL SEARCHSUB LOCAL NUMBER 9876543 PREC OUT Each call has the same name ROHO and this name is passed via the called subaddress IE to provide identification to the remote end of the link Each router wil...

Страница 15: ...initiate the call but calls from the Remote Office have precedence On the Head Office router create a call to the Remote Office router ADD ISDN CALL ROHO OUTSUB LOCAL SEARCHSUB LOCAL NUMBER 1234567 PR...

Страница 16: ...and any routing protocols such as IP and IPX that are configured to use PPP interface 0 will automatically inherit the dial on demand functionality CONFIGURING ISDN BANDWIDTH ON DEMAND A PPP interface...

Страница 17: ...er Remote Office Router eth0 Ethernet interface eth0 172 16 8 33 Ethernet interface IP address 192 168 31 30 172 16 8 0 Ethernet LAN IP subnet address 192 168 31 16 255 255 255 0 Ethernet LAN IP subne...

Страница 18: ...rs can exchange information about routes to all of the IP devices hosts PCs file servers etc on the internet However on a dial on demand ISDN connection this may result in excessive call charges So fo...

Страница 19: ...uter Check that RIP is configured correctly steps 4 and 5 above Check that the IP Telnet server is enabled on each router using the command SHOW IP If the Telnet server is disabled enable the Telnet s...

Страница 20: ...required to configure a pair of AR720 routers to create a Novell IPX internetwork using the router s command line interface In this scenario PCs at a remote office need access to a Novell file server...

Страница 21: ...network in a Novell internet including all LANs and WAN links must be assigned a network number Novell file servers also have an internal network number These network numbers must be unique across th...

Страница 22: ...can be caused by a number of different events The following give some of the most common 1 Check that when the workstation is moved to the same LAN as the file server it is able to access the server...

Страница 23: ...2 INT PPP0 NETW 129 DEMAND ON SET IPX CIRC 2 RIPCHANGE YES SAPCHANGE YES 3 Repeat this procedure on the Remote Office router defining one IPX circuit for the Ethernet interface and one for the wide ar...

Отзывы: