background image

Optional Features

 Bleach Dispenser

The bleach dispenser is located in the left front corner, under
the lid.

Use liquid bleach in the dispenser. Powdered bleach must not
be used in the dispenser. Add powdered bleach to the wash
water.

Use no more than one cup chlorine bleach for large loads,
three-quarters cup for medium and one-half cup for small
loads.

Carefully pour recommended amount of bleach into the dis-
penser before the start of the wash cycle.

Be careful not to spill undiluted bleach. It is a strong chemical
and can damage some fabrics if it is not properly diluted.

Bleach is very corrosive and overfilling the dispenser can
cause chemical damage to the washer components. Compo-
nents damaged by bleach are not covered under the product
warranty.

 Fabric Softener Dispenser

Fabric softener should not be used with the Normal Eco or
Spin Only cycles unless the Extra Rinse option is also selected.

 To Use Dispenser

After the clothes are loaded into the washtub and before the
start of the WASH cycle, pour the proper amount of liquid fab-
ric softener into the bottle measuring cap (refer to bottle direc-
tions). Pour into dispenser.

The large fabric softener dispenser allows for the fabric soften-
er to be diluted with water. We recommend adding water up to
the fill level. Do not exceed tip of arrow which indicates correct
fill level. Over-filling can allow fabric softener to spill onto the
clothes, causing stains on clothes if the softener comes into
contact with detergent suds.

Setting the water level to medium or higher will result in better
performance from the fabric softener.

The fabric softener will remain in the dispenser during the
wash fill, agitation and spin. At the end of the wash spin, the
liquid fabric softener will be dispensed into the washtub
through the slots in the agitator and will be mixed with the in-
coming rinse water.

 To Clean the Dispenser

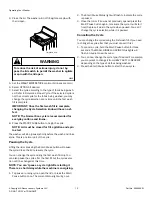
1.  Grasp the entire fabric softener assembly firmly with both

hands and place your thumbs inside the hole at the top.

2.  Pull quickly up and towards you. The assembly will come

off the agitator.

3.  Lay down a cloth on a hard, flat surface.

4.  Lay the assembly on the cloth on its side so the vertical

lines are facing up.

5.  Place your palms on the ridge at the base of the dispenser

housing and press down firmly. The assembly will split
apart for easy cleaning.

6.  Soak housing, cup and funnel in hot soapy water. Use a

small brush to scrub if needed.

7.   Rinse housing, cup and funnel clean.
8.  The inside of the agitator can also be cleaned.
9.  After cleaning, install dispenser funnel, cup and housing

until they click into place.

10.  Push assembly directly downward onto top of agitator until

firmly snapped in place.

IMPORTANT: When adding detergent to the wash load,
DO NOT allow any detergent to enter the softener dis-
penser cup. If this happens, refer to the cleaning in-
structions.

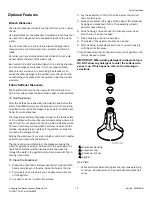
1.  Dispenser Housing
2.  Dispenser Cup
3.  Dispenser Funnel
4.  Agitator

 Use Tips

• Fabric softener spilled onto garments may cause staining.

To remove, dampen stain and rub with bar soap. Wash as
usual.

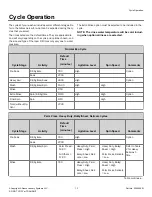
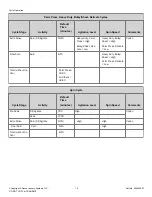
Cycle Operation

©

 Copyright, Alliance Laundry Systems LLC -

 DO NOT COPY or TRANSMIT

  15

  Part No. 204954EN

Содержание TC5102WN

Страница 1: ...hers Original Instructions Keep These Instructions for Future Reference CAUTION Read the instructions before using the machine If this machine changes ownership this manual must accompany machine Part...

Страница 2: ......

Страница 3: ...tructions ap pearing in this manual are not meant to cover all possi ble conditions and situations that may occur It must be understood that common sense caution and care fulness are factors which can...

Страница 4: ...ls 11 To Wash Clothes 11 Pausing the Cycle 12 Canceling the Cycle 12 Cycle Operation 13 Optional Features 14 Clothing Care 17 Clothing Concerns 17 Maintenance 19 Cold Weather Care 19 Care of Your Wash...

Страница 5: ...ve Maintenance 19 Reinstallation of Shipping Materials 20 Motor Overload Protector 20 Troubleshooting 21 Contact Information 23 Copyright Alliance Laundry Systems LLC DO NOT COPY or TRANSMIT 5 Part No...

Страница 6: ...nnel when required Do not do it yourself Do not install or store the washer where it will be exposed to water and or weather Do not wash articles that have been previously cleaned in washed in soaked...

Страница 7: ...the shut off valves at the end of each wash day Keep your washer in good condition Bumping or dropping the washer can damage safety features If this occurs have your washer checked by a qualified serv...

Страница 8: ...into loads that can be washed in cold warm or hot water 4 Sort by Type and Amount of Soil Heavily soiled clothes will need extra treatment Lightly soiled clothes can become dingy if washed with heavil...

Страница 9: ...mperature of the in coming water supply The washer does not heat or cool the wa ter For example northern climates will have much colder incom ing water during the winter months Southern climates will...

Страница 10: ...periods of agi tation and then a short soak until advancing to the spin por tion of the cycle All spin speeds are a low spin Waterproof Items If waterproof or water resistant items need to be washed...

Страница 11: ...on A three second tone will sound to confirm that these signals are turned off or on In addition the Status lights will be lit in an upward pattern when the signal is turned on The lights will be lit...

Страница 12: ...ou can change the cycle during the first wash fill only You can also pause the cycle after the first fill but the cycle selec tion can t be changed at this time NOTE You can t pause a cycle right afte...

Страница 13: ...on Soak 27 00 Heavy Soil Fill Agitate Soak 24 00 High Option Wash Fill Agitate Spin 15 30 High High Rinse 2 50 Extra Rinse Spin Fill Agitate 10 10 High High Option Final Spin Spin 9 10 High Total with...

Страница 14: ...n Final Spin Spin 8 10 Heavy Duty Bulky Sheet High Perm Press Delicate Low Total without Op tion Perm Press 29 40 All Others 32 40 Spin Cycle Cycle Stage Activity Default Time minutes Agitation Level...

Страница 15: ...ith detergent suds Setting the water level to medium or higher will result in better performance from the fabric softener The fabric softener will remain in the dispenser during the wash fill agitatio...

Страница 16: ...ing detergent to wash water do not allow any to enter into softener dispenser cup as softener will become gummy To prevent softener buildup the dispenser can be filled with clean water for automatic c...

Страница 17: ...r if possible Water Not Hot Enough White clothes will stay whiter with hot wash water Increase temperature Overcrowding Washer Clothes must circulate freely through the water for best results Yellowed...

Страница 18: ...phosphate Detergent Use enough detergent so lint remains suspended in water and flushed out Do not oversuds the water Mixing Fabric Types Knits and permanent press attract lint Wash these only with s...

Страница 19: ...r care though it may need rinsing or wiping after some unusual loads have been washed This also may be necessary if too little detergent has been used Leave the lid open to allow the inside of the was...

Страница 20: ...er agi tator placing the back of the brace into the lid opening first Shipping Plug The plastic shipping plug should be saved and reinstalled any time the washer is moved The plug fits into two openin...

Страница 21: ...hoses Such assem blies are designed to shut off the water flow if an increase in flow volume is detec ted such as a burst hose It is possible the devices are activating falsely Replace these fill hose...

Страница 22: ...roperly set Check fill hoses Make sure hot faucet hose is connected to hot mixing valve indi cated with H on the valve bracket and cold faucet is connected to cold mixing valve indicated with C on the...

Страница 23: ...on con tinuously Overflow Error This code indicates the washer has filled to the overflow level The machine will begin to attempt to pump water out if the lid is closed and locked If the code does no...

Страница 24: ...rom where you purchased your unit or call 1 920 748 3950 for the name and address of the nearest authorized parts distrib utor WARNING To reduce the risk of serious injury or death DO NOT repair or re...

Отзывы: