background image

Installer Checklist

Fast Track for Installing the Washer

1

Remove the Shipping
Brace and Shipping
Plug.

TLW2280N_SVG1

5

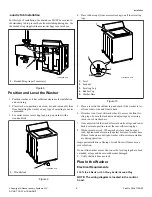
Position and Level the
Washer.

TLW2201N_SVG

CHECK

CHECK

2

Wipe Out Inside of
Washtub.

TLW2281N_SVG1

6

Plug In the Washer.

TLW2289N_SVG

CHECK

CHECK

3

Connect Fill Hoses.

TLW1988N_SVG

HOT

COLD

7

Add Water to the
Washer.

W391I_SVG

CHECK

CHECK

4

Connect Drain Hose to
Drain Receptacle.

TLW2288N_SVG

8

Check Lid Switch.

W376I_SVG

CHECK

CHECK

Refer to the manual for more detailed information

Installer Checklist

©

 Copyright, Alliance Laundry Systems LLC -

 DO NOT COPY or TRANSMIT

  12

  Part No. 204871ENR1

Содержание TC5003WN

Страница 1: ...ers Original Instructions Keep These Instructions for Future Reference CAUTION Read the instructions before using the machine If this machine changes ownership this manual must accompany machine www s...

Страница 2: ......

Страница 3: ...ation 7 Low Standpipe Installation 8 Wall Installation 8 Laundry Tub Installation 8 Position and Level the Washer 9 Plug In the Washer 9 Electrical Requirements 9 Earth Ground Instructions 10 Check Li...

Страница 4: ...ic Control 41 25 in 1048 mm Knob Control 40 75 1035 mm D 53 in 1346 mm E 26 in 660 mm F 0 4 in 10 mm G 25 63 in 651 mm H 29 in 737 mm I 42 75 in 1086 mm J 36 in 914 mm With leveling legs turned into b...

Страница 5: ...Hose Kit if needed Kit includes two fill hoses color coded for hot and cold water If using any other hoses follow these requirements Hoses must be new Hoses must be a minimum of 3 8 in inside diameter...

Страница 6: ..._SVG Figure 3 Connect Fill Hoses WARNING Under certain conditions hydrogen gas may be pro duced in a hot water system that has not been used for two weeks or more HYDROGEN GAS IS EXPLO SIVE If the hot...

Страница 7: ...tight Make sure the red color coded hose from the hot water faucet goes to the water mixing valve marked H and the blue color coded hose from the cold faucet goes to the valve marked C Refer to Figure...

Страница 8: ...e TLW2341N_SVG 4 5 3 2 1 1 Ribbed Portion of Drain Hose 2 Beaded Strap 3 Standpipe 2 in 51mm or 1 1 2 in 40 mm Diameter 4 36 in 914 mm Recommended Height 5 12 in 305 mm Figure 5 Low Standpipe Installa...

Страница 9: ...p and check if the washer is lev el from side to side and front to back 6 If washer is not level tilt washer back to access the front lev eling legs Loosen the locknuts and adjust legs by screwing int...

Страница 10: ...e plugged directly into a polarized three slot effective earth ground receptacle rated 110 120 Volts AC alternating current 15 Amps Refer to Figure 11 to determine correct polarity of the wall recep t...

Страница 11: ...m has an effective earth ground have a qualified electri cian or your local electrical utility company check it and cor rect any problems WARNING This unit is equipped with a three prong earth ground...

Страница 12: ...TLW2281N_SVG1 6 Plug In the Washer TLW2289N_SVG CHECK CHECK 3 Connect Fill Hoses TLW1988N_SVG HOT COLD 7 Add Water to the Washer W391I_SVG CHECK CHECK 4 Connect Drain Hose to Drain Receptacle TLW2288...

Отзывы: