background image

4

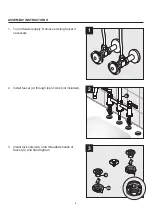
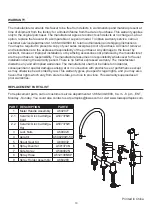
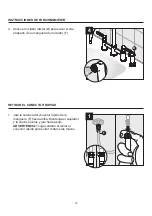
ASSEMBLY INSTRUCTIONS

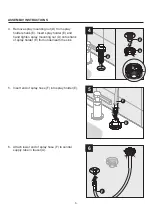
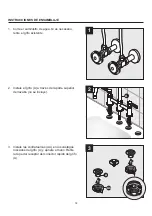
2.  Install faucet (A) through top of sink (not included).

3.  Install lock nuts (AA) onto threaded shanks of 

faucet (A) and hand tighten. 

1.  Turn off water supply. Remove existing faucet if 

necessary.

1

A

2

1

1

A

AA

3

2

Содержание 3782749

Страница 1: ...Date ATTACH YOUR RECEIPT HERE Questions problems missing parts Before returning to your retailer call our customer service department at 1 866 439 9800 8 a m 8 p m EST Monday Sunday You could also contact us at partsplus lowes com or visit www lowespartsplus com ALLEN ROTH and logo design are trademarks or registered trademarks of LF LLC All rights reserved ...

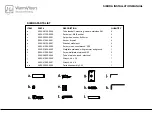
Страница 2: ...RT DESCRIPTION QUANTITY A Faucet 1 B Side Spray 1 C Aerator preassembled 1 D Spray Mounting Nut preassembled 1 E Spray Holder 1 F Spray Hose 1 HARDWARE CONTENTS PACKAGE CONTENTS A C D B E F AA Lock Nut x 2 ...

Страница 3: ... parts are present Compare parts with package contents list and hardware contents list If any part is missing or damaged do not attempt to assemble the product Estimated Assembly Time 12 minutes Tools Required for Assembly not included Adjustable wrench silicone sealant Helpful Tools not included Channel lock pliers safety goggles Prior to beginning installation turn off the cold and hot water lin...

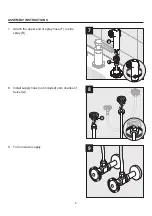
Страница 4: ...STRUCTIONS 2 Install faucet A through top of sink not included 3 Install lock nuts AA onto threaded shanks of faucet A and hand tighten 1 Turn off water supply Remove existing faucet if necessary 1 A 2 1 1 A AA 3 2 ...

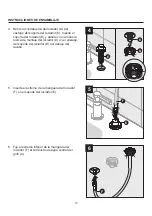
Страница 5: ...F to central supply tube in faucet A 5 Insert end of spray hose F into spray holder E 4 Remove spray mounting nut D from spray holder shank E Insert spray holder E and hand tighten spray mounting nut D onto shank of spray holder E from underneath the sink 4 E F 5 F 6 3 ...

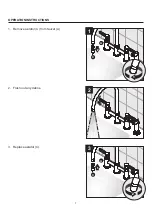
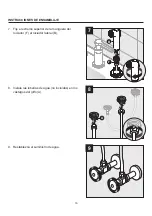
Страница 6: ...6 ASSEMBLY INSTRUCTIONS 9 Turn on water supply 8 Install supply lines not included onto shanks of faucet A 7 Attach the upper end of spray hose F to side spray B 1 F B 7 1 1 A 8 9 2 2 ...

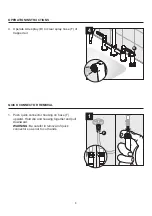
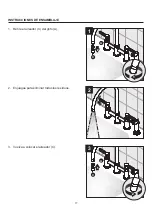
Страница 7: ...7 C A 2 1 OPERATION INSTRUCTIONS 3 Replace aerator C 2 Flush out any debris 1 Remove aerator C from faucet A 1 2 C A 1 3 2 ...

Страница 8: ...MOVAL 4 Operate side spray B to clear spray hose F of trapped air 1 Push quick connector housing on hose F upward Hold clip and housing together and pull downward WARNING Be careful in removal of quick connector so as not to cut hands B 4 F 1 1 ...

Страница 9: ...r is properly installed Water leaks from aerator Seats need to be replaced Determine if the drip is hot or cold Disassemble correct handle and cartridge Remove rubber seat from inside of the faucet body and replace with new one Reassemble cartridge and handle Leaks around base of spout O ring set should be replaced Turn off water supply Remove spout trim cap Pull spout straight up Replace the o ri...

Страница 10: ...r assumes no responsibility whatsoever for faucet installation during the warranty period There is no further expressed warranty The manufacturer disclaims any and all implied warranties The manufacturer shall not be liable for incidental consequential or special damages arising at or in connection with product use or performance except as may otherwise be accorded by law This warranty gives you s...

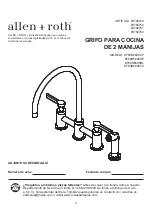
Страница 11: ...iseño del logotipo son marcas comerciales o marcas registradas de LF LLC Todos los derechos reservados Preguntas problemas piezas faltantes Antes de volver a la tienda llame a nuestro Departamento de Servicio al Cliente al 1 866 439 9800 de lunes a domingo de 8 a m a 8 p m hora estándar del Este También puede ponerse en contacto con nosotros en partsplus lowes com o visitar www lowespartsplus com ...

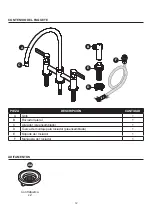
Страница 12: ...IEZA DESCRIPCIÓN CANTIDAD A Grifo 1 B Rociador lateral 1 C Aireador preensamblado 1 D Tuerca de montaje para rociador preensamblada 1 E Soporte del rociador 1 F Manguera del rociador 1 ADITAMENTOS AA Contratuerca x 2 A C D B E F ...

Страница 13: ...mpare las piezas con la lista del contenido del paquete y la lista de aditamentos No intente ensamblar el producto si falta alguna pieza o si estas están dañadas Tiempo estimado de ensamblaje 12 minutos Herramientas necesarias para el ensamblaje no se incluyen Llave ajustable sellador de silicona Herramientas útiles no se incluyen Pinzas channel lock gafas de seguridad Antes de comenzar la instala...

Страница 14: ...te superior del lavabo no se incluye 3 Instale las contratuercas AA en los vástagos roscados del grifo A y apriete a mano Retire la tapa del receptor del conector rápido del grifo A 1 Corte el suministro de agua Si es necesario retire el grifo existente 1 A 2 1 1 A AA 3 2 ...

Страница 15: ...nserte el extremo de la manguera del rociador F en el soporte del rociador E 4 Retire la contratuerca del rociador D del vástago del soporte del rociador E Inserte el soporte del rociador E y apriete con la mano la tuerca de montaje del rociador D en el vástago del soporte del rociador E por debajo del lavabo 2 E D E 1 4 E F 5 F 6 3 ...

Страница 16: ... ENSAMBLAJE 9 Restablezca el suministro de agua 8 Instale las tuberías de agua no incluidas en los vástagos del grifo A 7 Fije el extremo superior de la manguera del rociador F al rociador lateral B 1 F B 7 1 1 A 8 9 2 2 ...

Страница 17: ...17 INSTRUCCIONES DE ENSAMBLAJE 3 Vuelva a colocar el aireador C 2 Enjuague para eliminar todos los residuos 1 Retire el aireador C del grifo A C A 2 1 1 2 C A 1 3 2 ...

Страница 18: ...rapado de la manguera del rociador F RETIRAR EL CONECTOR RÁPIDO 1 Jale la carcasa del conector rápido de la manguera F hacia arriba Mantenga el sujetador y la carcasa juntos y jale hacia abajo ADVERTENCIA Tenga cuidado al retirar el conector rápido para evitar cortarse las manos B 4 F 1 1 ...

Страница 19: ...e necesita reemplazar los asientos Determine si el goteo es caliente o frío Desensamble la manija correcta y el cartucho Retire el asiento de goma del interior del cuerpo del grifo y reemplácelo con el nuevo Vuelva a ensamblar la manija y el cartucho Hay fugas alrededor de la base de la boquilla Se debe reemplazar el juego de junta tórica Interrumpa el suministro de agua Retire la tapa para el reb...

Страница 20: ...ad por la instalación del grifo durante el período de garantía No existe otro tipo de garantía explícita El fabricante rechaza cualquiera y todas las garantías implícitas El fabricante no se hará responsable por daños accidentales resultantes o especiales que surjan en relación con el uso o el funcionamiento del producto excepto que la ley indique lo contrario Esta garantía le otorga derechos lega...

Отзывы: