6
3
4
1
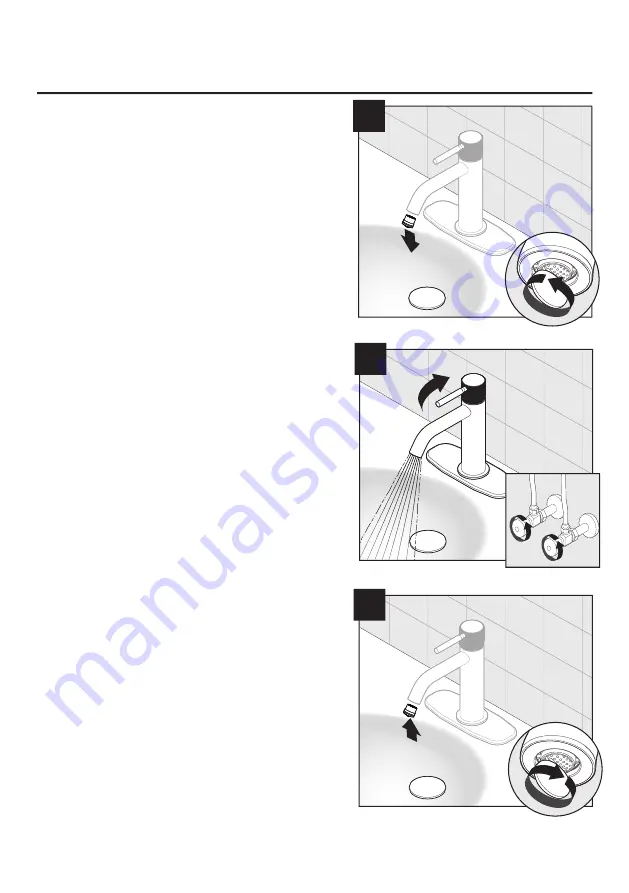
7. Using a coin, remove aerator from faucet.
8. Turn on water supply. Flush out any debris
and check for leaks around drain.
2
8
7
ASSEMBLY INSTRUCTIONS
9. Replace aerator.
9
Страница 1: ...0 8 a m 8 p m EST Monday Sunday ITEM 80375181 2564468 SINGLE HANDLE BATH FAUCET MODEL FS1A9281CP Fran ais p 9 ATTACH YOUR RECEIPT HERE Serial Number ____________________________ Purchase Date ________...
Страница 2: ...1 B Deck Plate 1 C Putty Plate 1 D Rubber Washer 1 E Metal Washer 1 F Water Supply Line 1 G Lock Nut 1 DRAIN ASSEMBLY COMPONENTS AA Main Plunger 1 BB Rubber Washer 1 CC Lock Nut 1 DD Drain Assembly 1...
Страница 3: ...ement is ever required be sure to replace it with a WaterSense compliant aerator or flow controller to retain the water conserving flow rate of this product PREPARATION Before beginning assembly of pr...
Страница 4: ...te installation Place the faucet A in the appropriate faucet hole of the sink not included 3b With deck plate installation Position the putty plate C and deck plate B onto the sink install faucet A th...
Страница 5: ...dy A Secure faucet body A to sink with lock nut G and preassembled screws 5 1 2 4 D A E G 6 1 1 1 5 Connect water supply lines 5 6 Install the main plunger AA and the drain assembly DD above sink From...
Страница 6: ...6 3 4 1 7 Using a coin remove aerator from faucet 8 Turn on water supply Flush out any debris and check for leaks around drain 2 2 8 7 ASSEMBLY INSTRUCTIONS 9 Replace aerator 9 1 1 2 2 1...
Страница 7: ...ce the faucet with a comparable or superior model To obtain warranty service call our customer service department at 1 866 439 9800 for return authorization and shipping instructions You may be requir...
Страница 8: ...EST Monday Sunday PART DESCRIPTION PART 1 Metal Handle A662B38 2 Index Button A66D558 3 Trim Cap A508014 4 Adjusting Ring A603A38N 5 Ceramic Disc Cartridge A507084N 6 Aerator 1 2gpm A553058N 7 Cover P...
Страница 9: ...VOTRE RE U ICI Des questions des probl mes des pi ces manquantes Avant de retourner l article au d taillant appelez notre service la client le au 1 866 439 9800 entre 8 h et 20 h HNE du lundi au dima...
Страница 10: ...pplique 1 C Plaque mastic 1 D Rondelle en caoutchouc 1 E Rondelle m tallique 1 F Conduite d eau 1 G crou de blocage 1 COMPOSANTS DE L ENSEMBLE D VACUATION AA Bouchon principal 1 BB Rondelle en caoutch...
Страница 11: ...urez vous d utiliser un a rateur ou un contr leur de d bit conforme au programme Watersense pour continuer conomiser l eau PR PARATION Avant de commencer l assemblage du produit assurez vous d avoir t...
Страница 12: ...icone clair non inclus autour de la plaque mastic INSTRUCTIONS POUR L ASSEMBLAGE 2 Retirez l crou de blocage pr assembl G la rondelle d espacement en m tal E et la rondelle d espacement en caoutchouc...
Страница 13: ...lavabo l aide de l crou de blocage G et des vis pr assembl es 5 1 2 4 D E G 6 1 1 1 5 1 1 2 6 AA DD CC BB 6 2 3 1 popup A 6 Installez le plongeur principal AA et l ensemble d vacuation DD par le dess...
Страница 14: ...limentation en eau vacuez les d bris et v rifiez si le drain fuit 9 Remettez l a rateur en place 7 Retirez l a rateur du robinet l aide d une pi ce de monnaie INSTRUCTIONS POUR L ASSEMBLAGE 3 4 1 2 2...
Страница 15: ...mod le comparable ou de qualit sup rieure Pour effectuer une r clamation au titre de la garantie communiquez avec notre service la client le au 1 866 439 9800 afin d obtenir une autorisation de retou...
Страница 16: ...u dimanche Imprim en Chine 1 2 3 4 5 6 7 8 9 PI CE DESCRIPTION N DE PI CE 1 Poign e en m tal A662B38 2 Capuchon indicateur A66D558 3 Capuchon d coratif A508014 4 Bague d ajustement A603A38N 5 Cartouch...