Alinking UNC-9412 Скачать руководство пользователя страница 59

1. 

Dial: You can select whether or not to dial when you boot the machine. 

2. 

Use DHCP or fixed IP for connection to the LAN environment. 

3. 

Key in the IP address of the camera and enter "PPPoE Setting" following the 

route Setting 

 Basic Setting 

 Network

 PPPoE. 

4. 

Key in the xDSL "Username" and "Password" acquired from your ISP. Click 

Save to confirm the setting. 

5. 

Where the ADSL modem and the camera is connected via a switch-hub, you 

can press “Reboot” or restart the machine manually to try PPPoE dialing when 
the setting of the camera has been completed. 

6. A different IP address is obtained after each dial-up network connection. You 
can get the new IP address from Setting 

 Basic Settings 

 System. If you want 

to know the new IP address anytime, you must enter Setting 

 Basic Settings 


Notification to set some settings. There are three ways to get information: 1. 
SMTP 2. FTP 3. HTTP. For details, refer to the Notification Setup Menu. 

Note: You can use the DDNS function to access the camera. Refer to the “DDNS Setting” 
page for more information. 
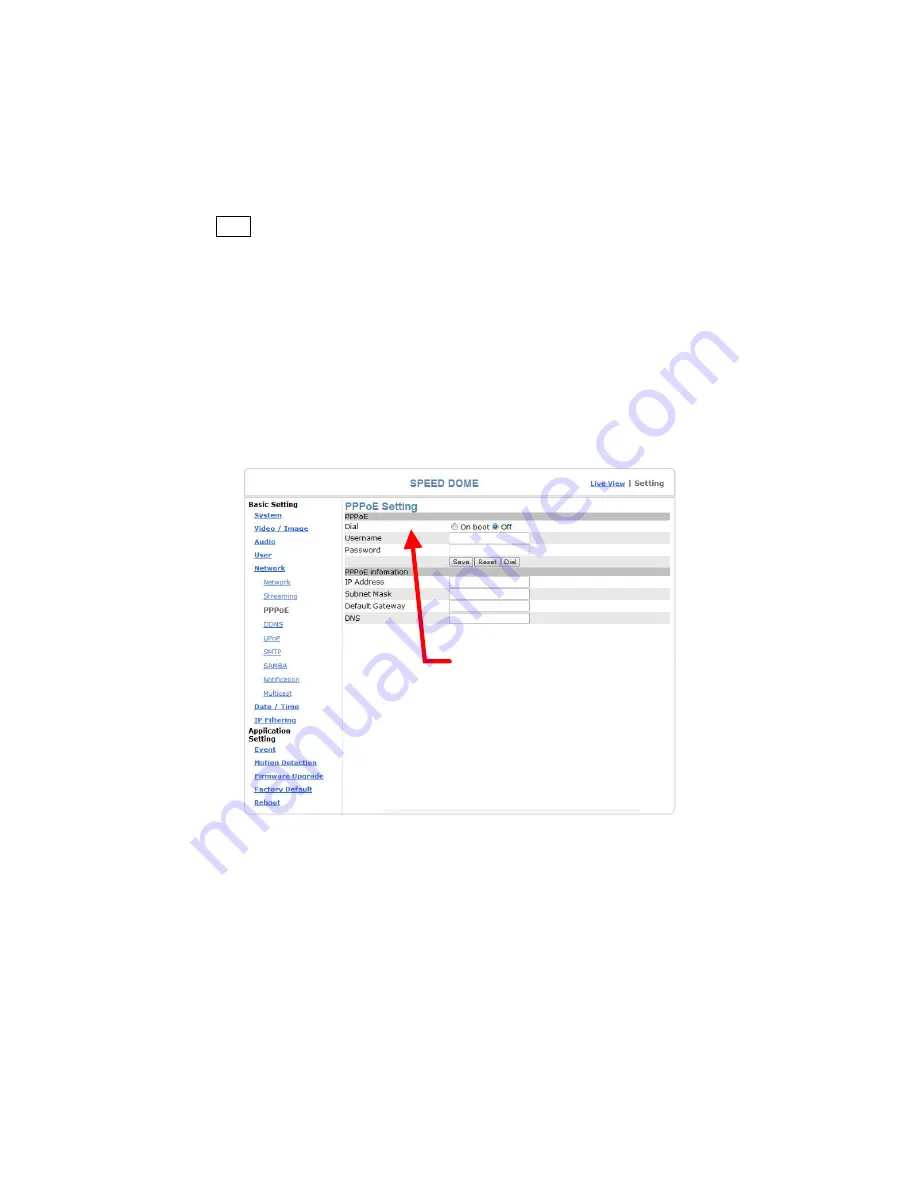


PPPoE setting 


Basic Setting > Network > PPPoE > PPPoE


Dial: You can select whether or not to dial when you boot the machine (On Boot 
or Off). 
Username: Enter the username provided by your ISP. 
Password: Enter the password. 


Basic Setting > Network > PPPoE > PPPoE Information 

IP Address: The IP address acquired when dialing has been executed 
successfully. 
Subnet Mask: The subnet mask information acquired when dialing has been 
executed successfully. 
Default Gateway: The gateway information acquired when dialing has been 
executed successfully. 
DNS: The ISP domain name acquired when dialing has been executed 

59 

Содержание UNC-9412

Страница 1: ...UNC 9412 9512 High Speed Dome Network Camera User Manual Software Version 1 0 1...

Страница 2: ...10 Camera Settings 23 Camera Setting from a Router 25 Change the Internet Explorer Setting 26 Enter the Main Page 28 Camera Main Page 31 System Settings 43 Basic Settings 43 System 43 Video Image 44 A...

Страница 3: ...69 Event 69 Motion Detection 76 Firmware upgrade 77 Factory Default 79 Reboot 80 Attachment A External Alarm 82 Attachment B Bandwidth Estimation 84 Attachment C Troubleshooting and FAQs 85 FCC Class...

Страница 4: ...received the following items If any item is missing please contact your dealer Camera unit Pack 1 Speed dome camera 2 Network module base Accessory Pack 3 Optical cover 4 Inserting holder 5 Decorativ...

Страница 5: ...7 Screw Pack Pack A Pack B Pack C Pack D 8 Inserting opening sample sheet 9 Quick Installation Guide 10 Hardware Installation Manual 11 CD ROM Manual Software 5...

Страница 6: ...hernet Monitoring system resource requirements Operating system Windows 2000 Professional SP4 XP Home SP2 Browser Internet Explorer 6 x or later versions System hardware CPU Pentium 4 2 4GHz or better...

Страница 7: ...ollowing features The 1 4 Sony Exview HAD CCD image sensor provides vivid image quality The 18x or 26x optical zooming camera lens allows a clearer view from a distance MPEG4 MJPEG dual image compress...

Страница 8: ...Ethernet cable or 100 Base T High Speed Ethernet cable This port can automatically detect or coordinate the transmission rate of the network 3 Use a video audio output cable for external video audio...

Страница 9: ...network from the LAN socket External alarm connector DI DO See Appendix A for details of D1 DO Default settings After booting up the system press and hold the button for 5 seconds to reset the produc...

Страница 10: ...lder wall or ceiling to avoid damage to personnel and equipment 10 Do not open the protective cover to avoid electric shock or other hazards 11 Do not attempt repairs by yourself Otherwise electric sh...

Страница 11: ...provide all required knowledge regarding installation of the camera As for the setting of the network and the description of the interface please read the related part of the User s Manual Notice Use...

Страница 12: ...ox Do not put the equipment on a firm surface or the protruding metal connector beneath the camera will be damaged It is recommended to keep the camera in the package box before the installation begin...

Страница 13: ...nd glass The thickness of the wooden plate should be at least 1 5 cm If the camera is to be fixed on a concrete or brick surface suitable setscrews should be prepared by the user For convenience of th...

Страница 14: ...ect the video terminal if analog video output is required 9 Connect the power cable and if required the alarm input output lines and microphone cable Note The power input must be 24V AC 2A or 12V DC 2...

Страница 15: ...pack Cut the edge as shown if it is necessary to pull out wires inside the rim 11 Mount the decorative rim onto the network module base and notice the position of the outlet hole 12 Use the screws in...

Страница 16: ...nts on the optical cover Gloves are recommended for installation Dust may accumulate on the optical cover after it is used for a period of time and affect the image quality A high pressure gas spray c...

Страница 17: ...carbonate magnesia PU PVC and glass The thickness of the wooden plate should be at least 1 5 cm 2 Take the Push the inserting holders out from the accessory pack and push them into the hole 4 A hole...

Страница 18: ...e legs carry the total weight of the camera Thus they should be firmly secured to avoid damage to the equipment and personnel If the surface to which the legs are secured is not level adjust the adjus...

Страница 19: ...le on the network module base 11 Use the screw in Screw Pack B to secure the camera 12 Inserting the assembled PTZ Dome Camera and network module base into the inserting holder slowly from top to the...

Страница 20: ...e decorative rim onto the network module base and notice the position of the outlet hole 15 Use the screw in Screw Pack D to secure the rim to the base 16 Illustration of the completed inserting insta...

Страница 21: ...e network cable Connect the video terminal if analog video output is required 18 Connect the power cable and if required the alarm input output lines and microphone cable 19 Remove the lens protection...

Страница 22: ...late on the lightweight steel frame The fragile asbestos plate might not be capable of holding the weight and the camera may fall from the ceiling to injure personnel or damage the equipment It is rec...

Страница 23: ...y IP setting 192 168 0 20 appears on the screen 1 Click Search to find the IPCAM on the LAN 3 Changing the IP address and related settings for the network environment When you find the camera click it...

Страница 24: ...Setting 2 All UIC camera network server products can be found and changed using the IP FINDER software 3 If the IP FINDER software cannot be executed check your antivirus software or firewall to remov...

Страница 25: ...SL router After completing the settings you can operate the camera from a WAN IP Address via the ADSL router Example The Virtual Server setting screen of the Zonet ADSL router Note 1 The virtual serve...

Страница 26: ...that the security level is set to Medium the commonly used default security level Steps Open the IE browser Tools Internet Options Security Custom Level Check that the security level is Medium Check...

Страница 27: ...Install IE Tab Restart Firefox IE Tab online learning 27...

Страница 28: ...2 Key in the default username and password Default User Name root Default Password root You can access the camera as an administrator by default and set up for other users or privileges from the Basic...

Страница 29: ...ning screen appears Click Install The ActiveX Control is named UIC ActiveX Control This software is owned by UIC and well certified You can use it without any doubts about its validity Click Install 5...

Страница 30: ...6 When installation of the ActiveX control is completed the image transmitted from the camera and the operation interface appear on the screen 30...

Страница 31: ...e change the streaming setting to HTTP if nothing appears in the image area Control Panel 1 Pan direction This function controls the camera to move up down left or right You can directly drag the smal...

Страница 32: ...oPan modes 7 options are available 1 is the slowest and 7 is the fastest speed Speed Option 1 2 3 4 5 6 7 Angle second 1 16 32 48 64 80 95 Set the angle for each movement Control the horizontal direct...

Страница 33: ...ball on the control bar for quick zooming or click the or button at both ends of the control bar to zoom precisely The digital zoom in combination with the optical zoom creates 216x or 312x depending...

Страница 34: ...t setting window 3 Rotate the camera to a desired location 2 Enter a name for the location 8 Tour This function can enable or disable the auto tour mode for the selected location 5 When a location num...

Страница 35: ...r mode Auto horizontal tour mode Auto horizontal tour mode In the AutoPan mode the camera automatically rotates counterclockwise and keeps horizontally rotating till disabled 10 Park to You can use th...

Страница 36: ...age When Disable is selected no message will show Save AlertImg The Enable Disable button can activate or stop the save of the alert image in the Snapshot directory When the button shows Enable you ha...

Страница 37: ...for display of the image Normal Normal image Display on the ceiling default value Flip Upside down image Mirror left and right opposite image Rotate 180 Mirrored and upside down Display on the desktop...

Страница 38: ...nsmitted through UDP Port 50000 60000 by default to ensure the fastest image transmission However video fragment or mosaics may occur due to poor transmission quality TCP provides reliable data transm...

Страница 39: ...t button can additionally adjust the brightness or contrast of the image Pressing will increase the brightness or contrast while pressing will decrease the brightness or contrast Adjustment of the bri...

Страница 40: ...age will be saved in the default folder C snapshot Note If you are using the Windows Vista operation system files may not be saved in the default folder when you click the REC or Snapshot button This...

Страница 41: ...r and reopen again If the setting is correct Trusted Sites will display 6 Enter the IP address of the speed dome 21 Path Setting of the path and filename for the recording and snapshot files The defau...

Страница 42: ...an external microphone will not be received 23 ANS Anti Noise System Default is on Enabling this function is recommended When you click the ANS icon a Forbidden mark will show on the icon and the ANS...

Страница 43: ...em System info Basic Setting System System Info Device Name You can set the name for your camera here Click Set to complete the setting MAC Address IP Address Network Mask and Gateway Network informat...

Страница 44: ...sing a 3G cellular phone click Enable to enable the 3GPP mode Note When the 3GPP mode has been activated all relevant parameters are set automatically and cannot be changed This is for the sake of com...

Страница 45: ...ltimedia data from the main screen 2 Select a streaming link 4 Enter the link name 3 Add a new link 5 Enter the IP address of the camera e g rtsp xxx xxx xxx xxx 554 cam1 3gpp 6 Select OK to save the...

Страница 46: ...h linking 10 Loading the image 9 Connecting 11 Video stream screen Basic Setting Video Image Video Image Video Format You can select MPEG4 or MJPEG as the video format It is recommended to select MPEG...

Страница 47: ...f the network you are using This product offers different selections for video audio settings However to ensure undisrupted image transmission you need a higher uploading bandwidth Generally it is rec...

Страница 48: ...0 for video resolution With PAL you can choose 1 2 3 4 5 6 12 or 25 for video resolution FPS selection Basic Setting Video Image Video Image Video Quality You can select Fix Quality resolution priorit...

Страница 49: ...ins the parts that are different from the I Frame and need lower bandwidth Hence when you need to transmit the pages without disruption in a normal network environment you can set up a higher GOP For...

Страница 50: ...ideo Image OSD Display Color 256 colors and tones from 0 deepest black to 255 lightest white are available for display of the text Basic Setting Video Image Sensor brightness contrast adjustment You c...

Страница 51: ...ll immediately appear on the real time display window Real time display window Auto ICR setting Basic Setting Video Image Camera Advance Setting ICR Setting When the ambient illumination becomes dim t...

Страница 52: ...o Exposure mode setting Basic Setting Video Image Privacy Zone The privacy zone function can mask the image in the mask zone to ensure confidentiality First select a mask zone A to X and a mask color...

Страница 53: ...Privacy area Masked area Mask color setting Masked area effect The masked area move when the camera change position Basic Setting Audio Sound Basic Setting Audio Audio sound setting 53...

Страница 54: ...the security and control of the camera The access privileges and setting steps are described as below Basic Setting User User List access privilege list The access privileges of the administrator ope...

Страница 55: ...v PTZ Control v User with PTZ privilege Steps Click Add to add a new user Update to change the privilege or password of a user on the list or Delete to delete a user from the list and complete require...

Страница 56: ...at Anonymous Login To allow the user to control the camera you need to check Enable at Anonymous PTZ Control However Disable for both options is recommended for the sake of security Depending on the b...

Страница 57: ...tic assignment of TCP IP information to the client Each DHCP client connects to the DHCP server to access its network setting information including IP address gateway and DNS server The IP address of...

Страница 58: ...on quality 3 RTP Port 50000 to 60000 are UDP ports and can be defined by users They provide the fastest but also most unreliable transmission service Video streams are transmitted through UDP Port 500...

Страница 59: ...he new IP address anytime you must enter Setting Basic Settings Notification to set some settings There are three ways to get information 1 SMTP 2 FTP 3 HTTP For details refer to the Notification Setu...

Страница 60: ...you connect to the Internet the DDNS helps you locate your website and access your website easily You can find a lot of free DDNS service providers on the Internet such as www no ip com and www DynDN...

Страница 61: ...and the port of the router Enter the IP address in the Internet Explorer to penetrate the NAT Basic Setting Network UPnP UPnP Device Active yes enable no disable Device Name the name of the UPnP devic...

Страница 62: ...in Windows OS Ex Windows XP 1 Windows component installation 4 Click Networking Services 2 Click Add Remove Programs 1 Click Control Panel 5 Click Detail 6 Check UPuP User Interface 3 Click Add Remov...

Страница 63: ...etwork SMTP Server mail server setting This camera is able to transmit images to a particular email address when a motion detection event occurs or a sensor is triggered To use this function a mail se...

Страница 64: ...ons Active Enable Disable Samba Authentication Enable Disable Username the username Password the password Path specify the IP address of the computer you want to share with and the file name i e 192 1...

Страница 65: ...ate your settings 2 Notification via FTP server Basic Setting Network Notification of IP Address Change FTP Notification FTP Server FTP Server name FTP Port FTP port The default setting is 21 recommen...

Страница 66: ...ion allows multiple people to watch video streaming without limitation on the number of users but is only applicable in the LAN environment The video streaming format MPEG4 MJPEG depends on the select...

Страница 67: ...time 2 Get Time from an NTP server synchronize the time with the NTP Network Time Protocol Click on the NTP Button Enter the NTP server s IP address Press SAVE to activate it The camera will update i...

Страница 68: ...ilter IP Address Overview of the set IPs Add enter the IP address you want to allow or deny the access of in the front field Remove removes a set IP addresses Remove All removes all the set IP address...

Страница 69: ...management functions It ensures security monitoring by allowing user to define trigger events based on particular times and situations and sets the camera respond to the event Application Setting Eve...

Страница 70: ...ge or other reasons On boot The alarm is triggered by reboot The camera will send an alarm when the system is rebooted due to power shortage sabotage or other reasons Response process trigger event re...

Страница 71: ...are basically the same except that the Add Schedule setting page does not have the option Trigger by to indicate the sources of the trigger event Click Save to save and activate your settings when you...

Страница 72: ...ormal grounded by setting the page Setting Application Event Trigger 1 When alarm input is set to be Normal Open then the external device connected to alarm input pin should be in open status So when...

Страница 73: ...erver to make a complete custom parameters settings TCP Server Sending message to TCP Server Enter the message in the Message field Trigger SAMBA Sending message to Samba shared folder Path Enter the...

Страница 74: ...og in name Password Log in password Upload Path Uploading path Port Port Passive Check to set the FTP status as passive Click Add Http to go to the setting page and enter the information of the HTTP s...

Страница 75: ...Proxy server log in name Proxy Password Proxy server log in password Click Add Tcp to go to the setting page and enter the information of the TCP server you specified Name TCP server name Network Add...

Страница 76: ...ame drag the arrow to adjust after you move the mouse to the edge of the area and left click There are 3 frames available for setting You may adjust the sensitivity of the area by entering the degree...

Страница 77: ...firmware decompress the file uImage gz to your PC and follow the steps below to execute the upgrade Important Read Carefully 1 Close all active applications on your PC 2 Select Firmware Upgrade The Fi...

Страница 78: ...ged seriously and need to be returned to the factory for repair if the power cable is removed or becomes loose during the upgrade Firmware upgrading in a wireless network environment is not recommende...

Страница 79: ...e this function to reset to factory default All changes you have made are deleted but the IP address and all settings relevant to networking remain valid including cable and wireless network settings...

Страница 80: ...bin Attention Don t change the file name otherwise the backup may fail Restore backup parameters You can select this function to restore the changes you have made To do this click Browse to select a...

Страница 81: ...81...

Страница 82: ...external devices These 4 pins only act as relay output contacts and no power is output dry contacts The default status for these 4 DI sets is NO The gray color indicates the current status NC status...

Страница 83: ...ing Where connecting of a low or high current loop to the external alarm input output of the product is required the wiring and connection shall be conducted by a qualified electrician Incorrect wirin...

Страница 84: ...ation of the place being monitored Image Resolution Average range of Data Sizes 176 x 122 QCIF 20 40k bit 352 x 240 CIF 40 200k bit 640 x 480 VGA 180 400k bit 704 x 480 D1 200 530k bit Ex The transmis...

Страница 85: ...ed Plug the power cable and reboot the machine If the problem remains contact your dealer for help What network cable is used for the camera The camera uses a 10 or 100 Base T Category 5 UTP network c...

Страница 86: ...not able to access the Internet Contact your ISP to acquire a usable port The proxy server might be blocking you from connecting to the camera Do not set the proxy server Please be sure that the defau...

Страница 87: ...are transmitted via a congested network The number of frames transmitted may become less when multiple users are viewing the video stream The network hub might be another reason for this problem espe...

Страница 88: ...your display card color quality to at least 16 bits 24 bits or more are recommended Incorrect camera video setting You may need to adjust some parameters such as brightness contrast color and saturati...

Страница 89: ...in a particular installation If this equipment does cause harmful interference to radio or television reception which can be determined by turning the equipment off and on the user is encouraged to tr...

Отзывы: