background image

CHAPTER 5: TROUBLESHOOTING 

79

Scan the computer for spyware:

If  you  are  experiencing  slow  computer  performance,  you  frequently  receive  pop-up 
advertisements, or you are having problems connecting to the Internet, your computer might 
be infected with spyware. Use an anti-virus program that includes anti-spyware protection 
(your program may require an upgrade) to scan the computer and remove spyware.

Run the PSA Diagnostics:

If all tests run successfully, the error condition is related to a software problem.

Check  the  software  documentation  or  contact  the  software  manufacturer  for 

troubleshooting information:

Ensure that the program is compatible with the operating system installed on your 

• 

computer.
Ensure that your computer meets the minimum hardware requirements needed to run 

• 

the software. See the software documentation for information.

Ensure that the program is installed and configured properly.

• 

Verify that the device drivers do not conflict with the program.

• 

If necessary, uninstall and then reinstall the program.

• 

Содержание Alienware DRF37

Страница 1: ...ALIENWARE M11x MOBILE MANUAL...

Страница 2: ...logo are trademarks or registered trademarks of Alienware Corporation Dell is a trademark of Dell Inc Microsoft and Windows are either trademarks or registered trademarks of Microsoft Corporation in...

Страница 3: ...on 13 Connect the Network Cable Optional 14 Set Up Microsoft Windows 15 Connect to the Internet Optional 16 CHAPTER 2 GETTING TO KNOW YOUR LAPTOP 19 Left View Features 20 Right View Features 23 Back V...

Страница 4: ...gement 41 Configuring the BIOS 43 CHAPTER 4 INSTALLING AND REPLACING COMPONENTS 55 Before You Begin 56 Replacing the Battery Pack 60 Upgrading or Replacing Memory 63 Upgrading or Replacing the Hard Dr...

Страница 5: ...CONTENTS CHAPTER 6 SYSTEM RECOVERY 83 Recovery Options 84 Dell DataSafe Local Backup 85 CHAPTER 7 BASIC SPECIFICATIONS 89 APPENDIX 95 GENERAL AND ELECTRICAL SAFETY PRECAUTIONS 96 CONTACTING ALIENWARE...

Страница 6: ...6...

Страница 7: ...machine meets or exceeds our very demanding criteria We have tested your machine extensively in order to ensure that you enjoy the highest levels of performance In addition to a standard burn in peri...

Страница 8: ...8...

Страница 9: ...CHAPTER 1 SETTING UP YOUR LAPTOP CHAPTER 1 SETTING UP YOUR LAPTOP...

Страница 10: ...may have occurred during shipment Report any missing components or damaged items to customer service within 5 days of receiving the shipment Anything reported missing or damaged after the first 5 days...

Страница 11: ...support staff is available to assist you Placing Your Laptop WARNING Do not place the laptop near or over a radiator or heating vent If your laptop is placed in a cabinet ensure that adequate ventilat...

Страница 12: ...ARNING The AC adapter works with electrical outlets worldwide However power connectors and power strips vary among countries Using an incompatible cable or improperly connecting the cable to a power s...

Страница 13: ...CHAPTER 1 SETTING UP YOUR LAPTOP 13 Press the Power Button...

Страница 14: ...CHAPTER 1 SETTING UP YOUR LAPTOP 14 Connect the Network Cable Optional...

Страница 15: ...procedures including accepting license agreements setting preferences and setting up an Internet connection CAUTION Do not interrupt the operating system s setup process Doing so may render your compu...

Страница 16: ...o the optional external USB modem and to the telephone wall jack before you set up your Internet connection If you are using a DSL or cable satellite modem connection contact your ISP or cellular tele...

Страница 17: ...connection you need to connect to your wireless router To set up your connection to a wireless router Ensure that wireless is enabled on your computer 1 Save and close any open files and exit any ope...

Страница 18: ...ve your ISP information ready If you do not have an ISP the Connect to the Internet wizard can help you get one Save and close any open files and exit any open programs 1 Click 2 Start Control Panel I...

Страница 19: ...CHAPTER 2 GETTING TO KNOW YOUR LAPTOP CHAPTER 2 GETTING TO KNOW YOUR LAPTOP...

Страница 20: ...2 GETTING TO KNOW YOUR LAPTOP 20 This chapter provides information about your new laptop to familiarize you with its various features and get you up and running quickly Left View Features 2 1 3 4 5 6...

Страница 21: ...e or MP3 player The USB Powershare feature allows you to charge USB devices when the computer is powered on off or in sleep state NOTE Certain USB devices may not charge when the computer is powered o...

Страница 22: ...ectors with DisplayPort 7 3 in 1 Media Card Reader Provides a fast and convenient way to view and share digital photos music videos and documents 8 IEEE 1394 A connector Connects to high speed serial...

Страница 23: ...onnectors 2 Connect to a pair of headphones or to a powered speaker or sound system 2 Audio in Microphone connector Connects to a microphone or inputs signal for use with audio programs 3 USB connecto...

Страница 24: ...CHAPTER 2 GETTING TO KNOW YOUR LAPTOP 24 Back View Features 1 1 AC adapter connector Connects to an AC adapter to power the computer and charge the battery...

Страница 25: ...CHAPTER 2 GETTING TO KNOW YOUR LAPTOP 25...

Страница 26: ...CHAPTER 2 GETTING TO KNOW YOUR LAPTOP 26 Display Features 1 2 3 4...

Страница 27: ...ilt in camera for video capture conferencing and chat 3 Camera activity indicator Indicates if the camera is on or off 4 Display Your display can vary based on selections you made when purchasing your...

Страница 28: ...CHAPTER 2 GETTING TO KNOW YOUR LAPTOP 28 Computer Base and Keyboard Features 2 3 4 1...

Страница 29: ...page 30 2 Keyboard The backlit keyboard provides visibility in dark environments by illuminating all symbols on the keys 3 Touch pad buttons 2 Provide left and right click functions like those on a mo...

Страница 30: ...on how to program this button see Power Options in the Control Panel of Microsoft Windows operating system The power button is located in the center of the hinge cover For the exact location see Compu...

Страница 31: ...arging Blue or custom AC color fading into black The computer is in standby mode On battery Amber or custom battery color The battery is fully charged Amber or custom battery color fading into black T...

Страница 32: ...ith the key described below F1 Extend Desktop Press Fn F1 to switch between the various external display options available either simultaneously or separately F2 Check Battery Status and Battery Charg...

Страница 33: ...mode The user can switch between the discrete and integrated graphic modes for performance and power savings respectively F7 Mute on off Press Fn F7 to enable or disable the mute function F8 Decrease...

Страница 34: ...r play the next track PAUSE Alienware Command Center Press Fn PAUSE to access Alienware Command Center for more information see Alienware Command Center on page 36 PRT SCRN AlienFX Press Fn PRT SCRN t...

Страница 35: ...CHAPTER 3 USING YOUR LAPTOP CHAPTER 3 USING YOUR LAPTOP...

Страница 36: ...Alienware Command Center by pressing Fn PAUSE Connecting External Displays If you want to enjoy your computing environment on a bigger scale visually or extend your desktop area you can connect an ext...

Страница 37: ...VGA to VGA VGA cable HDMI to HDMI HDMI cable DisplayPort to DisplayPort DisplayPort cable DisplayPort to DVI DisplayPort to DVI adapter DVI cable NOTE You can purchase the DisplayPort to DVI adapter...

Страница 38: ...playPort VGA or HDMI connector on 3 your Alienware laptop Connect the other end of the cable to the same connector on your display 4 If necessary connect one end of the power cable to the display s po...

Страница 39: ...tended Show my desktop on the external display only Click 5 Apply to apply your changes and then click OK to exit the Display Settings control panel Using Removable Media and Cards Observe the safety...

Страница 40: ...argeable lithium ion prismatic Li ion battery pack Battery life will vary depending on your laptop configuration model applications installed power management settings and features used As with all ba...

Страница 41: ...n your computer The Microsoft Windows operating system installed on your computer provides three default options Balanced Offers full performance when you need it and saves power during periods of ina...

Страница 42: ...o the selected power plan Reducing Power Consumption Although your laptop together with the operating system is capable of power conservation there are measures you can take to reduce the power consum...

Страница 43: ...r laptop Set or change a user selectable option View the installed amount of memory or set the type of hard drive installed Before you use System Setup it is recommended that you write down the curren...

Страница 44: ...ility If an error occurs during POST Power On Self Test you may also enter the BIOS Setup Utility by pressing F2 when prompted NOTE If you wait too long and the operating system logo appears continue...

Страница 45: ...upport dell com manuals Main Menu System Time Displays the system time System Date Displays the system date Alienware Displays the model number of your computer Service Tag Displays the service tag of...

Страница 46: ...e model Advanced Menu Switchable Graphics Allows you to enable or disable switchable graphics mode Disabled Integrated graphics mode is disabled and is not visible to the operating system When this op...

Страница 47: ...or disable the Intel SpeedStep technology Disabling this feature may improve performance but will greatly reduce battery life Wired Network Allows you to enable or disable the on board LAN controller...

Страница 48: ...able the internal high definition audio device Disabled The internal audio device is disabled and is not visible to the operating system Enabled The internal audio device is enabled USB Emulation Allo...

Страница 49: ...mode AHCI SATA is configured for AHCI mode 1394 Allows you to enable or disable the IEEE 1394 A connector Disabled The IEEE 1394 A connector is disabled and is not visible to the operating system Enab...

Страница 50: ...set the supervisor password The supervisor password controls access to the system setup utility User Password Status Displays if the user password is clear or set Set User Password Allows you to set t...

Страница 51: ...nicates with the Absolute Software Monitoring Server at programmed intervals to provide the tracking service By activating the service you consent to the transmission of information from and to your c...

Страница 52: ...ge your laptop and your digital files if your laptop is lost or stolen Asset Tag Displays the asset tag Power Menu A C Adapter Rating Displays the AC adapter rating A C Adapter Warnings Allows you to...

Страница 53: ...s using the stored battery power through the USB PowerShare connector on the laptop even while the laptop is turned off For more information on USB PowerShare connector see Left View Features on page...

Страница 54: ...changes to CMOS Exit Discarding Changes Allows you to exit utility without saving Setup data to CMOS Load Setup Defaults Allows you to load default values for all Setup items Discard Changes Allows yo...

Страница 55: ...CHAPTER 4 INSTALLING AND REPLACING COMPONENTS CHAPTER 4 INSTALLING AND REPLACING COMPONENTS...

Страница 56: ...ific replacement instructions Before You Begin This section provides procedures for removing and installing the components in your laptop Unless otherwise noted each procedure assumes that the followi...

Страница 57: ...all open files and exit all open programs 1 Click 2 Start Shut Down The laptop turns off after the operating system shutdown process finishes Ensure that the computer and any attached devices are turn...

Страница 58: ...edges not by its pins CAUTION Only a certified service technician should perform repairs on your computer Damage due to servicing that is not authorized by Dell is not covered by your warranty CAUTIO...

Страница 59: ...first unplug the cable from your computer and then unplug the cable from the network device Disconnect all telephone or network cables from the laptop 3 Press and eject any installed cards from the M...

Страница 60: ...ing the battery pack CAUTION To avoid damage to the laptop use only the battery designed for this particular Alienware laptop Do not use batteries designed for other Alienware or Dell laptops To remov...

Страница 61: ...1 1 captive screws 8 2 compartment door Loosen the two captive screws that secure the battery pack to the computer base 5 Disconnect the battery pack cable from the connector on the system board 6 Lif...

Страница 62: ...CHAPTER 4 INSTALLING AND REPLACING COMPONENTS 62 1 2 3 1 battery pack 3 battery pack cable 2 captive screws 2 To replace the battery pack perform the removal steps in reverse order...

Страница 63: ...below illustrates all the possible ways system memory can be configured Memory connector 1 Memory connector 2 Total Memory 1 GB 1 GB 2 GB 2 GB 2 GB 4 GB 4 GB 4 GB 8 GB Removing the Memory Module s Fo...

Страница 64: ...odule 4 notch 2 spring locks 2 5 memory module connector 3 tab To replace the memory modules perform the removal steps in reverse order While inserting the memory module into the connector align the n...

Страница 65: ...led properly the computer may not boot Upgrading or Replacing the Hard Drive Assembly Your laptop is equipped with one hard drive socket Removing the Hard Drive Follow the instructions in Before You B...

Страница 66: ...LING AND REPLACING COMPONENTS 66 2 1 1 pull tab 2 hard drive Remove the four screws that secure the hard drive to the hard drive bracket 5 Lift the hard drive bracket of the hard drive according to th...

Страница 67: ...CHAPTER 4 INSTALLING AND REPLACING COMPONENTS 67 3 2 1 1 hard drive bracket 3 hard drive 2 screws 4...

Страница 68: ...CHAPTER 4 INSTALLING AND REPLACING COMPONENTS 68 Remove the interposer from the hard drive 7 1 2 1 hard drive 2 interposer To replace the hard drive perform the removal steps in reverse order...

Страница 69: ...CHAPTER 5 TROUBLESHOOTING CHAPTER 5 TROUBLESHOOTING...

Страница 70: ...re Power Savings Ensure that your computer is not in hibernate or standby mode by pressing the power button for less than 4 seconds The power status light will fade from blue to black while in standby...

Страница 71: ...let Run maintenance programs as often as you can You may schedule these programs to run at times when you are not using your computer You can use those provided with your operating system or buy more...

Страница 72: ...etween your computer and a grounded three prong power outlet Ensure that the power outlet is working Ensure the UPS or power strip is turned on if applicable If your peripheral devices e g keyboard mo...

Страница 73: ...erating system logo appears continue to wait until you see the Microsoft Windows desktop then shut down your computer and try again Select 3 Diagnostics from the menu and press Enter During the assess...

Страница 74: ...are Diagnostics NOTE Download Dell Drivers and Utilities from My DELL Downloads downloadstore dell com media and create your own backup media If you experience a problem with your Alienware laptop run...

Страница 75: ...p then shut down your computer and try again NOTE The next steps change the boot sequence for one time only On the next start up the computer boots according to the devices specified in the system set...

Страница 76: ...The POST Power On Self Test tests the computer ensuring that it meets the necessary system requirements and that all hardware is working properly before starting the remainder of the boot process If...

Страница 77: ...the power button for at least 6 seconds until the computer turns off then restart your computer NOTE The chkdsk program may run when you restart the computer Follow the instructions on the screen A pr...

Страница 78: ...sion of Microsoft Windows operating system environments Click 1 Start Control Panel Programs Programs and Features Use an older program with this version of Windows In the welcome screen click 2 Next...

Страница 79: ...iagnostics If all tests run successfully the error condition is related to a software problem Check the software documentation or contact the software manufacturer for troubleshooting information Ensu...

Страница 80: ...prevent the operating system from starting Try allowing the computer to return to room temperature before turning it on Run Check Disk Click 1 Start Computer Right click 2 Local Disk C Click 3 Proper...

Страница 81: ...ontact Alienware Technical Support for more information see CONTACTING ALIENWARE on page 99 Display If the display is blank NOTE If you are using a program that requires a higher resolution than your...

Страница 82: ...UPS is securely connected to an electrical outlet is switched on and is working correctly Check that the wall outlet is working properly by testing another device such as a radio or lamp that you kno...

Страница 83: ...CHAPTER 6 SYSTEM RECOVERY CHAPTER 6 SYSTEM RECOVERY...

Страница 84: ...cal Backup on page 85 Dell DataSafe Online Dell DataSafe Online is an online data backup service see Dell DataSafe Online Backup on page 87 System Drivers You can download the latest drivers for your...

Страница 85: ...r folders or if the hard drive crashes This application allows you to Restore files and folders Restore your hard drive to the operating state it was in when you purchased your computer without erasin...

Страница 86: ...access the 4 Advanced Boot Options window NOTE If you wait too long and the operating system logo appears continue to wait until you see the Microsoft Windows desktop then shut down your computer and...

Страница 87: ...e is an automated backup and recovery service that helps protect your data and other important files from catastrophic incidents like theft fire or natural disasters You can access the service on your...

Страница 88: ...CHAPTER 6 SYSTEM RECOVERY 88...

Страница 89: ...CHAPTER 7 BASIC SPECIFICATIONS CHAPTER 7 BASIC SPECIFICATIONS...

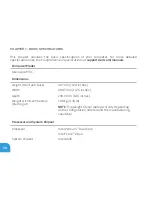
Страница 90: ...Model Alienware M11x Dimensions Height Front and Back 32 7 mm 1 29 inches Width 285 7 mm 11 25 inches Depth 233 3 mm 9 19 inches Weight with 8 cell battery starting at 1 99 kg 4 39 lb NOTE The weight...

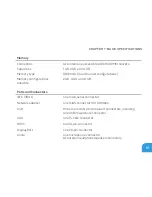
Страница 91: ...figurations possible 2 GB 4 GB and 8 GB Ports and Connectors IEEE 1394 A one 4 pin serial connector Network adapter one RJ45 connector 10 100 Mbps USB three 4 pin USB 2 0 compliant connectors includin...

Страница 92: ...C Adapter Type 65 W Output current 3 34 A Rated output voltage 19 5 VDC Communications Network adapter 10 100 Mbps Ethernet LAN on system board Wireless WLAN Mini Card half Mini Card slot WWAN Mini Ca...

Страница 93: ...SD memory card Multi Media Card MMC Memory Stick PRO Video cards Intel Graphics Media Accelerator 4500MHD Integrated on system board Nvidia GeForce GT 335M Discrete Display Type WLED 11 6 inch HD 1366...

Страница 94: ...6 81 inches Weight 0 43 kg 0 94 lb Voltage 14 8 V Operating time Battery operating time varies depending on operating conditions and can be significantly reduced under certain power intensive conditi...

Страница 95: ...APPENDIX APPENDIX...

Страница 96: ...e computer using the power source type indicated on the rating label Never block or cover any openings or fans in the computer case These are required for ventilation Never insert objects of any kind...

Страница 97: ...internal system components if precautions are not taken ESD is caused by static electricity and the damage caused is usually permanent Computer technicians wear a special wrist strap that grounds the...

Страница 98: ...cal Shock is not covered by the warranty Electrical Shock If you do not open up your computer there is nothing to worry about Your computer protects itself against most irregularities in the power sou...

Страница 99: ...and telephone based support and service options Because availability varies by country and product some services may not be available in your area To contact Dell for sales technical support or custom...

Страница 100: ...untries only www dell com jp Japan only www euro dell com Europe only www dell com la Latin American and Caribbean countries www dell ca Canada only You can access Alienware Support through the follow...

Отзывы: