UPMIDIAS
1
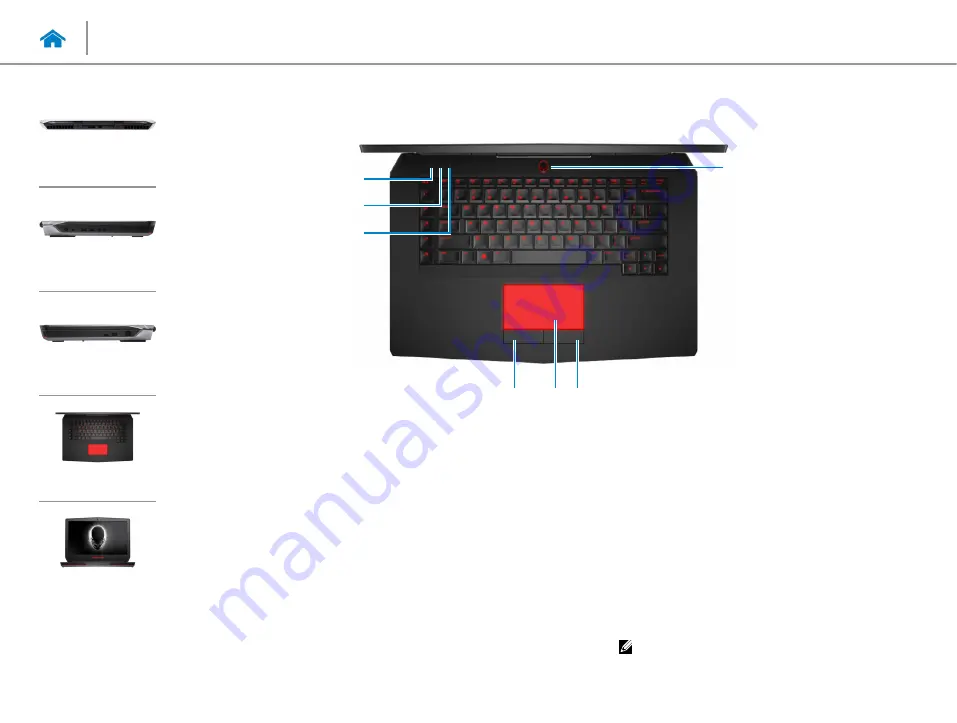
Hard-drive activity light
Turns on when the computer reads from or writes to the
hard drive.
2
Wireless-status light
Turns on when wireless is turned on.
3
Caps Lock status light
Turns on when Caps Lock is turned on.
4
Left-click button
Press to left‑click.
5
Touch pad
Move your finger on the touch pad to move the mouse
pointer. Tap to left‑click.
6
Right-click button
Press to right‑click.
7
Power button/Power-status light
Press to turn on the computer if it is turned off or in sleep
state.
Press to put the computer in sleep state if it is turned on.
Press and hold for 4 seconds to force shut‑down the
computer.
Solid white light indicates the computer in on and
breathing white light indicates the computer is in sleep
state. The light is off when the computer is in hibernate
state or turned off.
NOTE:
You can customize the power‑button
behaviour in Power Options. For more information,
see
Me and My Dell
at
www.dell.com/support/
manuals.
2
3
1
6
5
4
7
Views
Base
Содержание 15 R2
Страница 36: ...UPMIDIAS Getting help and contacting Alienware 147 Self help resources 147 Contacting Alienware 147 11...
Страница 55: ...UPMIDIAS 8 Disconnect the interposer from the hard drive 1 interposer 2 hard drive 30...
Страница 67: ...UPMIDIAS 16 Follow the procedure from step 1 to step 5 in Removing the touch pad 1 palm rest 42...
Страница 72: ...UPMIDIAS 5 Lift the touch pad off the palm rest assembly 1 palm rest assembly 2 touch pad 47...
Страница 78: ...UPMIDIAS 5 Remove the screws that secure the keyboard to the palm rest assembly 1 keyboard 2 screws 2 53...
Страница 105: ...UPMIDIAS 11 Lift the display assembly off the computer base 1 display assembly 2 screws 4 3 computer base 80...
Страница 111: ...UPMIDIAS 5 Follow the procedure from step 1 to step 2 in Removing the logo board 1 display bezel 86...
Страница 118: ...UPMIDIAS 2 Lift the display hinges off the display assembly 1 display hinges 2 2 screws 6 3 display back cover 93...
Страница 126: ...UPMIDIAS 4 Follow the procedure from step 1 to step 4 in Removing the display panel AlienFX LED 1 display back cover 101...
Страница 146: ...UPMIDIAS 2 Lift the heat sink assembly off the system board 1 heat sink assembly 2 system board 3 captive screws 8 121...
Страница 159: ...UPMIDIAS 4 Lift the battery off the computer base 1 screws 2 2 battery 3 computer base 134...
Страница 162: ...UPMIDIAS 1 computer base 137...


