background image

32

1/10/2019

EN

USING THE MEDIA PLAYER

USING THE REMOTE CONTROL 

When you use the remote control, the driver is not in control of the vehicle. 

ASSEMBLY 

Lift the back off the remote control and insert 2 AAA batteries (not included).

1.  CONNECT THE REMOTE CONTROL TO THE CAR 

Hold down the pairing button for 2-4 seconds, then push the ignition button of the car (on the dashboard). 

If the LED light on the remote-control lights up, your remote control has been connected. If the LED is 

flashing, the pairing has failed. Try changing the batteries and repeat the connection process. 

2.  STOPPING AT DISTANCE

Hold down the parking button (P) to stop the vehicle at distance, this will stop the accelerator pedal from 

working. 

3.  CHANGING THE SPEED 

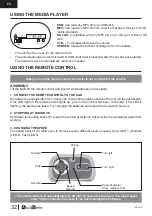
The speed selector (S) allows you to choose several different levels of speed; Slow (LED 1), Medium 

(LED 2), Fast (LED 3). 

Forward

Speed indicator : 

Slow, medium, fast

Reverse

Speed

selector

Pairing

Turn left

Turn right

Park

The remote-control will automatically turn off after 10 seconds of non-use. You must repeat 

step 1 of the connection process if you have changed the batteries. 

MP3

TF

TF

USB

MP3

V

USB

V+

V-

• 

USB: 

Can read any MP3 file on a USB stick

• 

MP3: 

Can read any MP3 file from a device that has a mini jack 3,5mm 

(cable provided). 

• 

SD card: 

Compatible with any MP3 file on an SD card or Micro SD 

card. 

• 

V+/V- : 

To increase/decrease the volume. 

• 

SCREEN: 

Shows the amount of charge left on the battery. 

•  The car must be in use for the radio to work. 

•  The external storage device (micro SD or USB card) must be inserted after the car has been started. 

The hardware will be automatically read once inserted. 

Содержание TUNDRA

Страница 1: ...ROCTOYOLSRC TUNDRA 1 10 2019 30 MIN 2 3 8 ANS 50 KG alicesgarden fr alicesgarden be alicesgarden es alicesgarden nl alicesgarden co uk alicesgarden pt alicesgarden it alicesgarden com au ...

Страница 2: ...mande 12 Garantie 13 Montage 44 IMPORTANT À CONSERVER POUR CONSULTATION ULTÉRIEURE À LIRE ATTENTIVEMENT ESPAÑOL Advertencias 14 Instrucciones de seguridad 15 Consejos en caso de avería 19 Mantenimiento 20 Uso del coche 21 Uso de la radio 22 Uso del control remoto 22 Garantía 23 Montaje 44 IMPORTANTE CONSÉRVELO PARA FUTURAS REFERENCIAS LEA ATENTAMENTE INDEX ÍNDICE CONTENTS INHOUD ...

Страница 3: ...emote control 32 Warranty 33 Assembly 45 IMPORTANT KEEP FOR FUTURE REFERENCE READ CAREFULLY NEDERLANDS Waarschuwingen 34 Veiligheidsinstructies 35 Tips in geval van storing 39 Onderhoud 40 Gebruik van uw auto 41 Gebruik van de autoradio 42 Gebruik van de afstandsbediening 42 Garantie 43 Montage 45 BELANGRIJK BEWAAR VOOR TOEKOMSTIGE REFERENTIE ZORGVULDIG LEZEN ...

Страница 4: ...soin notamment pour l identifi cation des composants par le Service Après Vente Avant le montage s assurer qu aucune pièce n est manquante Vous pouvez disposer d un surplus qui vous servira de pièce de rechange Avant de commencer le montage de votre voiture veuillez vérifier qu elle est bien en position OFF Avant la première utilisation nous vous conseillons de laisser charger votre voiture pendan...

Страница 5: ...éviter les chutes ou collisions pouvant causer des blessures au conducteur ou aux personnes aux alentours Vérifiez régulièrement l état de votre voiture ATTENTION cette voiture ne possède pas de frein Cette voiture possède une ceinture de sécurité ajustable Enseignez à votre enfant comment mettre sa ceinture de sécurité avant d utiliser le véhicule afin de garantir sa sécurité SÉCURITÉ DES ENFANTS...

Страница 6: ...eau ou vos yeux lavez les immédiatement à grande eau et contactez votre médecin au plus vite Ne court circuitez pas le pack batterie Il y aurait un risque d explosion Protégez le pack batterie de l humidité et de l eau ne rechargez pas cet appareil en milieu humide ou mouillé Vous réduirez ainsi les risques de choc électrique Si la batterie est endommagée ou utilisée de façon inappropriée des vape...

Страница 7: ...e utilisation vous devrez charger la batterie pendant 4 6 heures Ne chargez pas la batterie plus de 10 heures afin d éviter la surchauffe du chargeur Lorsque le véhicule commence à ralentir rechargez la batterie Après chaque utilisation ou une fois par mois rechargez la batterie pendant 8 à 12 heures Ne laissez pas la batterie en charge plus de 20 heures L affichage de la tension sur le tableau de...

Страница 8: ...le pendant 1 à 3 ans Suivez ces étapes pour remplacer et recycler la batterie 1 Retirez le siège 2 Débranchez les connecteurs de la batterie 3 Retirez tous les caches de la batterie 4 Soulevez la batterie soigneusement En fonction de l état de la batterie ex fuites portez des gants de protection Ne soulevez pas la batterie par ses connecteurs ou ses câbles 5 Placez la batterie usagée dans un sac e...

Страница 9: ...rie Véhicule surchargé Réduisez le poids dans le véhi cule Poids maximum 50kgs Le véhicule est utilisé dans des conditions difficiles Vérifiez les consignes de sécu rité Le véhicule doit être poussé pour avancer Mauvais contact entre les fils et les connecteurs Vérifiez que les connecteurs de la batterie sont fermement branchés Changement difficile entre marche avant et marche arrière Transition p...

Страница 10: ...à l intérieur ou couvrez le avec une bâche pour le protéger des intempéries Éloignez le véhicule de toute source de chaleur Les parties en plastique pourraient fondre Rechargez la batterie après chaque utilisation Seul un adulte peut manipuler la batterie Rechargez la batterie au moins une fois par mois quand le véhicule n est pas utilisé Ne pas nettoyer le véhicule avec un tuyau d arrosage Ne pas...

Страница 11: ...rs l arrière NOTE Le véhicule est conçu pour que la marche arrière ne puisse être effectuée qu à basse vitesse 3 Commandes au volant Actionnez le Klaxon en appuyant sur le bouton de gauche et à droite pour le son du démarrage moteur Nécessite des piles non fournies 4 Autoradio Permet d écouter une source audio et régler le volume Format supporté USB microSD MP3 L écran affiche le niveau de charge ...

Страница 12: ...lusieurs niveaux de vitesse Lent 1 LED Moyen 2 LED Rapide 3 LED Marche avant Indicateur de vitesse lent moyen rapide Marche arrière Sélecteur de vitesse Appairage Tourner à gauche Tourner à droite Parking La télécommande s éteindra automatiquement après 10 secondes de non utilisation Veuillez répéter l étape 1 de connexion à la voiture lorsque vous changerez les piles MP3 TF TF USB MP3 V USB V V U...

Страница 13: ...dre professionnel annulerait automatiquement toutes les garanties LISTE DES EXCLUSIONS DE LA GARANTIE Les dommages pannes défaillances ou défauts imputables à des causes d origine externe Les pannes résultant de la modification de la construction et des caractéristiques d origine de l ap pareil Les pannes affectant les pièces non conformes à celles préconisées par le constructeur Les réglages acce...

Страница 14: ... LICENCIA Respete de manera precisa las instrucciones de montaje El montaje estará asegurado por un adulto Mantenga a los niños alejados durante el montaje Existe peligro de asfixia a causa de las piezas pequeñas Es obligatorio conservar las presentes instrucciones para consultarlas en caso de necesidad espe cialmente para la identificación de los componentes por parte del servicio posventa Antes ...

Страница 15: ...a Este juguete se debe utilizar con precaución para evitar caídas o colisiones que puedan causar lesiones al conductor o las personas de su alrededor Compruebe de manera regular el estado del coche ATENCIÓN este coche no dispone de freno El presente coche dispone de un cinturón de seguridad ajustable Enseñe al niño cómo ponerse el cinturón de seguridad antes de usar el vehículo con el objetivo de ...

Страница 16: ...del elec trolito con la piel o los ojos lávelos inmediatamente con agua abundante y póngase en contacto con su médico lo antes posible No cortocircuite el paquete de batería Esto podría provocar una explosión Proteja el paquete de batería de la humedad y del agua no recargue el aparato en un medio húme do o mojado De esta manera reducirá los riegos de descarga eléctrica Si la batería está dañada o...

Страница 17: ...inarios No incinere la batería Deshágase de la batería en un punto limpio o en un centro de reciclaje autorizado INSTRUCCIONES DE USO DE LA BATERÍA El interruptor debe estar en OFF durante la carga Antes del primer uso deberá cargar la batería durante 4 6 horas No cargue la batería más de 10 horas para evitar el sobrecalentamiento del cargador Cuando el vehículo comience a ralentizarse recargue la...

Страница 18: ... durante un plazo de 1 a 3 años Siga los siguientes pasos para sustituir y reciclar la batería 1 Retire el asiento 2 Desenchufe los conectores de la batería 3 Retire la carcasa de la batería 4 Retire la batería con cuidado En función del estado de la batería p ej fugas equípese con guantes de protección No extraiga la batería tirando de sus conectores o cables 5 Coloque la batería usada en una bol...

Страница 19: ...ustituya la batería Vehículo sobrecargado Reduzca el peso del vehículo Peso máximo 30 kg El vehículo se utiliza en condiciones difíciles Compruebe las instrucciones de seguridad El vehículo debe ser impulsado para avanzar Mal contacto entre los cables y los conectores Compruebe que los conectores de la batería están firmemente conectados Cambio difícil entre marcha hacia delante y hacia atrás Tran...

Страница 20: ...lo en el interior o cúbralo con una lona para protegerlo de las inclemencias meteo rológicas Mantenga el vehículo lejos de fuentes de calor Las partes de plástico se podrían fundir Recargue la batería después de cada uso Solo un adulto puede manipular la batería Recargue la batería al menos una vez al mes cuando no se use el vehículo No limpie el vehículo con una manguera No limpie el vehículo con...

Страница 21: ... el vehículo está diseñado para que la marcha atrás no pueda llevarse a cabo salvo en condiciones de baja velocidad 3 Controles del volante accione el claxon pulsando el botón de la izquierda y pulse el botón de la dere cha para arrancar el motor precisa de pilas las cuales no se incluyen 4 Radio permite escuchar una fuente de audio y ajustar el volumen Formatos compatibles USB mi croSD MP3 La pan...

Страница 22: ... niveles de velocidad Lenta 1 LED Media 2 LED Rápida 3 LED Marcha hacia Indicador de velocidad lenta media y rápida Marcha atrás Selector de velocidad Vinculación Girar a la izquierda Girar a la derecha Parking El control remoto se apagará automáticamente después de 10 segundos de inoperancia Repita el paso 1 de conexión al coche cuando cambie las pilas MP3 TF TF USB MP3 V USB V V USB permite la l...

Страница 23: ...uso en un ámbito privado y personal Su uso en un ámbito profesional anularía automáticamente cualquier garantía LISTA DE EXCLUSIONES DE LA GARANTÍA Los daños caídas incumplimientos o defectos imputables a causas de origen externo Las caídas resultantes de la modificación de la construcción y de las características originales del aparato Las caídas que afectan a las piezas no conformes a las recome...

Страница 24: ... to refer to them in future these are especially useful when identifying the specific parts for potential after sales cases Before assembly make sure that there are no pieces missing You may have extra pieces that can be kept as spares Before beginning to build the car make sure that it s in the OFF position Before the first use we recommend that you let the car charge for a minimum of 4 6 hours B...

Страница 25: ...ecting the safety precautions to avoid injuring the driver or those around them Regularly check the condition of the car WARNING this car doesn t have breaks of any form For safety the car has an adjustable seat belt For their safety show your child how to put the seat belt on before use CHILD SAFETY GUIDELINES Always keep your child in plain sight when using they re using the car Make sure your c...

Страница 26: ...if ingested If you have come into contact with it rinse the affected area immediately and contact your doctor or NHS direct Do not short circuit the battery pack this could cause an electric shock Avoid direct contact with the terminals of the battery This could cause fire or an explosion Protect the battery pack from humidity and water don t charge the apparatus in wet and humid conditions Charge...

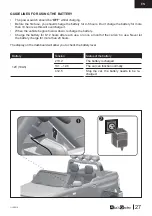
Страница 27: ...ould be OFF whilst charging Before the first use you should charge the battery for 4 6 hours Don t charge the battery for more than 10 hours as this will overcharge it When the vehicle begins to slow down recharge the battery Charge the battery for 8 12 hours after each use or once a month if the car isn t in use Never let the battery charge for more than 20 hours The display on the dashboard will...

Страница 28: ...attery has an estimated lifespan of 1 3 years Follow these steps to replace and recycle the battery 1 Remove the seat 2 Unplug the connectors to the battery 3 Remove all the covers from the battery 4 Lift the battery carefully If the battery has a fault eg leak wear protective gloves Do not lift the battery by its connectors or its cables 5 Place the used battery in a plastic bag The battery compo...

Страница 29: ... the weight in the vehicle Max weight 50kg The car is being used in difficult conditions Check the safety guidelines provided The car must be pushed to moved forward Poor contact between the wires and the connectors Make sure that the battery connectors are tightly secured Difficult to change between forward and reverse The driver is trying to transition when the car is in motion Stop the car comp...

Страница 30: ...doors or cover it with tarpaulin to protect it from bad weather Keep the car away from heat sources as the plastic parts could melt with intense heat Recharge the battery after each use Only an adult should touch the battery Recharge the battery at least once a month when the car isn t in use Don t clean the vehicle by spraying it with the hose nor with soapy water Don t use the vehicle in the rai...

Страница 31: ...el towards reverse 3 Additional controls Sound the horn by pressing the button from left to right to make the sound of the motor starting up This part needs batteries that are not included with the car 4 Media player Allows the driver to listen to an audio source and adjust the volume Supported format USB microSD MP3 The screen shows amount of battery remaining in Volts 5 Accelerator Increase the ...

Страница 32: ...king 3 CHANGING THE SPEED The speed selector S allows you to choose several different levels of speed Slow LED 1 Medium LED 2 Fast LED 3 Forward Speed indicator Slow medium fast Reverse Speed selector Pairing Turn left Turn right Park The remote control will automatically turn off after 10 seconds of non use You must repeat step 1 of the connection process if you have changed the batteries MP3 TF ...

Страница 33: ... are meant for personal and private use using these goods in a professional environ ment automatically voids all warranties WARRANTY EXCLUSIONS Damage breakages failures or faults caused by external factors Breakages caused by modifying the construction or the original features of the apparatus Breakages to non conforming pieces which were not present on delivery Affordable repairs that don t requ...

Страница 34: ...nstructies voor naslag in het geval van nood te bewaren vooral voor de identificatie van componenten door de Klantenservice Zorg er vóór de montage voor dat er geen onderdelen ontbreken U kunt een overschot hebben dat als reserveonderdeel zal dienen Controleer voordat u begint met het in elkaar zetten van uw auto of deze in de UIT stand staat Voor het eerste gebruik raden wij aan om uw auto minste...

Страница 35: ...ruikt om vallen of botsingen te voorkomen die tot verwonding van de bestuurder of derden kunnen leiden Controleer regelmatig de staat van uw auto WAARSCHUWING deze auto heeft geen rem Deze auto heeft een verstelbare veiligheidsgordel Leer uw kind hoe u een veiligheidsgordel moet dragen voordat u het voertuig gebruikt om de veiligheid te garanderen VEILIGHEID VAN KINDEREN Houd uw kind altijd in gat...

Страница 36: ... en water laad dit apparaat niet op in vochtige of natte omstandighe den Dit vermindert het risico op een elektrische schok Als de batterij is beschadigd of onjuist is gebruikt kunnen er dampen vrijkomen Onmiddellijke ventilatie van het gebied is noodzakelijk en neem contact op met een arts in geval van ademhalings moeilijkheden De dampen zijn erg irriterend Explosieve gassen ontstaan tijdens het ...

Страница 37: ...erhit raakt Laad de batterij op als het voertuig begint te vertragen Laad de batterij na elk gebruik of eenmaal per maand 8 tot 12 uur op Laat de accu niet langer dan 20 uur achtereen in de lader De weergave van de spanning op het dashboard laat u het resterende laadniveau van de batterij zien Accu Spanning Status van de accu 12V 10Ah 13 2 De batterij is opgeladen 13 1 12 6 De auto kan normaal fun...

Страница 38: ...unctioneren gedurende 1 tot 3 jaar Volg deze stappen om de batterij te vervangen en te recyclen 1 Verwijder de zitting 2 Koppel de batterijconnectors los 3 Verwijder alle afdekkingen van de accu 4 Til de accu voorzichtig op Draag beschermende handschoenen afhankelijk van de staat van de accu bijv Lekkage Til de accu niet op aan de connectoren of kabels 5 Plaats de gebruikte accu in een plastic zak...

Страница 39: ...u Overladen voertuig Verminder het gewicht in het voertuig Maximaal gewicht 50kgs Het voertuig wordt gebruikt in moeilijke omstandigheden Controleer de veiligheidsinstruc ties Het voertuig moet worden geduwd om verder te gaan Slecht contact tussen draden en connectoren Controleer of de connectors van de accu goed zijn aangesloten Moeilijke omschakeling tussen vooruit en achteruit Moeilijke omschak...

Страница 40: ...ertuig binnenshuis of bedek het met een zeil om het te beschermen tegen weersinvloe den Houd het voertuig uit de buurt van warmtebronnen Kunststof onderdelen kunnen smelten Laad de batterij na elk gebruik op Alleen een volwassene mag de batterij hanteren Laad de batterij minstens één keer per maand op wanneer het voertuig niet in gebruik is Reinig het voertuig niet met een tuinslang Reinig het voe...

Страница 41: ...ruit te rijden OPMERKING Het voertuig is zo ontworpen dat de achteruitversnelling alleen op lage snelheid kan worden gebruikt 3 Stuurbediening Activeer de claxon door op de linkerknop te drukken en druk op de rechterknop voor het startgeluid van de motor Vereist niet meegeleverde batterijen 4 Autoradio luister naar een audiobron en pas het volume aan Ondersteund formaat USB microSD MP3 Het display...

Страница 42: ...S maakt het mogelijk om verschillende snelheidsniveaus te kiezen Lang zaam 1 LED Middel 2 LED s Snel 3 LED s Vooruit Snelhiedsindicator langzaam middel snel Achteruit Snelheidsschakelaar Verbinding Draai naar links Draai naar rechts Parking De afstandsbediening schakelt automatisch uit als deze 10 seconden niet gebruikt is Herhaal stap 1 van het verbinden met de auto wanneer u de batterijen vervan...

Страница 43: ...oerd Onze apparaten zijn bedoeld voor gebruik in een privé en persoonlijke omgeving gebruik in een professionele omgeving doet automatisch alle garanties vervallen LIJST VAN UITSLUITINGEN VAN DE GARANTIE Schaden storingen tekortkomingen of fouten door externe oorzaken Storingen die zijn ontstaan door de wijziging van deconstructie van het apparaat Storingen door onderdelen die niet aanbevolen zijn...

Страница 44: ...ctement Tournevis non fourni Pince à bec long non fournie Clés fournies Material necesario para el montaje INSTRUCCIONES ANTES DEL MONTAJE Retire el producto y sus accesorios del embalaje con cuidado Asegúrese de que se incluyen todos los elementos catalogados siguiendo el esquema que viene a continuación Inspeccione el producto minuciosamente para asegurarse de que ninguna de las piezas se ha dañ...

Страница 45: ...eerd of het product naar behoren werkt Schroevendraaier niet meegeleverd Langbektang niet meegeleverd Sleutels meegeleverd MONTAGE ASSEMBLY NL EN Required tools for assembly ADVICE BEFORE BUILDING Carefully remove the product and all parts from their packaging make sure all the parts listed in the parts list are accounted for Thoroughly inspect the product to check that nothing was damaged during ...

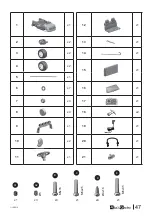
Страница 46: ...46 1 10 2019 21 22 5 1 3 D 2 4 9 20 12 11 15 16 18 19 6 7 6 8 13 13 17 14 10 B A C 17 18 19 15 9 12 11 16 5 10 10 14 21 6 13 6 8 7 6 4 2 3 1 D B A1 E A A C 20 B ...

Страница 47: ...47 1 10 2019 Ø4x16 M5x35 1 x1 12 x1 2 x2 13 x1 3 x2 14 x1 4 x2 15 x1 5 x1 6 x7 16 x1 7 x4 17 x1 8 x4 18 x2 9 x1 19 21 x1 10 x2 20 x1 11 x1 21 x1 x1 x3 x3 x1 x4 x1 A2 A1 C D E M5x25 Ø5 B M5x16 ...

Страница 48: ...e la rueda delantera Ajuste el eje de las ruedas atornillelo y luego el varillaje de dirección siguiendo las instrucciones más arriba EN Place the car on its side Use scissors to cut the plastic tape off the vehicle Re move the pre built hardware from the front axle wheel Adjust the wheel axle and then build the wheel axle and the steering system by following the schema below NL Plaats de auto op ...

Страница 49: ...ntera y poste riormente monte la rueda motriz 4 si guiendo el esquema que viene a conti nuación Repita este paso para montar la rueda opuesta EN Remove the prebuilt hardware from the front wheel axle then assemble the guide wheel 4 following the below schema Repeat this step to assemble the oppo site wheel NL Verwijder de voorgemonteerde hard ware van de voorwielas en monteer het stuur 4 volgens b...

Страница 50: ...tre piles AA LR6 ES Retire la tapa quitando el tornillo y poste riormente inserte cuatro pilas AA LR6 EN Take the cover off by removing the screws then insert 4 AA batteries LR6 NL Verwijder de kap door de schroef te verwijderen en plaats vervolgens vier AA LR6 batterijen ...

Страница 51: ...51 1 10 2019 D 9 4 D x4 ...

Страница 52: ...que el coche de costado y proceda a montar el mecanismo de dirección reti rando la tornillería premontada Sigua el esquema que viene a continuación EN Place the car on its side and proceed to build the steering system removing the pre built fittings Follow the schema pic tured below NL Plaats de auto op zijn kant en monteer de stuurstangen door de voorgemonteerde bouten te verwijderen Volg het sch...

Страница 53: ...a ci dessus ES Incline el coche sobre la parte delantera Inserte el eje de la rueda trasera como indicado en las instrucciones más arriba EN Place the car on front side Insert the rear wheel axle following the diagram below NL Plaats de auto op de voorkant Plaats de achterwielas volgens het bovenstaande schema ...

Страница 54: ...je 5 Después de ensamblar todas las ruedas compruebe que el espacio entre la rueda y la tuerca sea suficiente para que la rueda gire libremente y no dañar el motor EN Insert the motor 2 into the wheel axle 5 following the diagram pictured below The wheel drive 3 has a hole which is notched on the inner part TIP 2 keys are provided to help you screw the 2 nuts 7 into the axle 5 After fitting all th...

Страница 55: ...en el centro del volante quitando el tornillo y posteriormente inserte dos pilas AA LR6 EN Take the cover off the centre of the steering wheel by removing the screws then insert 2 AA batteries LR6 NL Verwijder de kap in het midden van het stuurwiel door de schroef te verwijderen en plaats vervolgens twee AA LR6 bat terijen ...

Страница 56: ... y posteriormente vuelva a instalar el tornillo E y atornille la tuerca A A continuación puede en cajar a presión el parabrisas en la carro cería EN Remove the screw E and the nut A from the steering wheel Align the holes of the steering wheel and the steering axle 14 then replace the screws and tighten the bolts NL Draai de schroef E en de moer A van het stuurwiel los Lijn de gaten in het stuurwi...

Страница 57: ...57 1 10 2019 1 2 3 16 10 15 1 2 3 16 10 15 1 2 3 16 10 15 10 11 12 ...

Страница 58: ...58 1 10 2019 13 Car Motor batt 2 3 12 B 13 14 B x2 ...

Страница 59: ...ntes de usar el juguete asegúrese de que las puertas estén siempre bien cerra das ayudándose del seguro de la puerta Lock EN Before using the toy make sure that all the doors are firmly closed using the door looking system NL Voordat u het speelgoed gebruikt moet u erop letten dat de deuren altijd gesloten zijn met behulp van de deurvergrendeling Lock ...

Страница 60: ...RANKRIJK 020 262 1095 033 313 383 After sales aftersales alicesgarden nl aftersales alicesgarden be IMPORTADO POR WALIBUY SPAIN SL Ed Palau de Mar Plaça Pau Vila 1 oficina 3B3 08039 BARCELONA ESPAÑA 931 993 006 911 337 937 Servicio postventa desistimiento alicesgarden es defecto IMPORTÉ PAR WALIBUY SAS 270 avenue de l Espace 59118 WAMBRECHIES FRANCE 0805 650 000 081 280 149 Service après vente sav...

Страница 61: ...erviço pós venda livreresolucao alicesgarden pt defeito IMPORTATO DA WALIBUY ITALIA S R L Via Torino 60 20123 MILANO ITALIA 0039 02 87368397 Contatto contatto alicesgarden it IMPORTED BY ALICE S GARDEN OUTDOOR PTY LTD SHOP 1 1 Denham Street Bondi 2026 NSW AUSTRALIA 1300 827 171 Contact service alicesgarden com au ...

Страница 62: ......
Отзывы: