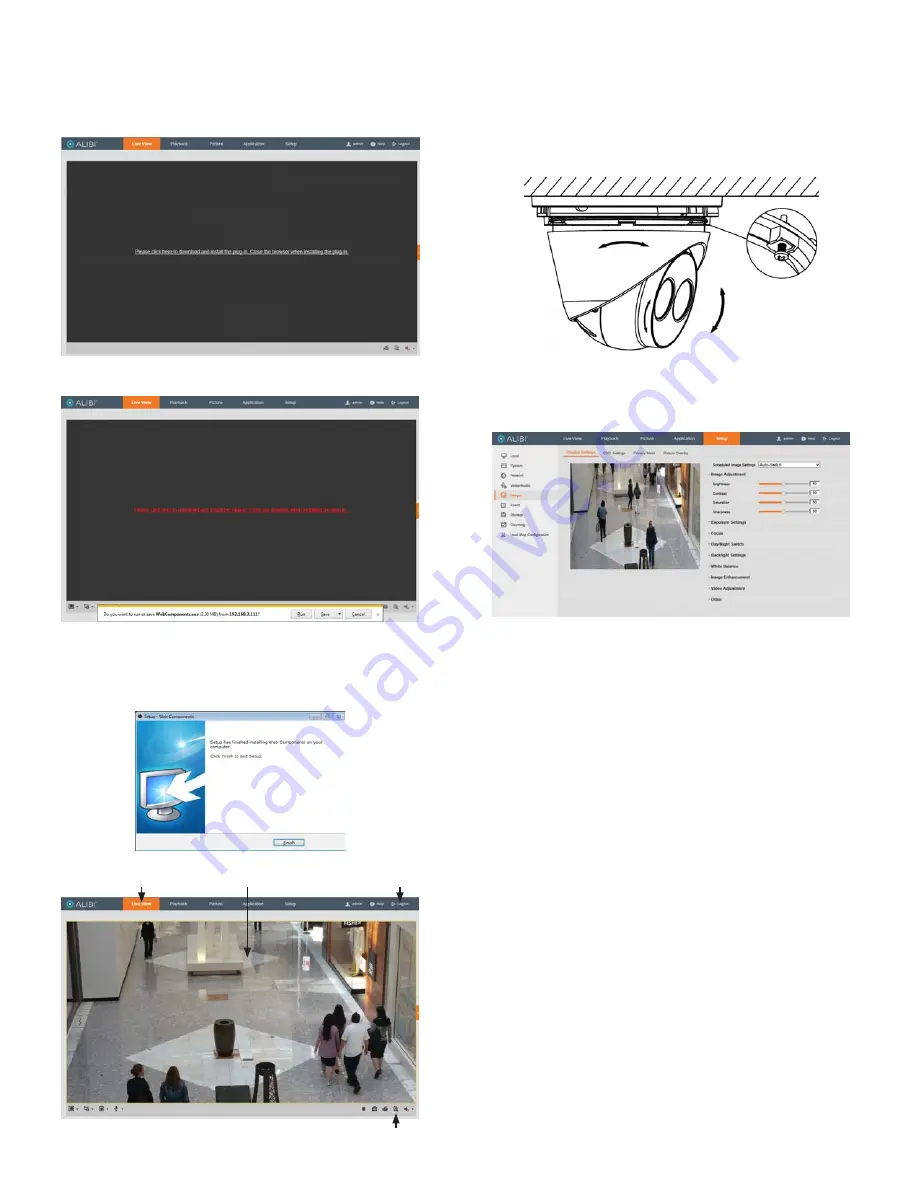
3
www.observint.com
© 2017 Observint Technologies. All rights reserved.
2.
In the login window, enter
admin
for the
User Name
and the password you created in the
Password
field, the click
Login
.
3.
If this is the first time you are logging into a camera, you may see the message in the following
screen. If this appears, follow the sub-steps below.
a.
Click on the message to install the plugin.
NOTE
: If QuickTime is installed on the computer, Alibi will use it for the plugin. If it does, skip
the rest of this step and continue at the next
b.
In the message bar at the bottom of the screen, click
Run
.
WebComponents
will install
automatically. When the following screen opens, click
Finish
to exit the installer.
The Live View screen with the camera video image should appear.
Capture, Record, Zoom icons
Screen select tabs
Logout button
Live View image
Step 4. Adjust the camera for your surveillance target
1.
Loosen the camera lock screw, if necessary, so that the turret can easily be moved within the
enclosure.
2.
While observing live video from your camera in the Live View tab (see above), adjust the enclosure
Pan, Turret Tilt and Turret Rotate to point the camera at the center of your surveillance target.
Tighten the lock screw to hold the camera in position.
Turret (tilt 0 ~ 75˚)
Lock Screw
Enclosure (pan ~ 360˚)
Turret (rotate 0 ~ 360˚)
3.
Reinstall the trim ring. Turn the ring counter-clockwise to lock it in place.
4.
After adjusting the camera for the preferred field of view, click the
Setup
tab, and then click the
Image
link in the left frame.
Adjust the Brightnessm Contrast, Saturation and Sharpness of the image as follows.
—
Image Adjustment
submenu (see above): Adjust the Saturation, Hue, Brightness, Contrast
and Sharpness of the video image. Each parameter can be set to a level of
0 ~ 100 either by moving the slider or entering the value in the box on the right. The effect of
the adjustment will appear in the Live View image in the menu.
5.
Open the other submenus on this screen. Adjust the following as needed. Refer to the Camera
Firmware User Manual for your camera for additional information about parameter settings.
—
Exposure Settings
submenu: In this submenu, set the following for the best performance:
Iris Mode
: Select Auto or Manual. Some cameras may not offer both options.
Exposure Time
: Value ranges from 1/3 to 1/100,000 s. The nominal value is 1/150.
Adjust it according to the lightening condition.
Gain
: Set the gain to show the optimal brightness level.
—
Switch Day and Night
: Select either
Auto-Switch
,
Scheduled-Switch
, or
Triggered
by Alarm Input
.
If using
Auto-Switch
, open the
Day/Night Switch
submenu to select the Sensitivity,
Filtering Time, and Smart IR feature ON or OFF.
If using
Scheduled Switch
, set the
Start Time
and
End Time
of the switch, then open
the
Day/Night Switch
submenu to select the
Smart IR
feature ON or OFF.
Also, click the
Common
,
Day
and
Night
tabs to set the Saturation, Hue, Brightness,
Contrast and Sharpness for Day and for Night modes.
—
Day/Night Switch
submenu: You can set the Day/Night switch to Day, Night, Auto, or
Schedule. The option you select determines the submenu options.
Day
or
Night
: These options both have one parameter: Smart IR.
Auto
: If you select Auto switch, you can set the sensitivity (0 .. 7), filtering time and
Smart IR.


