8-type fixation:
*Diagram
035-038
!
5
SINGLE - LEVER BAT HROOM FAUCET
Component list Pcs
1.Main body
1
2.Washer A
3.Base plate 1
4.Washer B
5.WasherC
6.Gasket
?.Nut
a.Screws
2
9.lnlet pipes
10.Manual
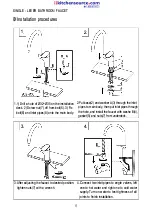
Страница 1: ... slightly differ from one to other type of single lever faucet and double handle faucet Warnings Disassembling of the faucet is prohibited as it has been assembled commissioned to the best using condition Before installing flush the water supplying pipes Do not over forcing when installing Corrosive materials such as plastic cement or glue is prohibited when installing valves angle valves or conne...
Страница 2: ...id detergent indissovable grain like detergent or soap 5 Aerator may accumulate dirt causing distorted and reduced water flow Unscrew aerator and rinse clean and then screw onto spout Important notices kin order to protect environment and reduce pollution used product to be discarded should following local waste materials handling codes 1 Used copper pieces stainless steel material recycle could b...
Страница 3: ...ingle lever Bathroom faucet A type fixation 8 Diagram 3 SINGLE LEVER BATHROOM FAUCET Compoent list Pcs 1 Main body 1 2 Base 1 3 Washer A 1 4 Washer B 1 5 Gasket 1 6 Bolt 2 7 Nut 2 8 lnlet pipe 2 9 Manual 1 ...
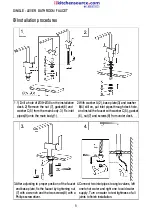
Страница 4: ... the faucet to desired position tighten nuts with a wrench 4 2 2 Put base 2 and washer A 3 through the inlet pipes to main body then put inlet pipes through the hole and install the faucet with washe 8 4 gasket 5 and nuts from underdeck 4 4 Connect two inlet pipes to angle valves left one to hot water and right one to cold water supply Turn on water to test tightness of all joints to finish instal...
Страница 5: ...type fixation Diagram 035 038 5 SINGLE LEVER BAT HROOM FAUCET Component list Pcs 1 Main body 1 2 Washer A 1 3 Base plate 1 4 Washer B 1 5 WasherC 1 6 Gasket 1 Nut 1 a Screws 2 9 lnlet pipes 2 10 Manual 1 ...
Страница 6: ... 4 still on put inlet pipes through deck hole and install the faucet with washer C 5 gasket 6 nut and screws 8 from under deck 4 3 After adjusting to proper position of the faucet 4 Connect two inlet pipes to angle valves left and base plate fix the faucet by tightening nut oneto hot water and right one to cold water 7 with a wrench and the two screws 8 with a supply Turn on water to test tightnes...