BATTERY RECHARGING
Important Notes
Warning!
Never charge or recharge a frozen
battery: it may explode because of the
nitrogen trapped inside the ice crystals.
At all times while charging or recharging
the battery, make sure that any sparks or
open flames are kept sufficiently far away
from the battery.
Note:
Before using the charging device,
always make sure that it is appropriate
for the installed battery, with constant
voltage (below 14.8 V) and low
amperage (maximum 15 A).
Recharge the battery in a well
ventilated environment.
Before using any devices to charge or
to maintain the charge of the battery,
carefully follow the instructions
provided with the device in order to
properly and safely connect it to the
vehicle battery.
You can recharge the battery without
disconnecting the wires of the vehicle's
electrical system.
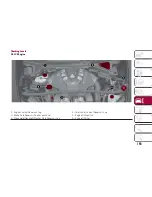
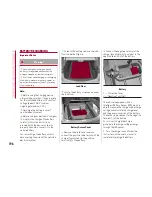
To reach the battery, remove the load
floor inside the liftgate.
Locate the battery access panel under
the load floor.
Remove the protective cover and
connect the positive cable terminal of the
charger (usually red) to the positive
terminal (+) of the battery.
Connect the negative terminal of the
charger (usually black) to nut next to the
negative terminal (-) of the battery.
The vehicle is equipped with an
Intelligent Battery Sensor (IBS), which is
able to measure the charge and discharge
voltage and calculate the charge level
and the general condition of the battery.
The sensor is placed next to the negative
terminal (-) of the battery.
For a correct charge/discharge
procedure, the charge voltage must go
through the IBS sensor.
1. Turn the charger on and follow the
instructions on the user's manual to
completely recharge the battery.
Load Floor
Battery Access Panel
Battery
1 — Protective Cover
2 — Negative Post (Nut)
196
SER
VICING
AND
MAINTENANCE
Содержание Stelvio 2019
Страница 10: ...This page is intentionally left blank...
Страница 12: ...This page is intentionally left blank...
Страница 156: ...154 This page is intentionally left blank...
Страница 165: ...Control Unit Under Passenger Side Footboard Passenger Side Control Unit 163...
Страница 167: ...Luggage Compartment Fuse Box Luggage Compartment Control Unit 165...
Страница 184: ...182 This page is intentionally left blank...
Страница 236: ...234 This page is intentionally left blank...
Страница 241: ...CONTROLS CONTROLS ON CONSOLE Controls 1 ON OFF Control AndVolume Knob 2 OPTION Button 3 Rotary Pad 4 MENU Button 239...
Страница 244: ...MENU button Opens the main menu Menu Button 4 Menu Button 242 MULTIMEDIA...


