24
• Push and insert the power cord to
the hole which is located at the back
of the base as shown in figure 3.
Figure: 3
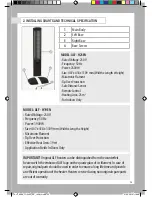
3. ASSEMBLY
• Before attaching the right and left
base, place the power cord into the
hole which is located on the left base.
Then attach two parts firmly as shown
in Fig. 1.
• Be careful not to damage power cord
while attaching the base.
• Assemble the main body and base
by using the “Base Screws”. Tighten
the base and body firmly by screwing
clockwise as indicated on figure 2.
Make sure that assembly is correct
and heater is well balanced on the
base.
Figure: 1
Figure: 2
ALF_MIKA_TOWER_KK_140813.indd 24
27.09.2013 18:08
Содержание micatronic H19EN
Страница 2: ...ALF_MIKA_TOWER_KK_140813 indd 2 27 09 2013 18 08 ...
Страница 3: ...Kullanım Kılavuzu Garanti Belgesi ALF_MIKA_TOWER_KK_140813 indd 3 27 09 2013 18 08 ...
Страница 19: ...17 Not ALF_MIKA_TOWER_KK_140813 indd 17 27 09 2013 18 08 ...
Страница 20: ...18 Not ALF_MIKA_TOWER_KK_140813 indd 18 27 09 2013 18 08 ...
Страница 21: ...User Manual Certificate ofWarranty ALF_MIKA_TOWER_KK_140813 indd 19 27 09 2013 18 08 ...
Страница 36: ...34 Note ALF_MIKA_TOWER_KK_140813 indd 34 27 09 2013 18 08 ...
Страница 37: ...35 Note ALF_MIKA_TOWER_KK_140813 indd 35 27 09 2013 18 08 ...
Страница 38: ...36 Note ALF_MIKA_TOWER_KK_140813 indd 36 27 09 2013 18 08 ...


