background image

12

WT4901/WT8901 Siren Battery Test

To determine which siren has a low battery press and hold the test button, located at the front of 
the siren, for 5 seconds. 

• If the siren sounds for 4 seconds, the batteries are good.  
• If the siren doesn’t sound, the batteries are low.

WT4901/WT8901 Siren Battery Replacement

• Open the front cover and remove old batteries. Once the old batteries are removed, wait 30 

seconds before inserting the replacement batteries. 

Note: Only use Energizer 1.5V AA alkaline batteries.


• Install new batteries as shown in the polarity indicated by the engraving. If the batteries are 

installed incorrectly, in the reverse polarity, the indoor siren will not work. With typical use, the 
WT4901/WT8901 batteries should be replaced every two years. 

DO NOT TRY TO RECHARGE THESE BATTERIES. DISPOSAL OF USED BATTERIES MUST BE MADE
IN ACCORDANCE WITH THE WASTE RECOVERY AND RECYCLING REGULATIONS IN YOUR AREA.

Walk Test 

Walk Test mode allows you to test the operation of each detector in the system. While in Walk Test
mode, the Ready, Armed, and Trouble LED's will flash to indicate that the Walk Test is active. The
Walk Test can be terminated at anytime by re-entering 

 [Master Code] 

 on the keypad.

The system will also automatically terminate the Walk Test on completion; it will sound an audible
warning (5 beeps every 10 seconds), beginning 5 minutes before the termination of the test.
1. Before testing, ensure that the system is disarmed and the Ready light is on.
2. Press 

 and close all zones to return the system to the Ready state.

3. Perform a System Test by following the steps in the previous section.
4. Press 

 [Master Code] 

 to initiate the Walk Test.

5. To test the zones, activate each detector in turn (e.g., open each door/window or walk in 

motion detector areas). 

The System will display the following message when each zone (detector) is activated: ‘Secure 
System Before Arming < >’,  or ‘Secure or Arm System’. Use the 

 buttons to view which 

zones are open. The message will disappear when the zones are closed.

Allowing Computer Access to your System

Occasionally, your installer may need to send information to or retrieve information from your
security system. Your installer will do this by having a computer call your system. You may need
to prepare your system to receive this ‘downloading’ call.  To do this:
Press 

 [Master Code] 

 at the keypad.  This allows downloading for a limited period 

of time. During this time, the system will answer incoming downloading calls.  For more informa-
tion on this feature, please ask your installer.

Reference Sheets

Fill out the following information for future reference and store this guide in a safe place.

System Information

Enabled? 


 FIRE         


 AUXILIARY     


 PANI

C


For Service
   

Central Station Information:

   Account#: ___________________   Telephone#: __________________

Installer Information:

Company: ___________________   Telephone#: __________________

,

,

,

The Entry Delay Time is _______ seconds.

   The Exit Delay Time is _______ seconds.

Содержание PC9155-433

Страница 1: ...l contains information on limitations regarding product use and function and information on the limitations as to liability of the manufacturer The entire manual should be carefully read 2 Way Wireless Security Suite User Manual ...

Страница 2: ... to party line service is subject to state tariffs Contact the state public utility commission public service commission or corporation commission for information Alarm dialling equipment must be able to seize the telephone line and place a call in an emergency situation It must be able to do this even if other equipment telephone answering system computer modem etc already has the telephone line ...

Страница 3: ...Code Programming 7 Access Codes 4 5 Master Code 7 User Code Attributes 7 Inherent Attributes all codes except installer 7 Zone Bypassing Attribute 7 Bell Siren Squawk Attribute 7 Erasing an Access Code 8 Proximity Tag Enrollment 8 User Function Commands 9 Changing Brightness Contrast 9 Ambient Light Sensor 9 Changing the Buzzer Level 9 Viewing the Event Buffer 9 Late to Open 10 2 Way Wireless Key ...

Страница 4: ...essage Refer to the provided list when you see an error message on the display If additional help is required contact your distributor for service WARNING This equipment PC9155 Alarm System shall be installed and used within an environment that provides the pollution degree max 2 and over voltages category II non hazardous locations indoor only It is designed to be installed serviced and or repair...

Страница 5: ...itoring function must be enabled by the installer before it can become functional NOTE This system has a communicator delay of 30 seconds This function can be deleted or it can be increased up to a maximum of 45 seconds by the installer NOTE Ensure that your installer verifies that your system is compatible with the Central Station Receiver format at yearly intervals Maintenance With normal use th...

Страница 6: ...s will illuminate When the exit delay is completed the alarm system is armed set and this is indicated on the keypad as follows the Ready indicator will turn off the Armed indicator will remain on The Armed indicator and a bypass message will be displayed The system will automati cally ignore bypassed zones i e motion sensors NOTE For SIA CP 01 listed panels the Stay Arming Exit Delay will be twic...

Страница 7: ...tion of the entry exit zone before the end of the exit delay will restart the exit delay Quick Exit If the system is armed and you need to exit use the Quick Exit function to avoid disarming and rearming the system Press and hold the Quick Exit button for 2 seconds or press You now have 2 minutes to leave the premises When the door is closed again the remaining exit time is cancelled Siren Sounds ...

Страница 8: ...ay time programmed no alarm transmission to the Central Station will occur Following the Abort Window there appears a 5 minute Cancel Window during which a user can cancel by entering their access code or presenting their prox tag an alarm that has been previously transmitted A cancel signal will be transmitted to the cen tral station and the alarm system will also announce that the cancel signal ...

Страница 9: ... a Bypass Group so that you do not have to bypass each zone individually Note that only one Bypass Group can be programmed at a time To program a Bypass Group 1 Press then your access code or present your prox tag if required 2 Enter the 2 digit numbers 01 34 of the zones to be included in the Bypass Group or use the buttons to find the zone to be included in the Bypass Group then press to select ...

Страница 10: ...al power the system will continue to operate on battery power for several hours Check AC connection Call for service Telephone Line Fault The system has detected that the telephone line is dis connected Call for service Failure to Communicate The system attempted to communicate with the monitor ing station but failed This may be due to a Telephone Line Fault Call for service Module Sensor Fault Th...

Страница 11: ...s These attributes are changeable Any user code can be made a supervisor code by enabling User Code Attribute 1 please see below for details Duress Codes Duress codes are standard user codes that will transmit the Duress Alarm Reporting Code whenever the code is entered to perform any function on the system Any user code can be made a duress code by enabling User Code Attribute 2 see below for det...

Страница 12: ... to assign a prox tag to an existing user code that has an associated prox tag the following message will be displayed Duplicate Tag User Code Return to Step 2 for instructions on how to enroll a user code NOTE To exit the process at anytime press Erasing a User Code Proximity Tag Enter 5 Master Code select the desired user code Enter to erase the code and associ ated prox tag The keypad will disp...

Страница 13: ...mmed in 0 0 Late to Open Time of Day This function is used to program the time setting enabled in 9 NOTE Refer to Late to Open section for details Changing Brightness Contrast When this option is selected the keypad will allow you to scroll through 4 brightness levels and 10 contrast levels 1 Press Master Code 2 Use the buttons to scroll to either Brightness Control or Contrast Control 3 Press to ...

Страница 14: ... to Open menu entering keys 1 7 will also select each day from Sunday to Saturday respectively If is pressed to select a day of the week no beeps will be sounded and the keypad will display Set 24hr Time Enter HH MM 9999 If is pressed from this menu the user will be returned to the previous Late to Open menu If the Alarm System is armed in any mode when the late to open time matches the time of da...

Страница 15: ... NOTE Should the system fail to function properly call your installer immediately for service Siren and Keypad Display Test This test activates all display pixels and indicator lights on the keypad and does a 4 second check of the siren 1 Press Master Code The following will occur The system activates the siren output on medium volume for 2 seconds followed by full vol ume alarm for 2 seconds All ...

Страница 16: ...rmination of the test 1 Before testing ensure that the system is disarmed and the Ready light is on 2 Press and close all zones to return the system to the Ready state 3 Perform a System Test by following the steps in the previous section 4 Press Master Code to initiate the Walk Test 5 To test the zones activate each detector in turn e g open each door window or walk in motion detector areas The S...

Страница 17: ...e 40 ______________________ Proximity Tag Sensor Zone Information Code Wireless Key Prox Tag Access Code Code Wireless Key Prox Tag Access Code 01 09 02 10 03 11 04 12 05 13 06 14 07 15 08 16 Sensor Protected Area Sensor Type Sensor Protected Area Sensor Type 01 18 02 19 03 20 04 21 05 22 06 23 07 24 08 25 09 26 10 27 11 28 12 29 13 30 14 31 15 32 16 33 17 34 ...

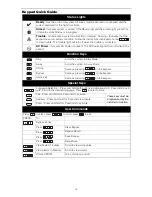
Страница 18: ...y Arms the system in Stay Mode Away Arms the system in Away Mode Chime Same as pressing on the keypad Bypass Same as pressing on the keypad Quick Exit Same as pressing on the keypad Special Keys Language Selection Press and hold both buttons simultaneously for 2 seconds to acti vate Scroll to the desired language Press to select choice Fire Press and hold for 2 seconds to activate These keys must ...

Страница 19: ...nsulated ceilings etc Consult National Fire Alarm Code NFPA 72 CAN ULC S553 02 or other appropriate national standards for installation recommendations Do not locate smoke detectors at the top of peaked or gabled ceilings the dead air space in these locations may prevent the unit from detecting smoke Avoid areas with turbulent air flow such as near doors fans or windows Rapid air movement around t...

Страница 20: ...ves freely in the air Suggest ed locations are in or as near as possible to sleeping areas of the home The human body is most vulnerable to the effects of CO gas during sleeping hours For maximum protection a CO alarm should be located outside primary sleeping areas or on each level of your home Figure 5 indicates the suggest ed locations in the home The electronic sensor detects car bon monoxide ...

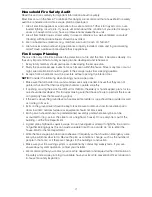
Страница 21: ... doors and windows are easily opened Ensure that they are not painted shut and that their locking mechanisms operate smoothly If opening or using the exit is too difficult for children the elderly or handicapped plans for res cue should be developed This includes making sure that those who are to perform the rescue can promptly hear the fire warning signal If the exit is above the ground level an ...

Страница 22: ...ipient agrees to the terms of this EULA If the SOFTWARE PRODUCT is an upgrade any transfer must also include all prior versions of the SOFTWARE PRODUCT f Termination Without prejudice to any other rights DSC may terminate this EULAifYoufailtocomplywiththetermsandconditionsof thisEULA Insuch event You must destroy all copies of the SOFTWARE PRODUCT and all of its component parts g Trademarks This E...

Страница 23: ......

Страница 24: ...number of reasons some of which follow The smoke detectors may have been improperly installed or positioned Smoke may not be able to reach the smoke detectors such as when the fire is in a chimney walls or roofs or on the other side of closed doors Smoke detectors may not detect smoke from fires on another level of the resi dence or building Every fire is different in the amount of smoke produced ...

Отзывы: