11
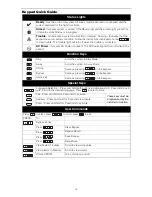
WT4989/WT8989 Status Display Icons
The table below summarizes the status that can be shown by the WT4989/WT8989 LCD:
Buzzer
Provides an audible confirmation of a pressed button or that a command to the panel has been executed.
Keylock Mode
Ensures that the system is not accidently armed or disarmed by the wireless key.
To lock the keys:
1. Press and hold the Status
and Away
keys simultaneously for 3 seconds.
2. After 3 seconds, the wireless key will beep and flash the keylock icon (
) to indicate that the
keys are locked.
To unlock the keys:
1. Press and hold the Status
and Away
keys simultaneously for 3 seconds.
NOTE:
Pressing the panic
key for 3 seconds will also exit Keylock mode.
2. Upon exiting Keylock mode, the status will be automatically displayed.
Testing Your System
NOTE:
Inform your Monitoring Station when you begin and end system testing.
All smoke detectors in this installation must be tested by your smoke detector installer or dealer
once a year to ensure they are functioning correctly. It is the user’s responsibility to test the system
weekly (excluding smoke detectors). Ensure you follow all the steps in the two tests below.
NOTE:
Should the system fail to function properly, call your installer immediately for service .
Siren and Keypad Display Test
This test activates all display pixels and indicator lights on the keypad and does a 4-second
check of the siren.
1. Press
[Master Code]
.
The following will occur:
- The system activates the siren output on medium volume for 2 seconds followed by full vol-
ume alarm for 2 seconds. All display lights and LCD pixels will turn on.
- The Ready, Armed, Trouble and Power LED’s will flash for the duration of the test.
2. To exit the function menu, press
.
Keypad Low Battery
The flashing trouble icon
on a keypad will indi-
cate that keypad has a low battery.
Keypad Battery Replacement
1. Slide the keypad up and out from the mounting
plate/desk stand (removing the screws first if
required). The bay for the four AA batteries is open
and visible at the back of the keypad.
2. Insert the batteries as directed on the back of the
keypad. Ensure the correct polarity is observed.
3. Slide the keypad back onto the mounting plate /
desk stand.
ICON (S=Steady, F=Flashing)
(
S
)
System Trouble
(S) Alarm in Memory
(F) Keylock Enable
(F) Active Alarm
(S) Disarmed
(F) [ ][9] Armed - Away
(S) Away - Armed
(F) [ ][9] Armed - Stay
(S) Stay - Armed
(F)
[ ][9]
Armed - Night
(S) Night - Armed
(S) Low Battery
(F) Critical Low Battery
,
$$
$$
$$
$$
DG009048
Mounting
Holes
Mounting
Holes
Batteries
Plug
Wire
Channel
Tamper
Switch
Содержание PC9155-433
Страница 23: ......


