background image


Editing Drum Kits


9


61 

Choosing the Base Note for the Drum Sound 


Button:   

[EDIT] [80 AMP/RANGE] 

Page:    

Parameter: 

Note (C2 000 to G8 127) 


This sets which note will trigger the Drum sound when played. You can 

also set the note assignment by holding [80] and tapping a key on the 

keyboard (while in this page).  


Setting the Note Range for the Drum Sound 


Button:   

[EDIT] [80 AMP/RANGE] 

Page:    

Parameter: 

Note Range (0 to +3) 


This sets the range of   notes above the root note that will trigger the 

Drum sound. A setting of  

+3

 assigns the Drum to a total of   4 

consecutive keys. 


The Amp/Env Function [AMP ENV 110]  


The Amp/Env Function (button [110]) is where you can set the drum’s 

decay time and assign it to a mute group, if   desired. 


Setting the Drum’s Decay Time 


Button:   

[EDIT] [110 AMP ENV] 

Page:    

Parameter: 

Decay (0 to 99, Gat00 to Gat99) 


This lets you adjust the amplitude envelope Decay time of   the selected 

Drum. If   this is set to 

0

, only the very beginning of   the drum sample will 

be played.  Setting this to 

99

 will cause the entire drum sample to play.  


Settings of  

Gat00

 to 

Gat99

 (“gate”) will cause the Drum sound to 

continue to be played as long as the key is held or the end of   the sample 

is reached.  The number after the word "Gat" means that after you let up 

the key, the drum will decay at that rate.  


Assigning the Drum to a Mute Group 


Button:   

[EDIT] [110 AMP ENV] 

Page:    

Parameter: 

Mute Group (OFF, 1, 2, or 3) 


Mute Groups

 force multiple Drums to share a single voice.  This is most 

often used with Hi Hats. 


For example, if   you have assigned a Closed Hat and an Open Hat to two 

different notes, playing either note should cut off   the other. This creates 

a more realistic sound, since an actual hi hat is only capable of making 

one kind of   sound at a time. 


There are three Mute Groups. In the example above, both hi hat drums 

would be assigned to Mute Group 1. 

NOTE: Only one Drum can be assigned to a 
single note within a single Program Sound.  
 
NOTE: If more than one Drum in a Sound is 
assigned to the same note, only the higher-
numbered Drum will sound. 
 
TIP: If you want to layer two Drum mode 
Drums on top of each other, you will have to 
use two separate Sound layers 


TIP:  This is useful for longer sounds, like 
cymbals, when you wish to hear a short 
crash by playing a short note but can still 
hear a longer crash by keeping the note held 
down.


Содержание QS6.2

Страница 1: ...Reference Manual...

Страница 2: ...This page intentionally left blank 10 20 30 40 50 60 70 80 90 100...

Страница 3: ...ard Sounds 21 Playing Card Sequences 21 Saving a Bank to an SRAM Card Formatting 22 Saving a Program or Mix to an SRAM Card 22 Loading Banks from a Card 22 Loading a Program or Mix from a Card 23 Tran...

Страница 4: ...ion 7 FILTER LFO 52 The Amplitude LFO Function 8 AMP LFO 52 Scaling Modulation Sources 9 TRACK GEN 54 Chapter 9 Editing Drum Kits 57 Selecting a Drum to Edit 0 9 DRUM 57 Selecting the Drum Sample 40 V...

Страница 5: ...I split the keyboard 89 How do I layer two sounds on the keyboard 89 What is a MIDI Sequence 89 Where can I get MIDI sequences for the QS 89 How do I play General MIDI sequences 89 How do I load seque...

Страница 6: ......

Страница 7: ...he front panel controls to make them more intuitive and improve ergonomics In addition we improved the little but important things The User Bank Programs have been completely updated The rear panel ja...

Страница 8: ...to Chapters 3 through 6 True synthesists who want to create their own sounds should refer to Chapters 7 through 11 Near the end of the manual are troubleshooting tips specifications and an Index to he...

Страница 9: ...s convenience receptacles and the point where they exit from the apparatus 11 Use only attachments or accessories specified by the manufacturer 12 Use only with a cart stand bracket or table designed...

Страница 10: ...ncer en particulier au niveau de la prise et aux endroits o il sor de l appareil 11 N utilisez que des accessoires sp cifi s par le constructeur 12 N utilisez qu avec un stand ou table con us pour l u...

Страница 11: ...ch Wagen St nder oder Tische die speziell f r professionelle Audio und Musikinstrumente geeignet sind Achten Sie immer darauf da die jeweiligen Ger te sicher installiert sind um Sch den und Verletzung...

Страница 12: ...residential installation This equipment generates uses and can radiate radio frequency energy and if not installed and used in accordance with the instructions may cause harmful interference to radio...

Страница 13: ...included sustain pedal into the jack marked SUS PEDAL SUS PEDAL is designed to work with any standard momentary footswitch It doesn t matter whether the footswitch is normally open or closed as long...

Страница 14: ...1 Connections 12 Connection Diagram...

Страница 15: ...for the Program you want to recall For example if you want to hear a grand piano Program press the BANK button until you are in the PRESET1 Bank then press the 00 PIANO button and then the 0 button Th...

Страница 16: ...ttom of the screen and the name of the Program on that channel will be displayed Changing the Programs in a Mix Suppose you re playing a Mix that has two Programs split across the keyboard a bass soun...

Страница 17: ...on Wheel allows you to add a modulation effect such as vibrato or tremolo to the sound The Controller A D Sliders allow you to affect various parameters of the sound In most of the presets slider A co...

Страница 18: ...bered buttons the VALUE buttons or the CONTROLLER D slider 3 If you want the Program or Mix to be stored on an SRAM card in the PCMCIA EXPANSION SLOT use the BANK buttons to select a card bank 4 Press...

Страница 19: ...ne of the Edit Modes Mix Program Effects STORE Button for storing or copying to the User Bank an expansion card or external MIDI devices BANK COMPARE Button selects a Bank in an Edit Mode compares the...

Страница 20: ...PROGRAM button Mix Mode In this mode you can play up to 16 Programs at the same time You can use this mode to create keyboard splits or keyboard layers or for multitimbral sequencing The QS contains...

Страница 21: ...x Mode Effects Edit Mode In this mode you can change the settings of the QS s internal digital effects processor To get into Effects Edit Mode press the EDIT button twice from Program mode or three ti...

Страница 22: ...buttons don t do anything Special Editing Features Compare In any Edit mode the BANK button performs the COMPARE function see the label under the button If you press COMPARE from any Edit mode the ori...

Страница 23: ...ke sure they are 5 volt read write only and have an access time of 120 nanoseconds or faster Flash cards provide additional sample memory that you can fill with your own sounds using a computer The QS...

Страница 24: ...the SAVE TO CARD option 4 Use the CONTROLLER D slider or the VALUE buttons to select a bank location on the card to store to 5 Press STORE to transfer the User Bank data from the QS onto the card Sav...

Страница 25: ...he slot after the transfer in order for that portion of the Program or Mix to sound the same or at all Transferring Mix Banks Whenever you transfer an internal Bank to an SRAM card all Mixes in the tr...

Страница 26: ......

Страница 27: ...sound modules drum machines sequencers and computers with MIDI interfaces MIDI Connections The QS has three MIDI connectors MIDI IN is for receiving MIDI information from another MIDI device MIDI OUT...

Страница 28: ...a cable from the MIDI OUT of the first device to the MIDI IN jack of the QS and then attach another cable from the QS s MIDI THRU jack to the MIDI IN of the third device Sequencing This setup allows y...

Страница 29: ...be set to the same MIDI channel There are 16 MIDI channels In Program Mode the MIDI channel is indicated by a small number at the bottom of the display To change the MIDI channel press either of the P...

Страница 30: ...is very similar to that of sending a Program see above Hit STORE then PAGE nine times to get to the MIDI Mix Store page Loading Programs and Mixes Via MIDI The QS doesn t need to be in a special mode...

Страница 31: ...struments 99 to 99 cents is equivalent to down or up one half step in hundredths of a semitone Picking the Keyboard Velocity Curve Button EDIT GLOBAL Page 3 Parameter KbdCurv WEIGHT PLASTC MAXMUM This...

Страница 32: ...ressing keys on the keyboard Setting the Keyboard MIDI Mode Button EDIT GLOBAL Page 6 Parameter Kbd Mode Norm Solo Out01 Out16 This setting determines how the QS s keyboard will work with respect to M...

Страница 33: ...in Volume When set to this value a pedal plugged into the back panel s Pedal 1 jack will automatically control volume Setting the Pedal 2 MIDI Controller Number Button EDIT GLOBAL Page 13 Parameter Pe...

Страница 34: ...d from the MIDI IN port will be echoed to the MIDI OUT port with no MIDI data from the QS mixed in In other words the MIDI OUT port will act as a MIDI THRU Resetting the A D Controllers Button EDIT GL...

Страница 35: ...nd allows low frequencies to pass through The frequency at which the dampening begins is called the filter frequency The lower the filter frequency the more muted the sound Amplifier Each voice filter...

Страница 36: ...gative modulation you also have the ability to make the Sound more muted the harder you play Setting modulation to 00 turns off the modulation source LFO Low Frequency Oscillator The term LFO stands f...

Страница 37: ...l control and can be assigned to any one of the four effect buses Editing a Program From Program Mode press the EDIT button once Program Edit Functions In Program Edit Mode the numbered buttons select...

Страница 38: ...d or Drum Mode Button EDIT 40 VOICE Page 2 Parameter Snd Type KYBD or DRUM This determines whether the Sound is in Keyboard Mode or Drum Mode This chapter describes the Keyboard Mode functions See the...

Страница 39: ...weep2 AcidSweep3 AcidSweep4 AcidSweep5 VeloAcid 1 VeloAcid 2 VeloAcid 3 VeloAcid 4 Chirp Rez1 Chirp Rez2 Chirp RezV Quack Rez1 Quack Rez2 Quack Rez3 Quack Rez4 QuackRezV1 QuackRezV2 QuackRezV3 Uni Rez...

Страница 40: ...Beat 8 Psi Beat 9 Psi Beat10 Psi Beat11 Psi Beat12 Kick Loop1 Kick Loop2 Kick Loop3 Kick Loop4 Kick Loop5 Kick Loop6 Kick Loop7 Kick Loop8 Kick Loop9 KickLoop10 KickLoop11 Snare Lp 1 Snare Lp 2 Snare...

Страница 41: ...ore information The Pitch Function 60 PITCH The Pitch function button 60 lets you control the pitch aspects of each Sound layer Setting the Pitch Button EDIT 60 PITCH Page 1 Parameter Semitone 24 to 2...

Страница 42: ...the Pitch LFO affects pitch Higher values increase the amount of Pitch LFO modulation Negative values flip the LFO phase Pitch LFO parameters such as speed and wave shape are programmed within the Pi...

Страница 43: ...er will play a single pitch the sample used for note C3 throughout the entire keyboard range 1 PMONO is simply a monophonic version of 1 PITCH The Filter Function 70 FILTER The Filter function button...

Страница 44: ...up raises the filter frequency At negative settings moving the wheel up lowers the filter frequency Setting the Aftertouch Filter Depth Button EDIT 70 FILTER Page 5 Parameter AFTCH FILT 99 to 99 This...

Страница 45: ...into each other to create a smooth transition between the two sounds 1OF3XFD 2OF3XFD and 3OF3XFD are designed to be used together when you want to switch between three Sounds using velocity going fro...

Страница 46: ...time by controlling the filter frequency For example you can use it to make the initial attack of a note bright and the sustaining part dark See below for the envelope parameters NOTE If you hear no...

Страница 47: ...sets the amount of time the envelope will take to reach its maximum level The higher the value the slower the attack Setting the Envelope Decay Time Buttons EDIT 90 110 Page 2 Parameter Decay 00 to 99...

Страница 48: ...sustain stage Setting the Envelope Trigger Type Buttons EDIT 90 110 Page 7 Parameter Trig NORMAL FREERUN RESET RES FRE This determines how the envelope will start and stop based on how the keys are h...

Страница 49: ...t is being routed to Setting Velocity Modulation of the Envelope Buttons EDIT 90 100 Page 11 Parameter VEL Level 00 to 99 It determines how keyboard velocity will affect the Pitch or Filter envelope l...

Страница 50: ...here will also determine which Sound will be copied from the Program number you chose in the top line If you selected one of the current Program s four Sounds in the top line you ll be able to select...

Страница 51: ...the end of the sound while slow key releases allow the sound to fade away gradually Hard Wired Mod Routes One way to extend the power of your Mod section is to be sure you re not routing something wi...

Страница 52: ...all keys being pressed The harder you press on the keys the greater the degree of modulation Note the QS8 2 s keyboard does not generate aftertouch but the synthesizer can still respond to MIDI aftert...

Страница 53: ...This is the output of a signal processed by the Tracking Generator module in stepped mode Choosing the Mod Destination Buttons EDIT 0 5 MOD Page 2 Parameter Dst see below Here you can select from the...

Страница 54: ...low for the LFO parameters The Filter LFO Function 7 FILTER LFO The Filter LFO function is most often used to apply tremolo like or wah wah effects to a sound See below for the LFO parameters The Ampl...

Страница 55: ...on The higher the value the more slowly the LFO fades in Setting the Trigger Type Buttons EDIT 6 8 Page 4 Parameter Trigger Range MONO POLY KEYMONO or KEYPOLY This determines how each voice s LFO shou...

Страница 56: ...ved up Negative values will lower the level of the LFO as the Mod Wheel is raised Aftertouch LFO Depth Buttons EDIT 6 8 Page 7 Parameter AFTCH LFO 99 to 99 This parameter sets how much the Aftertouch...

Страница 57: ...e modulation source the Tracking Generator functions normally scaling its input as determined by its parameter settings When STEPTRAK is selected as a modulation source the Tracking Generator s output...

Страница 58: ...to 100 The remaining pages of the TRACK GEN function control the levels of the tracking points 0 10 Select the various Points with the PAGE buttons and change the values in the usual ways A higher nu...

Страница 59: ...uttons to select DRUM for the sound type Notice that the SND1 text in the upper left corner changes to S1D1 indicating that you re editing Sound layer 1 Drum 1 in Drum Mode or whichever Sound layer yo...

Страница 60: ...rd Loop Fret Noise Fret Wipe Orch Hit Dance Hit Jungle 1 Jungle 2 Applause GoatsNails Brook Hi Bow Low Bow ShapeNzHi ShapeNzMid ShapeNzLow ScrtchPull ScrtchPush ScrtchLoop ScrtchPlLp ScrtcPshLp RezAtt...

Страница 61: ...S6 2 selecting ON routes the Sound to the outputs OFF shuts off the path In the QS8 2 selecting MAIN routes the Sound to the outputs OFF shuts off the path A setting of AUX will also shut off the path...

Страница 62: ...FILTER 0 to 3 The Filter function lets you control the brightness of the selected Drum with keyboard velocity As this value is increased keyboard velocity will have a greater effect on the filter freq...

Страница 63: ...gate will cause the Drum sound to continue to be played as long as the key is held or the end of the sample is reached The number after the word Gat means that after you let up the key the drum will...

Страница 64: ......

Страница 65: ...t Set the level panning transpositions and effect send of each MIDI channel Mix Editing Changing the Programs Within a Mix The first level of Mix editing is changing the Programs in the Mix Here s how...

Страница 66: ...ix Channel Volume Button EDIT 60 LEVEL Page 2 Parameter Prg Volume 00 to 99 This sets the volume for the Mix channel Setting the Mix Channel Panning Button EDIT 60 LEVEL Page 3 Parameter Prg Pan 3 to...

Страница 67: ...ction button 70 is where you can transpose the Mix channel s Program Both the pitch and MIDI note number are transposed in this operation Shifting the Mix Channel Pitch by Octaves Button EDIT 70 PITCH...

Страница 68: ...to use MIDI controller data for the Effect s Modulators will be accepted over this channel The Keyboard MIDI Function 90 KEYBOARD MIDI The Keyboard MIDI Function button 90 allows you to turn on and of...

Страница 69: ...ermines whether the selected channel will transmit and receive aftertouch MIDI information Enabling MIDI for the Sustain Pedal Button EDIT 100 CONTROLLERS Page 3 Parameter Sustn Pedl ON or OFF This de...

Страница 70: ...uffers In Mix mode there are 16 edit buffers for the Programs inside the Mix plus another buffer for the Mix parameters and yet another buffer for the Effects Processor You can edit a Program within a...

Страница 71: ...Channel containing the Program whose effects are active is called the Effects Channel The Effects Channel is set within Mix Mode Editing Effects Setting the Send Levels To hear any effects you must ro...

Страница 72: ...ithin Store Mode Here s how it s done 1 Select the Program that contains the Effect you wish to copy 2 Press STORE 3 Press the PAGE key three times and you will see the following display 4 Press the P...

Страница 73: ...Input levels for each effect function in the current configuration Reduce the Effect level settings in the Program or Mix that is giving you the problem The Effects Edit Pages The Configuration Funct...

Страница 74: ...MAIN RIGHT DELA Y 1 1 REVERB FX SEND 3 FX SEND 4 PITCH 2 DELA Y 2 AMP AMP PITCH 3 DELA Y 3 AMP DELA Y 4 AMP 1 2 1 2 1 2 1 2 BAL BAL BAL BAL BAL 2 3 1 2 3 1 4 MIX REVERB 1 REVERB 2 REVERB 3 REVERB 4 DE...

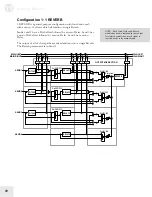
Страница 75: ...end 1 is routed through a mono Delay then a Chorus then to the first Reverb Send 2 is routed directly to the first Reverb Send 3 is routed through a mono Chorus then to the second Reverb Send 4 is rou...

Страница 76: ...GHT MAIN LEFT MAIN RIGHT DELA Y 1 1 REVERB FX SEND 3 FX SEND 4 PITCH 2 DELA Y 2 AMP AMP PITCH 3 DELA Y 3 AMP DELA Y 4 AMP 1 2 1 2 1 2 1 2 BAL BAL BAL BAL BAL 2 3 1 2 3 1 4 MIX REVERB 1 REVERB 2 REVERB...

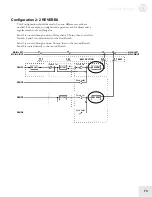
Страница 77: ...a mono Pitch effect a Delay a Reverb then a Lezlie This is summed with the main outputs and sent through a shelving EQ Sends 2 through 4 have no effects of their own but can feed the effects of Send...

Страница 78: ...t just the Effect Sends and is only available in Configuration 4 REVERB EQ and Configuration 5 OVERDRIVE LZLY There are four EQ parameters Setting the EQ Low Shelf Frequency Button EDIT EDIT 50 EQ Pag...

Страница 79: ...meters will be listed more than once For example D1 TIME D2 TIME D3 TIME etc NOTE Don t confuse this Effect Mod function with the Mod settings within the Programs They are not the same thing since the...

Страница 80: ...zlie in Configuration 5 OVERDRIVE LEZLIE The input can be the output of the Reverb or Delay Selecting the Lezlie Input 2 Source Config 5 Button EDIT EDIT 70 LEZLIE Page 2 Config 5 only Parameter In2 s...

Страница 81: ...of one of the parts and then mixing the two back together This final mixing step is essential since the overall sound of the effect is created in the way the changed and unchanged signals interact Se...

Страница 82: ...gnal is split into three parts a dry signal and separate left and right signals each with its own delay While one channel flanges up the other channel automatically flanges down making the effect more...

Страница 83: ...00 to 99 This parameter adjusts the Feedback for the Chorus and Flanger A portion of the output of the Pitch section can be fed back into the input in order to make the effect more pronounced Setting...

Страница 84: ...rive is being routed to the Resonator When set to 99 IN2 all that goes through is Input 2 When set to 0 an even mix of both signals is passed on The Delay Function 90 DELAY This effect delays the sign...

Страница 85: ...in 10ms and 1ms increments Setting the Delay Feedback Amount Button EDIT EDIT 90 DELAY Pages 5 and 8 in Stereo Delay Parameter Delay Fdbk 00 to 99 This adjusts the delay feedback which is a portion of...

Страница 86: ...t the signal is a blend between the Pitch output and the dry signal This parameter is not available in Config 2 2 REVERBS Setting the Reverb Input Balance Button EDIT EDIT 100 REVERB Page 3 Parameter...

Страница 87: ...a different space or produces a different ambient effect The different reverb types are PLATE 1 2 These are recreations of vintage plate reverbs especially useful on vocal and drum sounds ROOM This re...

Страница 88: ...Setting the Reverb Input Filter Frequency Button EDIT EDIT 100 REVERB Page 9 6 in Config 2 Send 3 Parameter Inpt Filter 00 to 99 This adjusts the frequency of the low pass filter at the Reverb input...

Страница 89: ...T 110 OVERDRIVE Page 1 Parameter Ovrdrv HARD or SOFT The SOFT Overdrive has less gain and distortion than the HARD Overdrive In addition the HARD Overdrive will only provide distortion when the signal...

Страница 90: ...outputs Setting the Effects Mix into the Main Outputs Button EDIT EDIT 120 MIX Page 1 to 5 Parameter Pitch Outpt Delay Outpt Rvb Output Ovrdrv Out Lezlie Out 00 to 99 These pages set the Effect Mix i...

Страница 91: ...ince the QS is General MIDI compatible it can play back any of the thousands of General MIDI sequences that are widely available For example there are many General MIDI sequences available on the Inte...

Страница 92: ...s mail order houses and on the Internet Check the Alesis website for more information Where can I get more Banks Additional Program Mix Banks are available on the Alesis website free of charge Are QS6...

Страница 93: ...jack to function relatively normally so you can play your MIDI gear from the keyboard while the sequence is playing A setting of THRU passes sequence data on to external MIDI devices from the MIDI Ou...

Страница 94: ......

Страница 95: ...of which values will be sent for each Bank as it is selected Transmission Mix Mode If a new Bank is selected and any of the channels within the Mix have their MIDI Out parameters set to ON Mix Edit M...

Страница 96: ...and 14 If a channel is set up this way Whenever a Mix is recalled via the front panel or via MIDI volume and panning information will be transmitted for that channel Whenever that Channel s Level par...

Страница 97: ...Purpose 3 0 127 19 General Purpose 4 0 127 32 63 Least Significant Bits LSB Controllers 0 31 0 127 64 Sustain Pedal 0 or 127 65 Portamento On Off 0 or 127 66 Sostenuto Pedal 0 or 127 67 Soft Pedal 0...

Страница 98: ...LY O Yes Mode 1 OMNI ON MONO Mode 4 OMNI OFF MONO X No General MIDI There are three MIDI registered parameter numbers RPNs which the QS will recognize in Mix Mode when General MIDI is enabled These ar...

Страница 99: ...te into a new song defined as having more tracks INPUT SELECT is set to 2 4 8 or 12 input mode Reset INPUT SELECT for 24 input mode MIDI input in Mix mode isn t working i e you can t control your unit...

Страница 100: ...your mixer and your amplifier 2 Turn off your QS 3 Make sure the MODULATION wheel is all the way down 4 Turn on your QS while holding down buttons 0 and 3 You ll know you were successful if there is...

Страница 101: ...ogram Memory Program Mode 512 Preset 128 User Mix Mode 400 Preset 100 User Effects QS Parallel Matrix Effects 4 independent stereo multieffect processing busses Multitimbral Mode QS Mix Mode 64 part m...

Страница 102: ......

Страница 103: ...3 Program 35 effects 35 69 chorus 80 clipping 71 configuration 71 copying 70 delay 82 detune 81 editing 69 EQ 76 flanger 81 gated reverb 85 Lezlie 78 Mix 65 modulating 77 output mix 88 overdrive 87 pi...

Страница 104: ...on 39 Mixes 65 Program 39 pitch envelope amount 40 function 44 pitch LFO function 52 pitch wheel 15 bend amount 40 plate reverb 85 polyphonic 41 polyphony 33 portamento mode 41 power cable 7 power con...

Страница 105: ...OR IMPLIED OR OTHERWISE WITH RESPECT TO THE PRODUCT AND SPECIFICALLY EXCLUDE ANY IMPLIED WARRANTIES OF FITNESS FOR A PARTICULAR PURPOSE OR MERCHANTABILITY OR OTHER IMPLIED WARRANTIES Some states do n...

Отзывы: