background image

1


Getting Started


11 


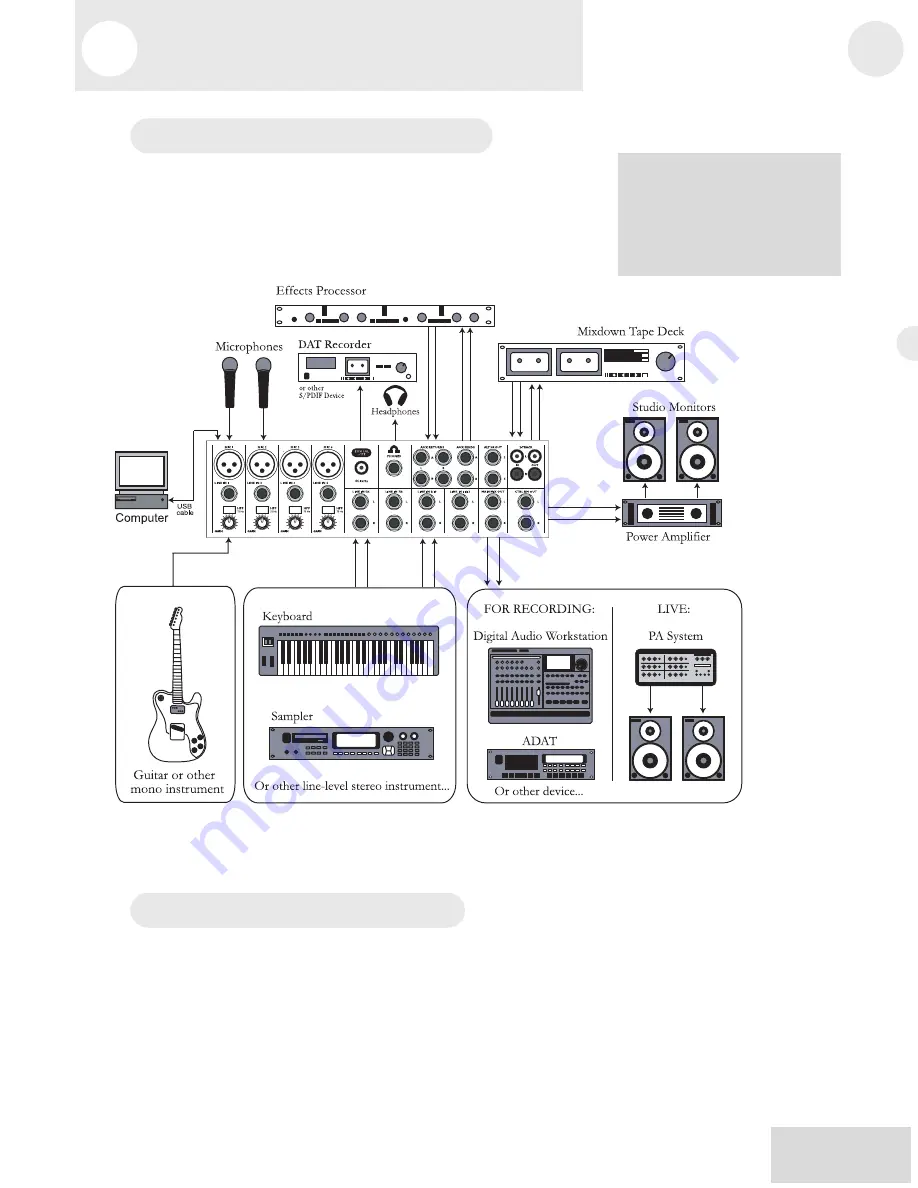
Hooking up the Multimix USB 


This diagram will help you get the Multimix USB hooked up and 

ready to go. The equipment you use depends on personal 

preference and on whether you’re performing live or recording. 

For example, you’ll see below that the MAIN MIX OUT can be 

routed to a recording device for recording, or to a PA system for 

live performance.  


Using Proper Cables 


When connecting instruments and other equipment to the 

MultiMix, it’s important that you use the appropriate types of  

cables. Here are some simple but important guidelines: 


y


For the mic inputs, use XLR cables. 

y


For the line inputs and all other 1/4” connections, use 1/4” 

mono TRS cables. 

y


Use stereo RCA cables for the 2-track in and out. 

Be sure to follow the
guidelines for which cables to 
use (further down this page) 
and the procedure for setting 
levels (on the next page) 
before you begin mixing. 

  1


Getting Started


 12 

y


Use a USB cable to connect the USB port to a computer.  

Do not use a USB hub, as hubs can introduce timing 

glitches in USB communication. 

y


For the S/PDIF Digital out, we suggest that you use a 

coaxial cable that is specifically designed for S/PDIF 

applications.   These cables are better suited for high 

frequency (digital) signals and are unbalanced, shielded 

coaxial cables with shielded RCA connectors on each end.  

Better to get the high quality S/PDIF cables and save 

yourself  some unnecessary grief.  


Setting Levels 


Before you can begin mixing different audio sources with your 

MultiMix, you must set the level for each channel you’re using. 

This helps to prevent distortion and clipping. Here’s how:


1.  Slide the channel fader to unity gain (0). 


2.  Turn the AUX SEND and GAIN controls all the way down, 

and turn the EQ knobs to the center detent (you’ll feel a click). 


3.  Connect the source of  the signal to the channel’s input. 


4.  Press the PFL / SOLO switch on the channel. 


5.  Make sure the SOLO MODE switch in the master section is 

set to SOLO. 


6.  Play the instrument at a normal level and watch the LED 

meters in the master section. 


7.  Adjust the channel’s gain until the LED meters remain at or 

very close to 0 and do not 6dB. 


8.  If  you need to apply EQ, do so and check the meter again. 


Содержание MultiMix12USB

Страница 1: ...Reference Manual ...

Страница 2: ...This page intentionally left blank 10 20 30 40 50 60 70 80 90 100 ...

Страница 3: ...atchbay 13 Mic Inputs Channels 1 4 13 Line Inputs Channels 1 4 13 Line Inputs Channels 5 12 14 Digital Output Jack 14 PHONE Jack 14 AUX RETURNS 14 AUX SENDS 14 ALT 3 4 OUT 14 2 TRACK 15 MAIN MIX OUT 15 CTRL RM OUT 15 Channel Strips 15 Fader 15 MUTE Alt 3 4 15 PFL SOLO 15 PAN or BAL 16 Aux 16 EQ 16 Master Section 17 Main Mix Fader 17 Alt 3 4 Fader 17 2TK To Mix 17 Alt 3 4 To Mix 17 Solo Mode 17 HDP...

Страница 4: ...MULTI MULTI II 22 Chapter Four Applications 23 Simple Recording Setup 23 Simple Live Setup 23 Using Additional External Audio Sources 23 Digital output to a digital recorder 24 Using the Multimix USB with a Computer 24 Sending and Receiving Audio Data 24 Precautions when using the USB connection 24 Connection instructions for Windows XP 2000 ME and 98 Second Edition 24 Connection instructions for ...

Страница 5: ...Table Of Contents 3 Alesis Contact Information 40 T 4 T ...

Страница 6: ...s 3 Table Of Contents 4 This page intentionally left blank ...

Страница 7: ...no one explains how to use them So we try to write our manuals as carefully as we build our products The goal of this manual is to get you the information you need as quickly as possible with a minimum of hassle We hope we ve achieved that If not please drop us an email and give us your suggestions on how we could improve future editions of this manual We hope your investment will bring you many y...

Страница 8: ...And with a multitude of ways in which to connect other equipment and instruments the Multimix USB offers endless possibilities Multimix USB Key Features y Three Models Multimix 8 USB 4 mic line preamps 4 stereo inputs Multimix 12 USB 4 mic line preamps 4 stereo inputs Multimix 16 USB 8 mic line preamps 4 stereo inputs y Clean and powerful preamps up to 50dB of preamp gain for capturing quiet sourc...

Страница 9: ...ntosh computers Aditional Features of the Multimix 12 USB and Multimix 16 USB y PFL Solo in place functionality per channel isolates a channel with a single push of a button y Mute Alt 3 4 assign per channel lets you mute a channel and at the same time route its signal to the mixer s ALT 3 4 output a separate stereo bus y Independent Main Mix and Alt 3 4 levels permits you to separately command th...

Страница 10: ...s provided by the on board digital effects processor If you want to know what a certain effect will do to your sound before you select it this is where you should look Chapter 4 Applications outlines a number of scenarios in which you can use the Multimix including some tips on what goes where when you re hooking everything up Chapter 5 Troubleshooting can give you a hand if you re experiencing pr...

Страница 11: ...h this manual True enough you will find all the technical lingo and specifications you can handle in here but we do our best to make this accessible to you Beginners will find several elements of this manual especially useful Keep your eye out for the tips found in the gray boxes on the right side of the page Be sure to check out the hookup diagrams on page 11 which will give you some ideas on how...

Страница 12: ...Introduction 10 This page intentionally left blank ...

Страница 13: ...performance Using Proper Cables When connecting instruments and other equipment to the MultiMix it s important that you use the appropriate types of cables Here are some simple but important guidelines y For the mic inputs use XLR cables y For the line inputs and all other 1 4 connections use 1 4 mono TRS cables y Use stereo RCA cables for the 2 track in and out Be sure to follow the guidelines fo...

Страница 14: ...Levels Before you can begin mixing different audio sources with your MultiMix you must set the level for each channel you re using This helps to prevent distortion and clipping Here s how 1 Slide the channel fader to unity gain 0 2 Turn the AUX SEND and GAIN controls all the way down and turn the EQ knobs to the center detent you ll feel a click 3 Connect the source of the signal to the channel s ...

Страница 15: ...inputs is a high pass filter HPF that can be turned on and off with the HPF switch When you activate this switch all frequencies below 75Hz are cut from the signal This is useful for mic or line signals that don t have much bottom end such as vocals snares cymbals and electric guitar You ll want to leave this inactivated for instruments like basses and kick drums Line Inputs Channels 1 4 The line ...

Страница 16: ... that is specifically designed to carry a digital signal and does not exceed 5 meters 16 4 ft in length PHONE Jack The headphone jack accepts 1 4 jacks If your headphones are 1 8 you can find a 1 8 to 1 4 adapter in most electronics stores AUX RETURNS These are the 1 4 jacks where you connect the outputs of an external effects processor or other audio source Each aux return gives you 15dB of gain ...

Страница 17: ... much of the signal from the mic or line inputs is sent to the channel To adjust the level simply slide the fader up and down to the desired level In the lowest position levels are cut completely and in the uppermost position you get an additional 10dB of gain When the fader is at 0 it is at unity gain where the level of the output equals the level of the input MUTE Alt 3 4 This switch has two pur...

Страница 18: ...this mean In POST mode the aux send is affected by the fader EQ and HPF settings In PRE mode the aux send is affected only by the EQ and HPF settings POST mode is generally used for sending the signal to an external effects device so that the fader controls the signal level and PRE mode is usually used for cue sends for example sending a signal to headphones while recording for which you may not w...

Страница 19: ...effectively becomes another stereo channel but without all the extras like pan EQ etc Alt 3 4To Mix This switch adds the signal from the Alt 3 4 bus to the main mix bus Solo Mode The SOLO MODE switch affects the signals of channels whose PFL SOLO switches are engaged When the SOLO MODE switch is in the up position you re in PFL or pre fader listen mode This means that you ll hear the signals of al...

Страница 20: ...eakers MIX Switch Pressing the MIX switch routes the main mix to the control room level control When you engage this switch the channels and aux sends will pass through the MAIN MIX fader and then through the HDPH CTRL RM level control You can then keep the MAIN MIX fader set to unity gain for optimal recording and the HDPH CTRL RM level control set to a more comfortable listening level if necessa...

Страница 21: ...pre and post fader and aux returns depending on which signal you have routed to the control room mix POWER Indicator When this LED is lit up that means the POWER ON switch on the rear of the mixer has been activated 48V Indicator When this one is lit up that means the PHANTOM ON switch on the rear of the mixer has been activated and is supplying 48V phantom power to all XLR mic inputs 2 A 20 R H P...

Страница 22: ... Switch this one on and your mixer has power Switch it off and it doesn t Make sure the faders in the master section are pulled all the way down when powering your mixer up or down Phantom On This switch activates and deactivates the phantom power described in Mic Inputs Channels 1 4 page 13 This switch controls phantom power for all four mic inputs USB port This port allows you to connect the Mul...

Страница 23: ...e effect knob to activate the selected effect LED Display This display shows you the number of the current program CLIP Indicator When lit this LED tells you that there is a signal clip at the internal effects input This means that you should reduce the signal via the EFFECTS AUX RET B LEVEL control SIG Indicator When lit this LED indicates that the effects processor is receiving a signal Effect D...

Страница 24: ...reate a sweeping swooshing sound effect that you will probably recognize DELAY These effects are based on a discreet repetition or echo of the input PITCH These effects transpose the pitch of the input signal and blend the effect signal with the original to create harmonies MULTI MULTI II These are combinations of two or more of the above effects ...

Страница 25: ...ing it via AUX RETURN A you ll probably want to set AUX SEND A to POST for post fader For monitoring you can connect the CTRL RM OUT jacks to a speaker or headphone amplifier or just simply plug headphones into the PHONES jack Simple Live Setup This is similar to the recording setup In a live setup you most likely will connect the MAIN MIX OUT to a PA system amplifier and the CTRL RM OUT to a head...

Страница 26: ...nd other extenders with USB audio often causes glitches and other problems Sending and Receiving Audio Data The USB port sends the Multimix s MAIN OUT TAPE OUT left and right signals to the computer The USB port receives a stereo audio stream from the computer and assigns it to the TAPE IN left and right channels of your Multimix mixer Note that if a device is connected to the Multimix s TAPE IN i...

Страница 27: ...Control Panel Select Sounds and Audio Devices or Multimedia go to the Audio tab and select the USB audio codec as your default sound recording and sound playback device Connection instructions for Macintosh OS X only After plugging in the Multimix select USB Audio CODEC in the Sound area of System Preferences No other action is required The Multimix USB is not designed for use with Mac OS9 and bel...

Страница 28: ...s 4 25 4 Applications 26 This page intentionally left blank ...

Страница 29: ...ake sure cables are plugged in securely Headphones are not plugged into PHONE jack Plug headphones into PHONE jack Monitor or headphone amplifier is turned off or down Turn amplifier on or up Bad cable Check all cables substitute cables with known good ones Audio signal is distorted Channel level is too high Set channel levels using the procedure on page 12 Channel input is too high Turn down your...

Страница 30: ...Test the microphone on other audio devices If you detect damage contact the manufacturer or dealer No or low sound from a channel Fader is too low Raise channel fader Instrument volume is too low Turn up the instrument s volume control If problem persists check the instrument by plugging headphones into the instrument s phone jack Channel is muted Check the MUTE ALT 3 4 switch Gain is too low Adju...

Страница 31: ...ck in If this does not work leave the Multimix on turn off the computer do not use restart but instead actually turn off the computer and then turn it on again Computer sees the Multimix USB but no sound is received and or transmitted Multimix USB is not set as primary sound device In the computer s Control Panel go to the Sounds Multimedia area In the Audio section set the default sound recording...

Страница 32: ...g 5 29 d n r 5 Troubleshooting 30 This page intentionally left blank ...

Страница 33: ...to 10dB Aux Returns Aux Return A Gain Range to 15dB Effects Level Aux Return B Gain Range to 15dB Channel Levels Channel Level Gain Range to 10dB Master Levels Main Mix Ctrl Room Gain Range to 10dB 1 4 Inputs Stereo Aux Return Level 4dBu nominal 20dBu maximum RCA Inputs Tape In Level 10dBV nominal 5dBV maximum 1 4 Outputs Main Mix Ctrl Room Aux 3 4 Ext Aux Send Level 4dBu nominal 20dBu maximum Hea...

Страница 34: ... over e with a 18dBu dances z 6 Specifications 32 Mechanicals W x L x H Multimix 12 USB 13 0 x 13 4 x 3 2 331mm x 340mm x 80mm 7 0lbs 3 2kg Multimix 16 USB 13 0 x 15 2 x 3 2 331mm x 386mm x 80mm 9 7lbs 4 4kg ...

Страница 35: ...7 Block Diagrams 33 7 B 34 ...

Страница 36: ...33 7 Block Diagrams 34 ...

Страница 37: ...ser microphone A type of high quality microphone that produces a weak signal usually requiring an external power source like the ones provided by your Multimix s XLR mic inputs dB decibel A common unit of measure for audio detent A point of resistance in the path that a mixer knob or fader travels Detents are used to mark important settings As you turn the knob or slide the fader you ll feel it cl...

Страница 38: ...ntrol that lets you position a mono signal within the stereo spectrum by altering the level of the signal being sent to the left channel as opposed to the right phantom power A way of providing power to condenser microphones Called phantom because the power isn t apparent to dynamic microphones when you connect them to an input that provides phantom power post fader Describes an aux send that send...

Страница 39: ...Glossary 37 opposite of dry G 38 T ...

Страница 40: ...y 37 Glossary 38 This page intentionally left blank ...

Страница 41: ...rbyunauthorized personnel and is limited to failures arising during normalusethatareduetodefects in materialorworkmanshipintheproduct THEABOVEWARRANTIES AREIN LIEUOF ANYOTHER WARRANTIES OR REPRESENTATIONSWHETHER EXPRESS OR IMPLIED OR OTHERWISE WITH RESPECT TO THE PRODUCT AND SPECIFICALLYEXCLUDEANYIMPLIED WARRANTIES OF FITNESS FOR A PARTICULARPURPOSE OR MERCHANTABILITYOROTHER IMPLIED WARRANTIES Som...

Страница 42: ...te http www alesis com Multimix USB Reference Manual Revision 2 0 by Edwin Erdmann Brooks Bruner and Fred Morgenstern Copyright 2004 Alesis Distribution LLC All rights reserved Reproduction in whole or in part is prohibited Multimix and Multimix USB are trademarks of Alesis LLC Specifications subject to change without notice 7 51 0179 A 4 05 2004 7 51 0179 A ...

Отзывы: