background image


24 


Operazione 


Kit 


Scelta 


Il CompactKit 7 presenta vari kit batteria diversi. Ciascun kit è una collezione di suoni che 
costituisce un set batteria tipico. 

Per selezionare un kit,

 premere 

Kit

 e servirsi dei tasti 

Valore giù

/

su

 per selezionare il numero 

di kit (Kit predefiniti 001–045 o Kit utente 046–050). Un puntino comparirà a display sopra al 

kit 

per indicare che questo è stato selezionato.


Per regolare il volume master, 

servirsi dei tasti 

Master Volume


giù

/

su

 (

L00

L16

). 


Modifica 


Il CompactKit 7 consente di configurare ciascun pad separatamente. È possibile selezionare 
una voce indipendente (suono), volume, panning e nota MIDI per ciascun pad.  

Nota bene:

 la nota MIDI non influisce sul suono del kit durante il funzionamento normale. 

Influisce sulla nota MIDI che il pad invia al computer tramite la porta USB (ad es. al software di 
registrazione, al plugin dello strumento virtuale, ecc.). Si veda 

USB MIDI

 per saperne di più. 


Per modificare la voce di un pad o interruttore a pedale: 

1.


Premere 

Voice

. Un puntino comparirà a display sopra 

Voce 

per indicare che si sta 

regolando un’impostazione voce. 

2.


Battere un 

pad

 o premere un 

interruttore a pedale

 per selezionarlo. 

3.


Servirsi dei tasti 

Valore giù

/

su

 per selezionare una voce (

001

265

) per il pad o 

l’interruttore a pedale. 

Per cambiare il suono di un altro pad, ripetere le fasi 2-3.  


Per impostare il volume di un pad o interruttore a pedale: 

1.


Premere 

Volume

. Un puntino comparirà a display sopra 

Voce 

per indicare che si sta 

regolando un’impostazione voce. 

2.


Battere un 

pad

 o premere un 

interruttore a pedale

 per selezionarlo. 

3.


Servirsi dei tasti 

Valore giù

/

su

 per impostare il volume (

L00

L31

) per il pad o l’interruttore 

a pedale. 

Per impostare il volume di un altro pad, ripetere le fasi 2-3.  


Per impostare il panning di un pad o interruttore a pedale: 

1.


Premere 

Pan

. Un puntino comparirà a display sopra 

Voce 

per indicare che si sta 

regolando un’impostazione voce. 

2.


Battere un 

pad

 o premere un 

interruttore a pedale

 per selezionarlo. 

3.


Servirsi dei tasti 

Valoree giù

/

su

 per configurare il panning (da 

P-8

 [sinistra] a

 P 0

 [centro] a


P 8 

[destra]) per il pad o l’interruttore a pedale. 

Per impostare il panning di un altro pad, ripetere le fasi 2-3.  

Содержание COMPACTKIT 7

Страница 1: ...User Guide English 3 8 Gu a del usuario Espa ol 9 14 Guide d utilisation Fran ais 15 20 Guida per l uso Italiano 21 26 Benutzerhandbuch Deutsch 27 32 Appendix English 33 37...

Страница 2: ......

Страница 3: ...product registration visit alesis com For additional product support visit alesis com support Features Top Panel 1 1 2 2 2 2 2 2 3 2 1 Speakers Sound will play out of these speakers When headphones ar...

Страница 4: ...ation Reverb to learn how to do this 10 Hand Perc Press this button to select Song 077 and Kit 015 instantly Kit 015 uses sounds from hand percussion instruments rather than standard drums 11 Drum Off...

Страница 5: ...e message in the same manner as it does when you hit a pad 3 Hi Hat Input Connect one of the included footswitches to this input If you hit the hi hat pad while pressing the footswitch it will produce...

Страница 6: ...change the voice of a pad or footswitch 1 Press Voice A dot will appear in the display above Voice to indicate you are adjusting a voice setting 2 Hit a pad or press a footswitch to select it 3 Use th...

Страница 7: ...e Down Up buttons to select a User Kit 046 050 The current kit will overwrite this User Kit 4 Press Save The kit number will stop flashing and that kit will be selected Songs CompactKit 7 has several...

Страница 8: ...want to activate or deactivate the drum part of the song press Drum Off 2 Press Rec Its light will flash 3 To start recording hit a pad or press Start Stop The metronome will count off the tempo but...

Страница 9: ...gistrarlo visite alesis com Para obtener soporte adicional del producto visite alesis com support Caracter sticas Panel superior 1 1 2 2 2 2 2 2 3 2 1 Altavoces El sonido se emite desde estos altavoce...

Страница 10: ...reverberaci n Consulte Funcionamiento Reverberaci n para aprender a hacer esto 10 Percusi n manual Pulse este bot n para seleccionar instant neamente la canci n 077 y el kit 015 El kit 015 utiliza son...

Страница 11: ...lsa el interruptor de pedal el CompactKit 7 recibir el mensaje de la misma manera que cuando golpea un pad 3 Entrada para hi hat Conecte a esta entrada uno de los interruptores de pedal incluidos Si g...

Страница 12: ...ulse Voice Aparecer un punto en la pantalla encima de Voice para indicar que est modificando un ajuste de voz 2 Golpee un pad o pulse un interruptor de pedal para seleccionarla 3 Utilice los botones V...

Страница 13: ...Save El n mero de kit dejar de parpadear y se seleccionar ese kit Canciones CompactKit 7 tiene diversas canciones que consisten en partes de bater a y acompa amiento Puede reproducir la canci n con o...

Страница 14: ...se Drum Off 2 Pulse Rec Su luz parpadear 3 Para comenzar a grabar golpee un pad o pulse Start Stop El metr nomo contar el tempo pero no se grabar Para desactivar el metr nomo pulse Click 4 Para detene...

Страница 15: ...l enregistrement du produit veuillez visiter alesis com Pour de l assistance suppl mentaire veuillez visiter alesis com support Caract ristiques Panneau sup rieur 1 1 2 2 2 2 2 2 3 2 1 Enceintes Le so...

Страница 16: ...savoir plus 10 Hand Perc Cette touche permet de s lectionner instantan ment Song 077 et le Kit 015 Le Kit 015 utilise des sons d instrument de percussion main plut t que d une batterie traditionnelle...

Страница 17: ...tr e grosse caisse Branchez une des p dales incluses cette entr e Lorsque vous appuyez sur la p dale la CompactKit 7 recevra le message de la m me mani re que lorsque vous frappez un pad 3 Entr e Char...

Страница 18: ...voix d un pad ou d une p dale 1 Appuyez sur la touche Voice Un point s affiche l cran au dessus du champ Voice afin d indiquer que vous modifiez le param tre de la voix 2 Frappez un pad ou appuyez sur...

Страница 19: ...Save Le num ro de kit s arr te de clignoter et le kit sera s lectionn Chansons La CompactKit 7 dispose de plusieurs chansons compos es de parties de batterie et d accompagnement Vous pouvez jouer la c...

Страница 20: ...che Rec Son t moin clignotera 3 Pour lancer l enregistrement frappez un pad ou appuyez sur la touche Start Stop Le m tronome d compte le tempo mais ne sera pas enregistr Pour d sactiver le m tronome a...

Страница 21: ...egistrazione del prodotto recarsi alla pagina alesis com Per ulteriore assistenza sul prodotto recarsi alla pagina alesis com support Caratteristiche Pannello superiore 1 1 2 2 2 2 2 2 3 2 1 Casse il...

Страница 22: ...emere questo tasto per selezionare istantaneamente la canzone 077 e il Kit 015 Il kit 015 impiega suoni di strumenti a percussione a mano anzich la normale batteria 11 Drum Off premere questo tasto pe...

Страница 23: ...a pedale il CompactKit 7 ricever il messaggio cos come quando viene battuto un pad 3 Ingresso hi hat collegare uno degli interruttori a pedale in dotazione a questo ingresso Se si batte il pad hi hat...

Страница 24: ...Un puntino comparir a display sopra Voce per indicare che si sta regolando un impostazione voce 2 Battere un pad o premere un interruttore a pedale per selezionarlo 3 Servirsi dei tasti Valore gi su...

Страница 25: ...peggiare e il kit viene selezionato Canzoni Il CompactKit 7 presenta diverse canzoni composte da parti di batteria e accompagnamento La canzone pu essere suonata con o senza accompagnamento Ciascuna c...

Страница 26: ...Il relativo LED lampeggia 3 Per iniziare la registrazione battere un pad o premere Start Stop Il metronomo segner il tempo ma non verr registrato Per disattivare il metronomo premere Click 4 Per inte...

Страница 27: ...g besuchen Sie alesis com F r zus tzlichen Produkt Support besuchen Sie alesis com support Funktionen Oberseite 1 1 2 2 2 2 2 2 3 2 1 Lautsprecher Der Ton wird von diesen Lautsprechern ausgegeben Wenn...

Страница 28: ...toppen 9 Reverb Dr cken Sie diese Taste um den Reverb Anteil zu ndern Siehe Betrieb Reverb um mehr dar ber zu erfahren 10 Hand Perc Dr cken Sie diese Taste um sofort Song 077 und Kit 015 auszuw hlen A...

Страница 29: ...n Sie einen der mitgelieferten Fu schalter an diesen Eingang an Wenn Sie den Fu schalter bet tigen wird CompactKit 7 die Nachricht genau wie bei der Bet tigung eines Pads erhalten 3 Hi Hat Eingang Sch...

Страница 30: ...ufscheinen um anzuzeigen dass Sie eine Voice Einstellung anpassen 2 Bet tigen Sie ein Pad oder dr cken Sie einen Fu schalter zur Auswahl 3 Verwenden Sie die Tasten Wert reduzieren erh hen um eine Voic...

Страница 31: ...Benutzer Kit 4 Dr cken Sie Speichern Die Kit Nummer h rt auf zu blinken und das Kit ist nun ausgew hlt Songs CompactKit 7 hat mehrere Songs die aus Drum Parts und der Begleitung bestehen Sie k nnen d...

Страница 32: ...Sie Rec Das Licht beginnt zu blinken 3 Um die Aufnahme zu starten dr cken Sie Start Stopp oder schlagen auf ein Pad Das Metronom z hlt im Takt mit wird aber nicht aufgezeichnet Dr cken Sie ein weiter...

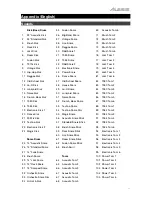
Страница 33: ...980 Tom 5 17 1980 Kick 52 Drum Bass Snare 87 1980 Tom 6 18 1984 Kick 53 Techno Snare 88 1984 Tom 1 19 Electronic Kick 1 54 Techno Snare Rim 89 1984 Tom 2 20 Dance Kick 55 Magic Snare 90 1984 Tom 3 21...

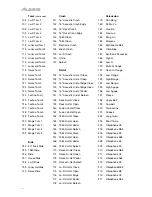
Страница 34: ...196 Low Agogo 124 Techno Tom 1 157 14 Acoustic Hi Hat Splash 197 Claves 125 Techno Tom 2 158 Rock Hi Hat Close 198 Jingle Bell 126 Techno Tom 3 159 Rock Hi Hat Open 199 Cowbell 127 Techno Tom 4 160 Fu...

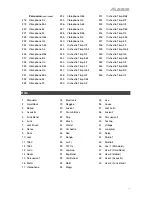
Страница 35: ...C5 245 Orchestra Timp E2 262 Orchestra Timp A3 229 Vibraphone Db5 246 Orchestra Timp F2 263 Orchestra Timp Bb3 230 Vibraphone D5 247 Orchestra Timp Gb2 264 Orchestra Timp B3 231 Vibraphone Eb5 248 Or...

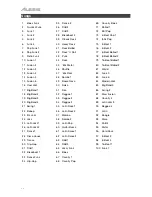
Страница 36: ...Samba 1 83 Funk 6 15 Fusion 6 49 Bossa Nova 84 Modern Jazz 16 Cool Jazz 50 Salsa 85 Big Band 5 17 Big Band 1 51 Ska 86 Swing 2 18 Big Band 2 52 Reggae 1 87 Slow Fusion 19 Big Band 3 53 Reggae 2 88 Cou...

Страница 37: ...5 mm stereo headphone output 1 1 8 3 5 mm stereo auxiliary input 1 power input Power 12V DC 2 A center positive power adapter included 6 C batteries Dimensions width x depth x height 19 7 x 14 6 x 6 2...

Страница 38: ......

Страница 39: ......

Страница 40: ...alesis com Manual Version 1 1...

Отзывы: