


Jawzilla Portable Clamping Jaws
AFTER SALES SUPPORT
e-mail: [email protected]
1800 909 909
MODEL: №. JH1000-01 • 03/2016 • 52539
(toll free)
8
AFTER SALES SUPPORT
(toll free)
Jawzilla Portable Clamping Jaws
e-mail: [email protected]
1800 909 909
MODEL: №. JH1000-01 • 03/2016 • 52539
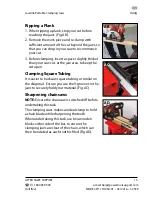
Portable Clamping Stand Assembly
The following assembly is required to prepare the product for use:
1. Remove the portable clamping jaws from the box and place on a flat
and level surface in the upright position so that the fixed clamping jaw is
sitting on the ground (Fig A).
2. Turn the rear leg release knob (4) in an anti clockwise direction to loosen
(Fig B).
3. Pull out the rear folding leg (5) slightly until the leg is above the front
securing slot (15) (Fig C).
4. Before being able to fully extend the rear folding (5) leg into position,
slide the leg downwards (Fig D), and then fully extend the rear folding leg
outwards (Fig E).
5. Once the rear folding leg (5) is fully extended outwards, push the leg back
into the rear securing slot (14) so it is secure (Fig F).
NOTE:
When the rear folding leg is secure, the leg will not be able to
move in any direction.
6. Secure the rear folding leg (5) into position by tightening the rear leg
release knob (4) in a clockwise direction (Fig B).
7. Pull down the foot pedal (8) fully to the ground until you hear a click to
indicate the foot pedal (8) is engaged and locked into position (Fig G).
NOTE:
If you have difficulty engaging the locking mechanism on the foot
pedal, tilt the unit slightly backwards so the foot pedal (8) can be pushed
down further to the ground to allow engagement.
8. To release the front folding leg/s (7), push in the front leg lock notch
(10) to release the front folding leg (5) from the locking position (Fig H),
then pull the leg out and downwards to the ground until you hear a click
which indicates the leg is locked into position (Fig I). Repeat for the 2nd
front folding leg (5).
9. The portable clamping jaws is now assembled and can be turned over
onto its feet.
WARNING:
Take care when lifting or moving the clamping jaws.
Ensure you use the correct lifting techniques when lifting heavy
objects. Prior to using the portable clamping jaws ensure it is located on a
flat and level surface where all three legs are touching the ground.
Assembly


