Alcatel F890 Voice Скачать руководство пользователя страница 15

2.      Press <Calls> to highlight 

De-register 

and press 

Select

3.      Press <Up> or <Calls> to highlight the handset you wish to de-register and press 

Select

 
4.      If the system PIN is not 0000 then you will be prompted to enter it, then select OK. If it is 0000, you will 

continue straight to point 6. 

5. 

The display will show

 De-registering handset 

and once successful the display will confirm the handset 

has been de-registered 
 

Notes


You cannot deregister the handsets if any other system handset is in use. 


If the deregistration process fails, you may need to reset the system and try again. To reset, unplug 
the power from the telephone base and plug it back in. 


5. 

CONTACTS (PHONEBOOK) 


You can store up to 200 entries in your list of contacts.  
For each contact, you can save a home, mobile and work number. Contact entries will automatically be 
copied to any other handsets you have registered to the base. Any change made on one handset will be 
updated on all other handsets. 


All handsets (if you have more than two handsets registered) and a list of the handsets registered to the 

base according to their default name/ number (e.g. Handset 2 or 3 etc.) or name if you have stored one. 


5.1. Add a New Contact entry 


1. From the idle screen, press <phonebook>. 


2. Select 

Options

Add contact 

is highlighted, press 

Select


3. Enter the new contact name using the keypad as per Character map below, then press <Calls> to select 3 

fields (

Home

Mobile

 or 

Work)

 and then enter the phone number.  

4. You can then press <Calls> and enter another number in other fields and then a work number if you want 

to. Select 

Save


when you’ve finished. 

The display will show 

Contact saved


Character map 


space 0 + £ $ # * 


1

&.,‘?!@1 


a b c 2 à á â ã æ ç 


3 d e f 3 è é ê ë 


4 g h i 4 î ï ì í 


5 j k l 5 £ 


6 m n o 6 ö ô ò ó õ ø ñ 


p q r s 7 $ ß 


t u v 8 ü ù ú û 


w x y z 9 


&.,‘?!“+=-;:#*£ 


$€¥%()@/_\<>~ 


 Changes text entry mode sentence case, upper or lower) 


5.2. View/Dial a contact 


1. From the idle screen, press <phonebook> to open your contact list. 
2. Press <Up> or <Calls> to scroll through and view the entries. 

3. To dial an entry, press <phone on> when the entry is highlighted. If entry has more than one number 
saved, you will need to highlight the number you want by pressing <Up> or <Calls> and then press 
<phone on> again. 


5.3. Edit a contact 


1. From the idle screen, press <phonebook> to open your contact list. 


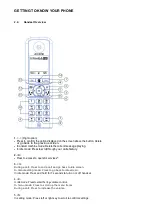
Содержание F890 Voice

Страница 1: ...Alcatel F890 Voice USER S GUIDE For more information you can download full user guide or get on line assistance www alcatel home com...

Страница 2: ...Do not overload wall outlets and extension cords as this can result in the risk of fire or electric shock 7 NEVER use your phone outdoors during a thunderstorm unplug the base from the telephone line...

Страница 3: ...o obstructions between the handset and base unit in an indoor environment place it away from electronic appliances such as televisions microwave ovens radios personal computers wireless devices or oth...

Страница 4: ...f polarity 3 Slide the battery compartment cover back 4 Put the handset on the base and charge for 15 hours before using the handset for the first time The handset will give a beep when it is properly...

Страница 5: ...not included is required 2 3 Connecting the Charger s for Duo Trio models Plug the power adapter into a mains socket If you have a Broadband line If you connect your telephone to a line with a broadb...

Страница 6: ...your callshistory 2 R Press to access to operator services 3 3 During a call Press to end a call and go back to idle screen In menu editing mode Press to go back to idle screen In idle mode Press and...

Страница 7: ...off the speakerphone In Idle mode predialing mode Call list Phonebook entry Press to make a call with speakerphone 12 12 In idle mode Press to access contacts phonebook 13 13 Left option Press to ent...

Страница 8: ...3 2 Base Station Overview...

Страница 9: ...ON where XX is number of messages in TAM memory 00 Steadily ON No voice messages in TAM XX Flash There are XX new voice messages received where XX is from 01 to 58 ZZ Steadily ON There are ZZ old voi...

Страница 10: ...ds 2 5 2 Idle mode Idle screen Show how much battery level Scrolls when charging Flashes when battery needs recharging On missed call s in the Calls list with number of calls displayed On answer machi...

Страница 11: ...dset will show Select country before Setup wizard In Select country window user can select below countries in native language by pressing Up or Calls After user selects the country the language will b...

Страница 12: ...s Save Saved will be displayed 4 1 3 Set Call Blocking 1 Then Turn on Call Blocking is shown Set Call blocking on now or turn it on later 2 After pressing Now or Later you are given the option to set...

Страница 13: ...call 4 5 Adjust Earpiece and Handsfree Volume There are 5 levels to choose from for each of earpiece and handsfree volume During a call Press up or Calls to select volume 1 5 The current setting is s...

Страница 14: ...on hold Select Switch to toggle between the two callers Press phone off to end the current call 4 11 Registration Your handset and base station are pre registered If for some reason the handset is no...

Страница 15: ...list of the handsets registered to the base according to their default name number e g Handset 2 or 3 etc or name if you have stored one 5 1 Add a New Contact entry 1 From the idle screen press phoneb...

Страница 16: ...selected contacts from all handsets is shown then select Yes to confirm All contacts deleted is shown 5 6 View the contact memory status 1 From the idle screen press phonebook then select Options 2 Pr...

Страница 17: ...then press Calls to highlight On or Off for the Confirmation tones and select Save 7 1 4 Change the handset display contrast 1 Select Menu press up or calls to select Settings 2 Press Select press Ca...

Страница 18: ...7 3 1 Set the base ring melody and volume 1 Select Menu press up or calls to select Settings 2 Press Select press Calls to highlight Base settings and press Select 3 Ringing is highlighted press Sele...

Страница 19: ...ettings settings is displayed while the reset takes place Once finished handset or base settings reset back to default is displayed 7 3 6 Clear the handset and base user data 1 Repeat step 1 to 2 of S...

Страница 20: ...ct Calls The most recent entry is at the top of the list will be displayed 2 Press Up or Calls to scroll through and view the list 3 When the entry you want is highlighted press phone on to dial 4 To...

Страница 21: ...to press phone on If it is not answered after 30 seconds the call will end automatically 10 2 Transfer a call You can transfer an external call to another handset registered to the base 1 During a cal...

Страница 22: ...v Confirm new PIN by entering new 4 digit PIN again then press OK Access PIN saved is shown You will need to enter your access PIN to access the Call control menu The default access PIN is 0000 When p...

Страница 23: ...your PIN or enter your PIN and select OK 3 Call Blocking is highlighted press Select or OK 4 Scroll to Announce msg press Select or OK 5 Press Select or OK on Record name and follow the voice prompt a...

Страница 24: ...bers to the answer phone Remember settings will be the same as the last mode you selected unless you save your own custom options Here s how to customize settings for certain types of call 1 In idle m...

Страница 25: ...s above from 1 to 3 and then 2 Scroll down using Calls to Allow numbers and press Select or OK 3 Add number is highlighted press Select or OK 4 Enter the telephone number you want to allow and press S...

Страница 26: ...s Select 2 Press Calls until Settings is highlighted press Select 3 Press Calls until Auto on off is highlighted press Select 4 Press Left or Right to select Off Once once Daily Mon Fri Sat Sun 5 Scro...

Страница 27: ...ghlight the outgoing message mode you want Ans record or Answer only and press Select 5 Use Left or Right to display the number of rings you want 2 10 rings or Time saver and select Save Saved will be...

Страница 28: ...time and date it was received If you have any old already listened to messages these will be played after your new messages 6 During playback you have the following options i Up or Calls to adjust th...

Страница 29: ...PIN first and then you will need to turn remote access on if you want to use this feature 12 10 1 Set the remote access PIN for the first time in case Call Control PIN is not yet set 1 Select Menu An...

Страница 30: ...on The network voltage is classified as hazard by the criteria of this standard Telephone Connection Appliance designed for connection to a TNV3 class telecommunications network voltage analogue telep...

Страница 31: ...incorrectly inserted Recharge or replace the battery Handset displays Searching Is the handset registered correctly to the base Check that the mains power is correctly connected Check that the handset...

Страница 32: ...separately and not mixed with the household waste The European Union has implemented a specific collection and recycling system for which producers are responsible This appliance has been designed an...

Страница 33: ...Menu Map...

Страница 34: ...L MALMAISON France www alcatel home com Alcatel is a trademark of Nokia used under license by ATLINKS Includes licensed QaltelTM technology QaltelTM is a trademark of Truecall Group Limited Alcatel F8...

Отзывы: