background image

Advanced Operation (TV) 

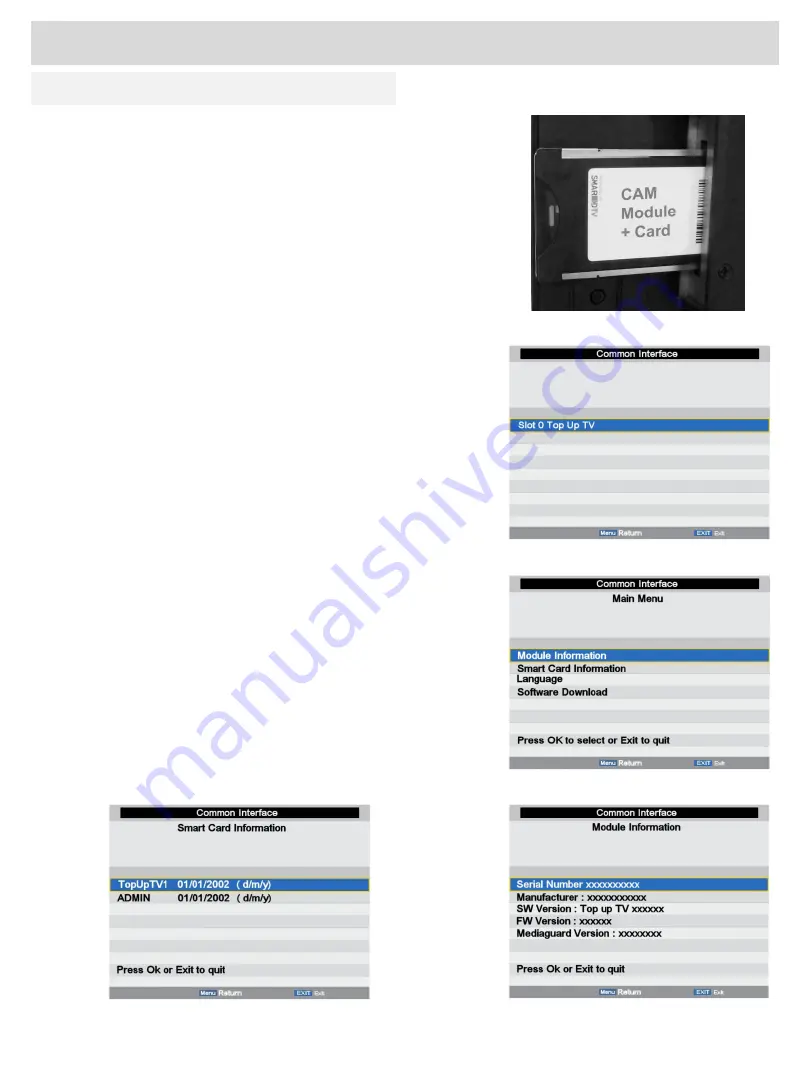
Fig 31 

C I Slot (Cam Module) 

Using a CAM (Conditional Access Module) (CI Slot). 

This feature allows the user to access digital terrestrial pay-per-
view channels. To use this facility a conditional access module 
(CAM) and viewing card need to be obtained by subscribing to a 
pay channel company. 

Before inserting the module ensure the TV is fully disconnected 
from the power source. 

Insert the CAM into the CI slot with the label facing the rear of 
the TV (Fig 31). A positive stop should be felt if correctly fitted. 
DO NOT force the module.  

To remove the CAM grasp the module firmly between the fingers 
and pull gently, do not twist. 

Reconnect the TV and switch on.  

Insert your pay-per-view card. 

Do NOT touch the gold 

contacts. 

Press the 

MENU

 button and select the 

Features Menu

. Select 

CI 

Info

 and press 

OK

.  

If everything is working normally you will see Fig 32, press 

OK

You should see the information as in Fig 33. 

To check the module is working use the 

▼ button to select 

Module Information

 and press 

OK

, you should now see the 

information as in Fig 34 

To check the card is working select 

Smart Card Information 

and 

press 

OK

. Again if everything is normal you will see a list as in 

Fig 35. If the information is not present, remove the card reverse 
and reinsert. This information should now be seen. 

Exit the menus by pressing 

MENU

 or 

EXIT

 and you are ready to 

view pay-per-view channels. 

To obtain the CAM and pay-per-view card, please contact the 
service provider. 

Fig 32 

Fig 33 

Fig 34 

Fig 35 

19 

For any help concerning setup and use of your TV please call the 

Customer Help Line: 0845 604 0105  

Содержание ASMKDVD22

Страница 1: ...contain important information which will help you get the best from your television and ensure safe and correct installation and operation For any help concerning setup and use of your TV please call...

Страница 2: ...me Installation 18 Teletext 18 CI Slot Cam Module 19 EPG Electronic Programme Guide 20 Digital Radio 21 DVD CD Operation 21 Playing a Disc 21 Advanced Features DVD 22 25 DVD CD Operation 22 Playing a...

Страница 3: ...bol for Class II double insulation Correct disposal of this Product Waste Electrical Electronic Equipment WEEE The crossed out wheelie bin is intended to show that this appliance must not be placed wi...

Страница 4: ...adaptor with wet hands Should moisture enter the TV disconnect from the supply and call the customer helpline Cleaning Use a soft dry cloth for stubborn stains use a soft moist cloth with a dilute mil...

Страница 5: ...e with Call us today 0845 604 0105 Call charges apply Lines open 9am 8pm Monday to Saturday and 10am 4pm Sunday Calls to Argos enquiry lines may attract a charge and set up fee from residential lines...

Страница 6: ...imer Child lock DVD CD CDR CD RW JPEG MPEG playback NTSC PAL playback according to disc content Multi audio up to 8 support according to disc content Multi subtitle up to 32 support according to disc...

Страница 7: ...to 4 hours 22 MENU Enters Setup menu 23 RECALL Recall previous channel viewed 24 SOURCE Select between inputs 25 VOL Volume increase 26 UP Navigation button 27 RIGHT Navigation button 28 CH Channel U...

Страница 8: ...any Argos store for safe disposal Getting Started 7 For any help concerning setup and use of your TV please call the Customer Help Line 0845 604 0105 Battery Safety Disposal To prevent injury do not b...

Страница 9: ...to standby Input Connections right side Input Connections under side CI SLOT Common Interface slot for optional Conditional Access Module Top Up TV TV TUNER TV coaxial antenna input HEADPHONES Stereo...

Страница 10: ...ed Select HDMI in the Source menu to view SCART This is the connector to choose for general quality picture and sound VCRs set top boxes and some older games consoles Select SCART in the Source Menu V...

Страница 11: ...6 Connect a suitable antenna or signal source and plug into a mains supply Use the POWER button on the remote control or the TV The screen will display the ALBA splash screen and then Fig 1 Press OK...

Страница 12: ...and switch to the appropriate source Fig 9 Channel List Fig 9 When tuning has been completed a list of received stations may be viewed by pressing OK To view the station use the buttons to select and...

Страница 13: ...saturation colour depth Tint Only available when using NTSC sourced material from the AV inputs Colour Temperature This sets the overall picture dynamics You may select from Standard Warm and Cool St...

Страница 14: ...lect the required channel Press the BLUE button and the selected channel will start to flash Use the buttons to select the required new location and press OK To restore the channel to its original loc...

Страница 15: ...ich favourite memory is required Use the buttons to select which favourite channel is required and press OK The TV will now switch to that programme To exit the menu press EXIT or wait for OSD to time...

Страница 16: ...ter the menu and buttons to select the feature required and then press OK Child Lock Fig 22 This feature allows parental control when absent Press to enter the menu and buttons to select the feature r...

Страница 17: ...rely If you lose this number there is a override password see Page 27 Troubleshooting Guide Fig 23 Fig 24 Fig 25 Language Fig 25 To select Language use the buttons and or OK OSD Language Use the butto...

Страница 18: ...Fig 27 Use the buttons to select Auto Scart and press OK to enter the menu This feature allows automatic SCART switching so that when an external appliance such as VCR is connected the TV will automat...

Страница 19: ...f there is a loss of signal or input a blue screen will be displayed If turned off a grey black screen will be shown default is On Fig 29 Reset to Default Use the buttons to select Reset to Default an...

Страница 20: ...card Do NOT touch the gold contacts Press the MENU button and select the Features Menu Select CI Info and press OK If everything is working normally you will see Fig 32 press OK You should see the in...

Страница 21: ...D button again To exit the EPG press EXIT NOTE Some pages may take longer to complete this is normal Electronic Programme Guide EPG Radio An EPG is provided by the programme providers To access press...

Страница 22: ...disc or the player Fig 38 Fig 39 Fig 40 Playing a disc Press the POWER button on the remote control or TV Press SOURCE on the remote control and using the buttons select DVD and press OK Hold the dis...

Страница 23: ...t All Press again to cancel CD Mode Press once to repeat once press again to repeat folder press again to revert back to normal A B To repeat a section of a DVD press A B to set the start point then a...

Страница 24: ...er the number into the OSD box and press OK PREV NEXT Use these buttons to jump forward or back quickly PLAY PAUSE Starts playback and pause STOP LIST Stops playback and returns to the previous file m...

Страница 25: ...your requirements a series of menus are provided With no disc in the player press the SETUP button on the remote control you will now see menu Fig 41 General Setup Page Use the buttons to select the...

Страница 26: ...ult is ADULT Password Select Password using the buttons Select Change using the button and OK Put in the old password You must then put in the new password twice and press OK Make a note of the new pa...

Страница 27: ...tes on unauthorised discs Certain DVDs may not play on this unit as they may have been purchased outside the geographic area or may be made for business purposes Titles chapters and tracks DVDs are di...

Страница 28: ...TV picture freezing and breaking up digital Poor antenna signal Have antenna signal checked If indoor antenna it may need an outdoor antenna Bright or dark dots on screen Pixel fault This is uncommon...

Страница 29: ...ART HDMI AV CVBS L R audio CAM Module Outputs SCART Headphones 3 5mm DVD Disc Region 12cm Region 2 OSD Language English Italiano Espanol Portugues Francais Deutsch Nederlands Gaelic Wall Mounting VESA...

Страница 30: ...8 mm set screws NOTE DO NOT use longer screws as the internal parts of the TV may be damaged Argos Ltd accepts no responsibility for any damage caused to or by incorrect mounting of the wall bracket 2...

Страница 31: ...s knobs or consumable items This product must be correctly installed and operated in accordance with the instructions contained in this manual It must be used solely for domestic purposes The guarante...

Страница 32: ...other technical issues you may need assistance with Call us today 0845 604 0105 Call charges apply Lines open 9am 8pm Monday to Saturday and 10am 4pm Sunday Calls to Argos enquiry lines may attract a...

Отзывы: