Page 13
CONNECTION TO A METAL PREFABRICATED CHIMNEY
When a metal prefabricated chimney is used, the manufacturers installation instructions must be followed
precisely. You must also purchase (from the same manufacturer) and install the ceiling support package or wall
pass-through and T section package, firestops (where needed), insulation shield, roof flashing, chimney cap,
etc. Maintain the proper clearance to the structure as recommended by the manufacturer. This clearance is
usually a minimum of 2 (50mm), although it may vary by manufacturer or for certain components.
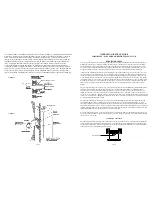
There are basically two methods of metal chimney installation. One method is to install the chimney inside the
residence through the ceiling and the roof (Figure 12). The other method is to install an exterior chimney that
runs up the outside of the residence (Figure 13). The components illustrated may not look exactly like the
system you purchase, but they demonstrate the basic components you will need for a proper and safe
installation.
The chimney must be the required height above the roof or other obstruction for safety and proper draft
operation. The chimney must be a minimum of 3 (914mm) higher than the highest point where it passes
through the roof, and at least 2 (610mm) higher than the highest part of the roof or structure that is within 10
(3048mm) of the chimney, measured horizontally (Figure 5).
REMEMBER
: Follow the manufacturers installation instructions and maintain the manufacturers specified
clearance distances.
FIGURE 12
I
NTERIOR
CHIMNEY
,
RUNNING
THROUGH
CEILING
AND
ROOF
Page 16
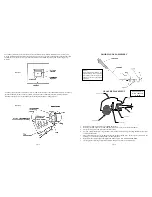
1. Place protective pad or stove pallet on floor.
2. Lay body of stove on its back on protective pad or pallet.
3. Slide pedestal over adapter on bottom of stove
4. Line up holes in sides of pedestal with holes in adapter.
5. Bolt pedestal into place, and tighten securely.
6. Carefully stand stove up and place in desired location.
7. Slip wooden decorative strips onto pedestal edges.
8. Open door of stove and check to insure firebricks and ceramic blankets are in
their proper locations (see page 22-23).
1. Place protective pad or stove pallet on floor.
2. Lay body of stove on its back on protective pad or pallet.
3. Screw leg base to bottom of stove.
4. Slip washers onto bolts, then bolt legs onto leg base.
5. Carefully stand stove up and place in desired location.
6. Use leveling bolts on legs to stabilize and level stove.
7. Open door of stove and check to insure firebricks and ceramic blankets are in
their proper locations (see page 22-23).
PEDESTAL MODEL
PEDESTAL/LEG KIT INSTALLATION
WARNING:
DO NOT OPERATE YOUR QUADRA-FIRE STOVE BEFORE FULLY ASSEMBLING ALL
COMPONENTS. BURNING YOUR STOVE WITHOUT A PEDESTAL OR LEG KIT ATTACHED WILL VOID
YOUR WARRANTY, AND COULD PRESENT A SERIOUS SAFETY HAZARD.
LEG MODEL
Pedestal
Leg base
Leg


