493686_a
13
Assembly
■
Do not exceed the maximum payload indicat-
ed in the technical data.
■
Only use the device on level ground
■
Speed increases the load on the device (dy-
namic influences). The maximum permissible
load capacity only applies to evenly distribut-
ed loads. The maximum permissible speed is
walking speed (max. 5 km/h). Avoid starting
up and braking rapidly as this subjects the
ramps to additional loads.
Maintenance, storage and transport
■
Repairs to the device must be carried out by
the manufacturer or by one of its customer
service centres.
■
Only carry the ramp parts individually and us-
ing both hands.
■
For safety reasons, replace any worn or dam-
aged parts. Only use original spare parts and
accessories.
■
Store the device in a place where it is not ex-
posed to the weather.
■
Only store the device lying down.
4
ASSEMBLY
WARNING! Danger if assembly is not
carried out completely!
Use of an incompletely
assembled device can result in serious injury.
■
Only use the device when it is fully assem-
bled!
■
Before using, check that all safety and pro-
tective devices are in place and functioning
correctly!
CAUTION! Risk of injury.
Sharp-edged
and moving appliance parts can lead to injury.
■
Always wear protective gloves during mainte-
nance, care and cleaning work.
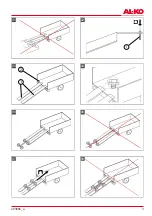
Installing the ramp parts on the trailer (02- 04)
1. Check the ramp for damage such as cracks
in the material.
2. Clear debris, dirt, ice and snow off of the
ramp.
3. Insert the securing bolts (02/1) in both ramp
parts (02/a).
4. Tighten the securing bolts using the nuts.
5. Position the ramp parts (03/1) on the trailer
(03/2) parallel to each other.
6. Insert the securing bolts through the holes in
the trailer (04).
5
OPERATION
5.1
Driving onto the ramp (05 - 08)
CAUTION! Risk of accident from incor-
rect positioning.
■
Ensure that the wheels of the vehicle are
centred before driving onto the ramp.
CAUTION! Risk of accident from driving
onto the ramp incorrectly.
■
Only drive onto the ramp with the vehicle
centred.
1. Position the vehicle straight and centred in
front of the ramp (05, 06).
2. Drive onto the ramp slowly and at an even
speed (07/a, 08).
5.2
Driving off of the ramp
1. Carry out the steps above in the reverse or-
der.
6
WORKING BEHAVIOUR AND
WORKING TECHNIQUE
■
Drive on the ramp straight, centred and at an
even speed.
■
Only use the ramp parts in pairs and set up
the two parts parallel to each other.
■
Only carry the ramp parts with both hands
and wearing the necessary personal protec-
tive equipment.
■
Before using the ramp, clear debris, dirt, ice
and snow off of the ramp.
■
Only use the ramp on firm, level ground.
■
Do not use the ramp as a bridge.
■
Do not exceed the maximum loading capacity
(see technical data).
■
The maximum load results from:
■
Total weight of the vehicle
■
Fuel
■
Weight of rider
■
Weight of grass in the tractor’s grass
catcher
■
Any attachments
Load distribution
The point load at the centre of the ramp is 1/3 of
the maximum load. The specified load pertains to
a 2-axle vehicle, where the weight was distribut-
ed with approx. 1/3 on one axle and approx. 2/3
on the other axle.
Содержание B 400-2,0
Страница 3: ...493686_a 3 01 02 1 a 03 1 2 04 05 06 07 a 08...
Страница 5: ...493686_a 5...
Страница 68: ...RU 68 B 400 2 0 S 400 2 0 CE 2 2 AL KO 01 2 3 3...
Страница 69: ...493686_a 69 5 4 02 04 1 2 3 02 1 02 a 4 5 03 1 03 2 6 04...
Страница 70: ...RU 70 B 400 2 0 S 400 2 0 5 5 1 05 08 1 05 06 2 07 a 08 5 2 1 6 1 3 2 1 3 2 3 7 1 2 3 8 3 68 9 1 2 3 4 10...
Страница 71: ...493686_a 71 11 AL KO www al ko com service contacts 12 xxxxxx x...
Страница 73: ...493686_a 73 CE 2 2 AL KO 01 2 3 3...
Страница 74: ...UA 74 B 400 2 0 S 400 2 0 5 4 02 04 1 2 3 02 1 02 a 4 5 03 1 03 2 6 04 5 5 1 05 08 1 05 06 2 07 a 08...
Страница 75: ...493686_a 75 5 2 1 6 1 3 2 1 3 2 3 7 1 2 3 8 p 3 73 9 1 2 3 4 10 11 AL KO www al ko com service contacts...
Страница 76: ...UA 76 B 400 2 0 S 400 2 0 12 xxxxxx x...
Страница 77: ...493686_a 77...
Страница 78: ...78 B 400 2 0 S 400 2 0...
Страница 79: ...493686_a 79...


