background image


47

Safety

Do not operate the appliance
if you are under the influence
of alcohol, drugs or medica-
tion.

3.4.2 Safety of persons and

animals

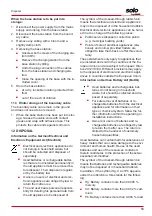
In areas accessible to the
public, affix warning informa-
tion with the following content
around the mowing area:

IMPORTANT!
Automatic lawn mower!

Do not approach the appli-
ance!
Supervise children.

Make sure that children are
not present in the vicinity of
the appliance when it is oper-
ating or climb onto the appli-
ance and do not play with the
appliance.

Sitting on the appliance and
reaching into the cutting blade
is forbidden.

Keep body and clothes away
from the cutting unit.

3.4.3 Appliance safety

Before working, make sure
that there are no objects (e.g.
branches, glass or metal piec-
es, and items of clothing,
stones, garden furniture, gar-
den utensils or toys) in the
work area of the appliance.

They can damage the cutting
blade of the appliance or can
be damaged by the appliance.

Only use the appliance under
the following conditions:

The appliance is not soiled.

The appliance shows no
damage or wear.

All controls function proper-
ly.

The base station and pow-
er supply as well as their
electrical supply cables are
undamaged and function
properly.

Always replace defective
parts with original spare parts
from the manufacturer.

Have the appliance repaired if
it has been damaged.

The user of the appliance is
responsible for accidents of
the appliance involving other
persons or their property.

3.4.4 Electrical safety

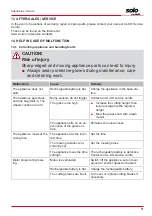
Never operate the appliance
when a lawn sprinkler is oper-
ating on the mowing area at
the same time.

Do not spray the appliance
with water.

Do not open the appliance.

Содержание 127547

Страница 1: ...BA Robolinho Master Deckblatt Li BETRIEBSANLEITUNG ROBOTER RASENM HER Robolinho 700E Robolinho 700I 457897_a 07 2018 DE GB...

Страница 2: ...rzeichnis Inhaltsverzeichnis Deutsch 6 English 37 2017 AL KO KOBER GROUP K tz Germany This documentation or excerpts therefrom may not be reproduced or disclosed to third parties without the express p...

Страница 3: ...3 01 02 X0 X2 X3 X1 X0 X2 X3 X4 X5 X1 1 2 m 15 cm 30 cm 15 cm 30 cm 0 cm 60 cm HF NF HF NF a c f e g h d 30 cm a b c d f e g h i i 15 cm f b 1 1...

Страница 4: ...4 Robolinho 700E 700I 05 06 07 08 09 15 cm 15 cm 15 cm 15 cm ca 10 cm 10 1 3 2 1 2 3 a b 1 2 3 15 cm 1 m 1 m 03 1 2 3 6 7 4 a b 5 1 04 1 2 4 3 5 6 A B 4 5 5...

Страница 5: ...5 600 x 400 x 290 mm max 700 m2 45 24 220 mm 25 55 mm IPX1 max 3400 min 1 60 dB A 9 1 kg 18 V 2 25 Ah 40 5 Wh 230 V AC 36 V DC 16 A 1 67 A 50 Hz 60 W...

Страница 6: ...3 Sicherheits und Schutzeinrichtungen 15 3 3 1 PIN und PUK Eingabe 15 3 3 2 Sensoren 16 3 4 Sicherheitshinweise 17 3 4 1 Bediener 17 3 4 2 Sicherheit von Personen und Tieren 17 3 4 3 Ger tesicherheit...

Страница 7: ...en 24 7 4 3 M hzeiten einstellen 25 7 5 Randm hen bei manuellem Start 25 7 6 inTOUCH 25 7 7 Nebenfl chenm hen einstellen 26 7 8 Displaykontrast einstellen 26 7 9 Einstellungsschutz 26 7 10 Neu kalibri...

Страница 8: ...tung an andere Personen weiter Lesen und beachten Sie die Sicherheits und Warnhinweise in dieser Betriebsanleitung 1 1 Zeichenerkl rungen und Signalw rter GEFAHR Zeigt eine unmittelbar ge f hrliche Si...

Страница 9: ...1 Roboter Rasenm her 2 Kurzanleitung 3 Betriebsanleitung 4 Rasenn gel 5 Netzteil 6 Basisstation inkl Schraubn gel 4 Stk und Schraubschl ssel 7 Begrenzungskabel nicht im Lieferumfang enthalten 2 2 Rob...

Страница 10: ...n chsten Tag wieder automatisch zur eingestellten M hzeit 2 Regensensor Registriert ob es regnet siehe Kapitel 7 3 Regensensor einstel len Seite 24 3 Display Zeigt den aktuellen Betriebszu stand des...

Страница 11: ...uptmen 2 Men punkte im Men Es werden immer nur zwei Men punkte angezeigt hier Einstellungen und Informatio nen Mit und k nnen weitere Men punkte angezeigt werden 3 Funktionen f r den ausgew hlten Men...

Страница 12: ...ktivieren Seite 23 inTOUCH siehe Kapitel 7 6 inTOUCH Seite 25 Randm hen siehe Kapitel 7 5 Randm hen bei manuellem Start Seite 25 Nebenfl che aktiv inaktiv siehe Kapitel 7 7 Nebenfl chen m hen einstell...

Страница 13: ...Ak kus vermieden Verk rzt sich die Betriebszeit des Akkus trotz Vollaufladung wesentlich ist der Akku ber einen AL KO Fachh ndler Techniker oder Servicepartner durch einen neuen Original Akku auszutau...

Страница 14: ...nnogy SmartHome Gateway verbunden und die AL KO inTOUCH App oder die innogy SmartHome App nur f r 700I auf ei nem mobilen Ger t installiert werden HINWEIS Das verwendete mobile Ger t ben tigt eine Fun...

Страница 15: ...nicht zur Ver wendung in ffentlichen Anla gen Parks Sportst tten sowie in der Land und Forstwirtschaft geeignet 3 3 Sicherheits und Schutzeinrichtungen WARNUNG Verletzungsgefahr Defekte und au er Kra...

Страница 16: ...die bei Kontakt mit Hindernissen daf r sorgen dass die Fahrtrichtung ge ndert wird Beim Ansto en an ein Hindernis wird das Geh useoberteil leicht verschoben und der Sto sensor ausgel st Neigungssenso...

Страница 17: ...it dem Ger t spielen Das Sitzen auf dem Ger t und das Hineingreifen in die Schneidmesser ist verboten Halten Sie K rper und Klei dung vom Schneidwerk fern 3 4 3 Ger tesicherheit Stellen Sie vor der Ar...

Страница 18: ...en die nen Hauptfl che und Nebenfl che n 01 Hauptfl che 01 HF Ist die Rasenfl che in der sich die Basisstation befindet und die vom Ger t ganzfl chig automatisch gem ht werden kann Nebenfl che 01 NF I...

Страница 19: ...ie ren und in die Klemme 03 7 stecken 4 Klemme schlie en 5 Begrenzungskabel durch die Zugentlas tung 03 5 mit Kabelreserve aus dem Kabel schacht f hren HINWEIS Mit der Kabelreserve k nnen auch sp ter...

Страница 20: ...egen 05 Wenn die Terrassen oder Wegkante h her als die Rasenfl che ist ein Abstand von mindestens 15 cm einzuhalten Ist die Terrassen oder Weg kante auf gleicher H he wie die Rasenfl che kann das Kabe...

Страница 21: ...enen und vor direkter Sonneneinstrahlung gesch tzten Ort in ausreichender N he zur Basisstation 04 1 platzieren 2 Niederspannungskabel des Netzteils 04 5 und Kabel der Basisstation 04 6 miteinan der v...

Страница 22: ...u nacheinander mit oder eine Ziffer ausw hlen und jeweils mit bernehmen Die Grundeinstellungen sind abgeschlossen Der Status Unkalibriert Start Taste dr cken wird angezeigt 5 3 Schnitth he einstellen...

Страница 23: ...terbrochen auf dem Ger t dr cken Das Ger t wird abgeschaltet HINWEIS In Gefahrensituationen kann das Ger t mit der STOPP Taste 08 2 gestoppt werden 6 3 Nebenfl che m hen 01 NF 1 Ger t anheben und von...

Страница 24: ...Startpunkte einstellen Startpunkte lernen 1 Ger t in die Basisstation stellen 2 Mit Ger t einschalten 3 Mit Hauptmen aufrufen 4 oder Programme 5 oder Einstiegspunkte 6 oder Startpunkte lernen 7 oder...

Страница 25: ...00 10 00 Uhr mit automatisch wechselndem Startpunkt 0 9 z B R 16 00 18 00 1 Das Ger t startet um 16 00 Uhr mit dem Randm hen R und f hrt am gesamten Begrenzungskabel entlang Danach be ginnt das Fl che...

Страница 26: ...3 Kalibrierfahrt durchf hren siehe Kapitel 5 4 Automatische Kalibrierfahrt durchf hren Seite 22 7 11 Auf Werkseinstellungen zur cksetzen Die Werkseinstellungen des Ger ts k nnen z B vor einem Verkauf...

Страница 27: ...nicht in die Schneidmesser geraten Einmal in der Woche durchf hren 1 Mit Ger t ausschalten 2 Geh useoberfl che mit einem Handfeger ei ner B rste einem feuchten Lappen oder ei nem feinen Schwamm abwisc...

Страница 28: ...estelle austau schen lassen 9 3 Schneidmesser wechseln VORSICHT Verletzungsgefahr durch Schneidmesser Die Schneidmesser sind sehr scharf und k nnen Schnittverletzungen her vorrufen Tragen Sie Schutzha...

Страница 29: ...t ber den Winter bzw wenn es voraus sichtlich l nger als 30 Tage au er Betrieb ist ein lagern 1 Akku vollst ndig aufladen siehe Kapitel 5 1 Akku laden 08 Seite 21 2 Ger t gr ndlich reinigen siehe Kap...

Страница 30: ...ktro und Elektronik Altger ten gelten Hinweise zum Batteriegesetz BattG Altbatterien und akkus geh ren nicht in den Hausm ll sondern sind einer getrennten Erfassung bzw Entsorgung zuzuf hren Zur siche...

Страница 31: ...laden Ger t f hrt sich fest und gr bt sich ein Die R der drehen sich weiter Sto sensoren l sen nicht aus AL KO Servicestelle aufsuchen Gras ist zu hoch Schnitth he erh hen danach zur gew nschten H he...

Страница 32: ...e aufsuchen Akku l sst sich nicht laden bzw niedrige Akkuspan nung Ladekontakte der Basis station sind verschmutzt Kontaktfl chen am Ger t sind verschmutzt Ladekontakte und Kontaktfl chen reini gen Ba...

Страница 33: ...f eingegraben LEDs an der Basisstation kontrollie ren Stromversorgung der Basisstation kontrollieren Netzteil aus und ein stecken Begrenzungskabel auf die vorge schriebene H he anheben evtl di rekt au...

Страница 34: ...Beim Aufladen kein Kontakt an den Ladekontakten Ladekontakte reinigen Ger t in die Basisstation stellen und pr fen ob die Ladekontakte anlie gen Ladekontakte von Servicestelle des Herstellers pr fen u...

Страница 35: ...umper de flected CN120 L Bumper de flected Ger t ist auf ein Hindernis aufgefahren und kann sich nicht befreien Hindernis entfernen CN128 Recov Impos sible Ger t ist auf ein Hindernis aufgefahren und...

Страница 36: ...n Endabnehmer Ma gebend ist das Datum auf dem Kaufbeleg Wenden Sie sich bitte mit dieser Erkl rung und dem Original Kaufbeleg an Ihren H ndler oder die n chste autorisierte Kundendienststelle Die gese...

Страница 37: ...ety and protective devices 45 3 3 1 PIN and PUK input 45 3 3 2 Sensors 46 3 4 Safety instructions 46 3 4 1 Operator 46 3 4 2 Safety of persons and animals 47 3 4 3 Appliance safety 47 3 4 4 Electrical...

Страница 38: ...ral 54 7 4 2 Setting the start points 54 7 4 3 Setting the mowing times 54 7 5 Edge mowing with a manual start 55 7 6 inTOUCH 55 7 7 Setting the secondary area mowing 55 7 8 Setting the display contra...

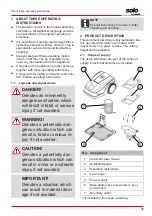
Страница 39: ...which will result in fatal or serious injury if not avoided WARNING Denotes a potentially dan gerous situation which can result in fatal or serious in jury if not avoided CAUTION Denotes a potentiall...

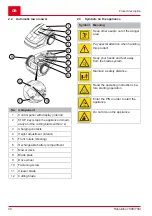
Страница 40: ...ers steering 6 Rechargeable battery compartment 7 Mower deck 8 Blade plate 9 Drive wheel 10 Fastening screw 11 Clearer blade 12 Cutting blade 2 3 Symbols on the appliance Symbol Meaning Keep other peo...

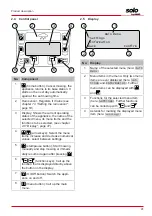
Страница 41: ...ase numerical values select between settings 5 start pause button Start mowing manually and stop mowing or immedi ately resume it again after pressing 6 function keys Call up the function that is disp...

Страница 42: ...the button tones page 53 inTOUCH see chapter 7 6 inTOUCH page 55 Margin mowing see chapter 7 5 Edge mowing with a manual start page 55 Sub zone active disabled see chapter 7 7 Setting the second ary...

Страница 43: ...rable dam age to the battery If the operating time of the battery is reduced in spite of it being fully charged have the bat tery replaced by a new genuine battery This task should be carried out by a...

Страница 44: ...teway via Lem onbeat and the AL KO inTOUCH app or the inno gy SmartHome app only for 700l must be in stalled on a mobile appliance NOTE The mobile appliance being used re quires a radio connection in...

Страница 45: ...r use in public gardens parks sports stadiums and in agricul ture and forestry 3 3 Safety and protective devices WARNING Risk of injury Defective and disabled safety and protective de vices can lead t...

Страница 46: ...rection of travel sideways If an upward or downward slope or a laterally inclined angle of 24 45 is reached in the di rection of travel the appliance is turned or the appliance changes its direction o...

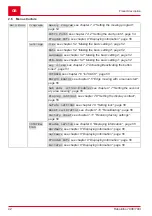
Страница 47: ...or metal piec es and items of clothing stones garden furniture gar den utensils or toys in the work area of the appliance They can damage the cutting blade of the appliance or can be damaged by the ap...

Страница 48: ...start points 01 X0 01 X3 At the specified mowing time the appliance moves along the boundary cable to the specified start point and begins to mow there The start points can be used to specify which a...

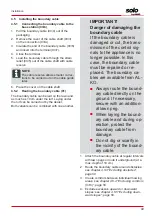
Страница 49: ...d with one another IMPORTANT Danger of damaging the boundary cable If the boundary cable is damaged or cut the trans mission of the control sig nals to the appliance is no longer possible In this case...

Страница 50: ...t lay them parallel 01 e Routing the boundary cable around corners 06 For inwards going corners 06 a Route the boundary cable diagonally to avoid the appli ance becoming caught in the corner For outwa...

Страница 51: ...t side of the charging station 09 1 light If not Disconnect the mains plug Check that all plug connectors of the power source and the boundary cable are positioned correctly and check for damage Statu...

Страница 52: ...se 10 Decrease the cutting height i e lawn height Turn the rotary knob 10 2 anti clockwise 10 3 Close the cover 5 4 Carrying out an automatic calibration movement Place the appliance at the starting p...

Страница 53: ...tches off or mows until the rechargeable battery is flat After mowing the secondary area place the ap pliance in the base station again by hand 7 SETTINGS 7 1 Calling up the setting General 1 Call up...

Страница 54: ...s reached the required start point The start point is stored 8 or Set entry point 1 if no start point has been specified during the teaching in movement If no start point has been specified here the s...

Страница 55: ...ges setting and continue to the next setting 3 or Save Save all changed set tings of the menu item 7 5 Edge mowing with a manual start For a manual start the setting can be made here that the applianc...

Страница 56: ...menu item with or and ac cept with Note The menu items are described in the following sections 4 Return to the main menu with Blades service Shows in how many operating hours a blade ser vice is requi...

Страница 57: ...ce defective parts by original spare parts from AL KO or have them replaced by an AL KO service centre Check the rollers can move freely Once a week carry out the following 1 Carefully remove grass re...

Страница 58: ...learer blades do not need to be replaced In case of stubborn dirt that cannot be removed with a brush the blade plate must be replaced because an imbalance can lead to increased noise levels greater w...

Страница 59: ...y not be disposed of in the household rubbish Electrical and electronic appliances can be hand ed in at no charge at the following places Public service disposal or collection points e g municipal bui...

Страница 60: ...l points of the common take back system for the used batteries of appliances Disposal point of the manufacturer if not a member of the common take back system These statements apply only to rechargeab...

Страница 61: ...in The wheels continue to turn Bump sensors do not trigger Contact an AL KO service centre The grass is too high Increase the cutting height then lower in stages to the required height Mow the grass s...

Страница 62: ...g blade or in the cutting blade drive Clean the mower deck Contact an AL KO service centre Rechargeable battery can not be charged or low bat tery voltage The charging contacts of the base station are...

Страница 63: ...too weak Check the LEDs on the base sta tion Check the power source of the base station Disconnect and reconnect the power supply Check the boundary cable for dam age Repair the defective cable CN008...

Страница 64: ...ring the calibration The appliance has bumped into an obstacle Remove the obstacle CN038 Battery The rechargeable battery is flat Loop of the boundary cable is too long too many islands Correct the lo...

Страница 65: ...C Switch off the appliance and let it cool down If the fault reoccurs Have the appli ance checked by a service centre of the manufacturer CN119 R Bumper de flected CN120 L Bumper de flected The appli...

Страница 66: ...date on the proof of pur chase is decisive In the event of a guarantee claim please take this guarantee declaration and the original proof of purchase and contact your dealer or the nearest authorise...

Страница 67: ...67...
Страница 68: ...AL KO GER TE GmbH Head Quarter Ichenhauser Str 14 89359 K tz Deutschland Telefon 49 8221 203 0 Telefax 49 8221 203 8199 www al ko com AL KO Service www al ko com service contacts...

Отзывы: