AL-KO 119589 Скачать руководство пользователя страница 14

en

Translation of the original assembly instructions

14

476240_c

TRANSLATION OF THE ORIGINAL

ASSEMBLY INSTRUCTIONS

Contents

About this handbook........................................ 14
Unpacking the lawn tractor.............................. 14
Lawn tractor assembly..................................... 14
Mounting the rear wheels (20'')........................15
Mounting the steering wheel............................15
Mounting the operator's seat........................... 15
Mounting the cruise control lever.....................15
Hooking in the fill-level signal transmitter of the

grass catcher......................................... 15

Assembling grass catchers.............................. 15
Setting the catcher holder................................16
Installing the starter battery..............................16
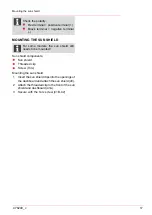
Mounting the sun shield...................................17

ABOUT THIS HANDBOOK

Before  assembling  the  lawn  tractor,  read

through these assembly instructions carefully

and perform all of the assembly work consci-

entiously. Please ask a dealer or the manu-

facturer if you have any questions or doubts

about assembly.
Comply with the lawn tractor's instructions for

use regarding operation of the lawn tractor.
Keep the assembly instructions to refer to du-

ring use of the product, and pass them on to

subsequent users.
The lawn tractors are supplied with different

levels of equipment. Please note that the il-

lustrations may differ somewhat from the ori-

ginal. Please contact a specialist workshop or

the manufacturer if you encounter difficulties

in following the descriptions.

Explanation of symbols

WARNING!

Observe  this  danger  note  in  order  to

avoid serious personal injuries.

CAUTION!

Following these warning instructions can

help to avoid personal injuries and/or da-

mage to property.

ADVICE

Special  instructions  for  ease  of  under-

standing and regarding handling.

UNPACKING THE LAWN TRACTOR

The lawn tractor is supplied on a sturdy wooden

pallet.
Place the pallet on level ground in order to unpack

the tractor.

1 Remove all accessory kits and the packaging

materials.

2 Remove the lengths of wood and the lath on

the front. (20'' tyres only)

3 Remove the two wood blocks.
4 Remove the nails and screws from the board,

or knock them flat using a hammer so that the

tyres cannot be damaged.

5 Push the tractor forwards off the pallet.
6 Secure  the  tractor  to  prevent  it  from  rolling

away. (e.g. with chocks)

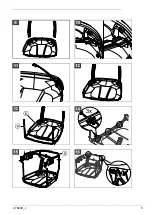
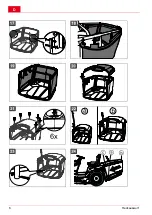
LAWN TRACTOR ASSEMBLY

WARNING!
Danger if assembly is not carried out

completely!

Do not operate the tractor (even for

a  test)  before  it  has  been  fully  as-

sembled!
Carry out all the work described in

the assembly instructions conscien-

tiously!
If you are uncertain about anything,

ask a specialist to confirm that the

assembly has been carried out cor-

rectly before the machine is started

up.

The following assembly jobs must have been car-

ried out correctly before the lawnmower can be

taken into operation as described in the operating

instructions for the tractor:

Mounting of the wheels
Mounting of the steering wheel
Mounting of the operator's seat
Assembly of the grass catcher
Sun shield installation
Mounting of the sensor rollers on the mower

mechanism
Connect the battery
Setting the catcher holding arms

Содержание 119589

Страница 1: ...476240_c I 12 2014 Rasentraktor Montageanleitung Heckauswurf...

Страница 2: ...D 2 Heckauswurf...

Страница 3: ...montagehandleiding 26 CS P eklad origin ln ho mont n ho n vodu 30 DA Original monteringsvejledning 34 LV Ori in l salik anas instrukcija 38 SK Preklad origin lneho n vodu na pou itie 42 PL T umaczenie...

Страница 4: ...D 4 Heckauswurf...

Страница 5: ...476240_c 5...

Страница 6: ...D 6 Heckauswurf...

Страница 7: ...476240_c 7...

Страница 8: ...D 8 Heckauswurf...

Страница 9: ...476240_c 9...

Страница 10: ...gen dieser Warnhinweise kann Personen und oder Sachsch den vermeiden HINWEIS Spezielle Hinweise zur besseren Ver st ndlichkeit und Handhabung RASENTRAKTOR AUSPACKEN Der Rasentraktor wird auf einer sol...

Страница 11: ...schieben 1 Beide Hinterr der berpr fen ob die mitge lieferten Passfedern richtig montiert sind 2 Gegebenenfalls richtig montieren LENKRAD MONTIEREN 1 Stellen Sie die Vorderr der gerade in Fahrt richtu...

Страница 12: ...llen und ziehen die unteren Sechs kantschrauben an beiden Haltearmen wieder fest 32 5 Stellen Sie im 90 Winkel von der R ckwand ausgehend zum Verbindungsstab der Box haltearme ein Abstand von 189 mm e...

Страница 13: ...den An schlusspolen der Batterie 38 HINWEIS Beachten Sie die Polarit t Rote Klemme Pluspol Schwarze Klemme Minuspol SONNENBLENDE MONTIEREN HINWEIS Bei einigen Modellen muss die Sonnen blende noch mon...

Страница 14: ...juries CAUTION Following these warning instructions can help to avoid personal injuries and or da mage to property ADVICE Special instructions for ease of under standing and regarding handling UNPACKI...

Страница 15: ...to the strai ght ahead position 2 Place the clamping sleeve 4a on the stee ring column 3 Place the steering wheel 4b on the clamping sleeve Note Make sure the position is correct with the spoke pointi...

Страница 16: ...6 Re tighten the upper hexagon bolts of the cat cher holding arms to 40 50 Nm 7 Re hook in the grass catcher 35 8 Check the spacing between the grass catcher and the lawn tractor Re adjust if necessa...

Страница 17: ...DVICE For some models the sun shield still needs to be mounted Sun shield components Sun shield Threaded clip Screw Torx Mounting the sun shield 1 Insert the sun shield clips into the openings of the...

Страница 18: ...telier sp cia lis ou au fabricant L gende AVERTISSEMENT Respectez les indications concernant les dangers pour viter des dommages cor porels s rieux ATTENTION Respecter la lettre ces instructions de s...

Страница 19: ...e de frein 2 Retirer les cales 3 Pousser la tondeuse manuellement Si les roues arri re sont mont es correcte ment il est impossible de pousser la tonde use manuellement Si toutefois il est possible de...

Страница 20: ...distance entre la tondeuse et le bac doit tre nulle 27 28 1 Mesurer la distance droite et gauche entre le bac et la tondeuse Si la distance est 0 mm il faut replacer le bac afin d ajuster la distance...

Страница 21: ...SE EN GARDE Risque de court circuit Afin d viter un court circuit veuillez toujours raccorder d abord le c ble n gatif la borne de batterie Lorsque vous travaillez sur la batte rie retirer toujours la...

Страница 22: ...olo ATTENZIONE La precisa osservanza delle avvertenze pu impedire danni a persone e o cose ADVICE Indicazioni speciali volte a migliorare la comprensione e l uso APERTURA IMBALLO DEL TRATTORINO Il tra...

Страница 23: ...te 1 verificare che le chiavette in dotazione siano state montate correttamente su entrambe le ruote posteriori 2 Se necessario montarle correttamente MONTAGGIO VOLANTE 1 Raddrizzare le ruote anterior...

Страница 24: ...rso l alto e stringere nuovamente le viti a testa esago nale inferiori in corrispondenza dei due bracci di supporto 32 5 Definire una distanza di 189 mm ad un an golo di 90 partendo dalla parete poste...

Страница 25: ...e il cavo della batteria con i poli di col legamento della batteria 38 ADVICE Attenzione alla polarit morsetto rosso polo positivo morsetto nero polo negativo MONTARE IL PARASOLE ADVICE Per alcuni mod...

Страница 26: ...re schade aan personen te voorko men LET OP Het nauwkeurig opvolgen van deze waarschuwingsinstructies kan schade aan personen of zaken voorkomen ADVICE Speciale aanwijzingen voor meer duide lijkheid e...

Страница 27: ...geleverde afstelveren correct gemonteerd zijn 2 Monteer deze eventueel correct HET STUUR MONTEREN 1 Zet de voorwielen recht in de rijrichting 2 Plaats de spanhuls 4a op de stuurkolom 3 Plaats het stuu...

Страница 28: ...aan beide armen weer vast 32 5 Stel in een hoek van 90 vertrekkend van de achterwand tot aan de verbindingsstang van de armen van de box een afstand in van 189 mm 33 6 Trek de bovenste zeskantbouten...

Страница 29: ...j 38 ADVICE Let op de polariteit rode klem pluspool zwarte klem minpool MONTEER HET ZONNESCHERM ADVICE Bij enkele modellen moet het zon nescherm nog gemonteerd worden Onderdelen van het zonnescherm Zo...

Страница 30: ...ny abyste p ede li v n m poran n m POZOR P esn dodr ov n t chto v stra n ch upozorn n m e p edej t zran n m a nebo v cn m kod m ADVICE Speci ln pokyny pro lep srozumitel nost a manipulaci VYBALEN ZAHR...

Страница 31: ...o do sm ru j zdy 2 Na sloupek zen osa te up nac pouzdro 4a 3 Na up nac pouzdro nasa te volant 4b Upozorn n Pozor na polohu paprsek vola ntu m m it k idi i 4 Nasa te krou ek 4c a tal ovou pru inu 4d 5...

Страница 32: ...aktorem P padn ji nastavte 36 MONT STARTOVAC BATERIE Obsahem dod vky zahradn ho traktoru je starto vac baterie Dr k startovac baterie se nach z pod krytem motoru Baterie je v z sad nabit z v robn ho z...

Страница 33: ...y slune n clona z vitov chyt roub Torx Mont slune n clony 1 chyty slune n clony zastr te do vybr n p strojov desky a nasa te slune n clonu 40 2 Z vitov chyt vp edu nasa te na slune n clonu a p strojov...

Страница 34: ...advarsler n je kan person og eller tingsskader undg s ADVICE Specielle anvisninger der g r dig i stand til at forst og h ndtere maskinen bedre UDPAKNING AF PL NETRAKTOREN Pl netraktoren leveres p en s...

Страница 35: ...ET 1 Tag akselsikringen 5a til s det 5c af 2 Tr k akslen 5b ud 3 S t s de 5c og aksel sammen og monter akselsikringen 5a igen 4 Tilslut s dekontakten 6a 5 Fastg r kablet 6b til s dekontakten 6a med ka...

Страница 36: ...startbatteri Holderen til startbatteriet findes under motorhjel men Startbatteriet er altid opladet fra fabrik ADVARSEL Fare ved forkert h ndtering af start batteriet F lg venligst f lgende punkter f...

Страница 37: ...men 476240_c 37 Monter solsk rmen 1 Stik clipsene p solsk rmen ind i udsparin gerne p apparattavlen og s t solsk rmen p 40 2 S t gevindclipsen foran p solsk rm og ap parattavle 41A 3 Skru fast med tor...

Страница 38: ...Sekojiet iem br din jumiem lai izvair tos no savainojumu g anas UZMAN BU o br din juma nor d jumu prec za ie v ro ana var pasarg t no traumu g a nas un vai materi lajiem zaud jumiem ADVICE pa i nor d...

Страница 39: ...jos rite us un p rliecinieties ka komplekt cij iek autie prizmatiskie ierievji ir pareizi mont ti 2 Ja nepiecie ams mont jiet tos pareizi ST RES RATA MONT A 1 Novietojiet priek jos rite us paral li br...

Страница 40: ...ra skr ves pie abiem tvertnes turek a ple ciem 31 4 Atbilsto i izm r tajam att lumam p rvietojiet turek a plecus kreisaj un labaj pus uz au g u un atk rtoti pievelciet apak j s se st ra skr ves pie ab...

Страница 41: ...lu piesl gviet m 38 ADVICE Iev rojiet polarit ti Sarkanais piesl gs pozit vais pols Melnais piesl gs negat vais pols SAULES AIZSARGA MONT ANA ADVICE Da iem mode iem saules aizsargs ir j mont atsevi i...

Страница 42: ...POZOR Presn dodr iavanie t chto v stra n ch pokynov m e zabr ni zraneniam os b a alebo vecn m kod m ADVICE peci lne pokyny pre lep iu zrozumite nos a manipul ciu VYBALENIE Z HRADN HO TRAKTORA Z hradn...

Страница 43: ...VOLANTU 1 Nastavi predn koles v smere jazdy 2 Up nacie puzdro 4a na st piku riadenia 3 Volant nastavte 4b na up nacom puzdre Pozn mka Uve te stanovisko e hovoril s vodi om 4 Vlo te disk 4c a podlo ku...

Страница 44: ...hla vou na obidvoch pr dr n ch ramen ch znova pevne utiahnite 32 5 Nastavte v 90 uhle vych dzaj c od zad nej steny k spojovacej ty i pr dr n ch ramien ko a vzdialenos 189 mm 33 6 Horn skrutky so es h...

Страница 45: ...Zoh adnite polaritu erven svorka plusov p l ierna svorka m nusov p l MONT SLNE NEJ CLONY ADVICE Pri niektor ch modeloch sa mus e te namontova slne n clona S asti slne nej clony Slne n clona Z vitov k...

Страница 46: ...lub producentem Obja nienie symboli OSTRZE ENIE Nale y stosowa si do tego ostrze enia w celu unikni cia powa nych obra e u ludzi UWAGA cis e stosowanie si do tych ostrze e pomo e unikn szk d osobowych...

Страница 47: ...hamulca 2 Usun kliny 3 R cznie przemie ci traktorek Je li ko a tylne s zamontowane prawid owo nie mo na przesun traktorka r cznie Je li traktorek mo na przemie ci r cznie 1 Sprawdzi na obu ko ach tyl...

Страница 48: ...Zmierzy odst p pomi dzy koszem na traw a traktorkiem ogrodowym po lewej i prawej stronie Je li odst p jest 0 mm nale y wyregulowa ra miona mocuj cych kosz stosownie do zmierzo nego odst pu 2 Zdj kosz...

Страница 49: ...o zwiera 1 Wyj kluczyk zap onowy 7b 2 Otworzy pokryw silnika PRZESTROGA Ryzyko zwarcia W celu unikni cia zwarcia od aku mulatora nale y zawsze od cza kabel minusowy Przed pracami przy akumulatorze nal...

Отзывы: