background image

16 


g.


Open top cover. 

h.


Mount Rotary Blade Assembly. 

i.


Put the Top Cover back on.  

j.


Switch Power on and check for abnormal sound.  


3)


Settling Paper Jams

 – Paper Jamming with Paper Feeding Tray 

a.


Turn off power.  

b.


Take out paper stack on the tray. 

c.


Pull jammed paper out. 

d.


Turn on the power and press [Start] key. The paper feeding motor will start.  Check for abnormal 

sound. 


4)


Long Blade Jam 

Reason – Residual paper inside – paper is too thick and rolled up.  

a)


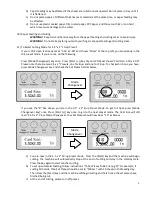
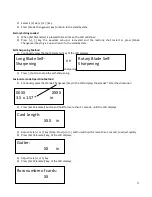
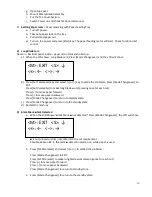
When the LCD shows: Long Blade Jam, Press [Mode Changeover] and the LCD will show:  


b)


Press [Set Parameter] key and select [+] or [-] key to settle the problems: Press [Mode Changeover] to 

EXIT. 

Press [Set Parameter] to make long blade work (pressing once for each cut) 

Press [+] to move paper forward 

Press [-] to move paper backward 

Press [Mode Changeover] to return to standby state.  

c)


Press [Mode Changeover] to return to the standby state. 

d)


Restart the machine  


5)


Black Mark 

 Not Detected 

a.


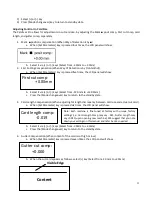
When the LCD Shows: “Black Mark  

 not detected”, Press [Mode Changeover], the LCD will show:  


Possible Reason #1: In the mar 

 detection mode, the mark   

 is not printed or does not conform to the set requirement. 

Possible Reason #2: In the mark 

■ 

detection mode, non-white paper is used.   


b.


Press [Set Parameter] and select [+] or [-] to settled the problems:  


Press [Mode Changeover] to EXIT. 

Press [Set Parameter] to make long blade work (pressing once for each cut) 

Press [+] to move paper forward 

Press [-] to move paper backward 

Press [Mode Changeover] to return to standby state.  


c.


Press [Mode Changeover] to return to the standby state. 


<M>: EXIT   <S>: ↓


<+>: ←   <

>: →


<M>: EXIT   <S>: ↓


<+>: ←   <

>: →


Содержание Cardmac Pro

Страница 1: ...1 Cardmac Pro Automatic Business Card Slitter Operation Manual Revised 12 4 2017 S N 01101778 MS ...

Страница 2: ...e Cut 9 Datum Selection 10 Selecting the Language 10 Adjusting For Error In Card Size 11 Sub accumulated Counting Reset 12 Check the Total Accumulated Cards 12 Adjust the Name Card Size 12 Select the Cutting Column 12 Factory Setting Loaded 13 Self Sharpening Method 13 Customize Mode Operation Method 13 Unloading the Rotary Blade Assembly 14 Loading the Rotary Blade Assembly 14 Adjusting to Cut Di...

Страница 3: ...es at 1 800 453 3997 if you have any technical questions that can not be resolved by this manual h In case of malfunction please call your authorized dealer or Akiles at 1 800 453 3997 to return the unit for service 2 Due to the precise mechanism and electronic elements mechanical failure may occur if placed as below a Direct sunshine b Mists c Wet environment d Fire e Vibrating Environment f Plea...

Страница 4: ...the machine 2 Input the Power When the power is turned on the machine starts initiating and goes into standby state 3 Set Up Waste Bin 4 Set Up Card Collecting Bin Waste Bin Slide inside to magnetic stop Hook onto upper pegs on both sides Card Collecting Bin Card Separator Waste Bin Card Collecting Bin Feeding Tray Extension And Two Thumb Screws Card Separator Feeding Tray Extension Guides ...

Страница 5: ...riangle mark 4 Aligned Mark in above picture then move the Left and Right Paper Guide Plates 2 and 3 above to suit the paper size b Paper width adjustment Sides of the paper should lightly touch the left and right paper guide plates Use the micro adjusting wheel on the paper guide plate to adjust the paper tightness c Lower Feeding Roller Back down and place Top Cover back on Turn machine back on ...

Страница 6: ... 2 00 Please note there are two 3 5 x 2 Presets one for 8 up and one for 10 up To check which one you have press Mode Changeover key and check the Set Pieces field as below If you see the 8 like above you are in the 3 5 x 2 8 up Preset Mode To get to 10pcs press Mode Changeover key once Press Start key once to go to the next preset mode The Card Size will still read 3 50 x 2 Press Mode Changeover ...

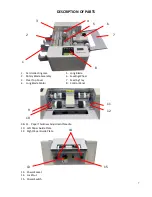
Страница 7: ...Blade Assembly 6 Feeding Wheel 3 Clear Top Cover 7 Feeding Tray 4 Long Blade Motor 8 Control Panel 9 11 Paper Thickness Adjustment Needle 10 Left Paper Guide Plate 12 Right Paper Guide Plate 13 Power Socket 14 Lock Nut 15 Power Switch 1 2 3 4 5 6 7 8 9 10 11 12 14 15 13 ...

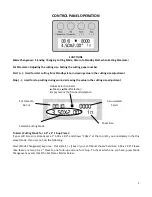
Страница 8: ...Cutting Mode for 3 5 x 2 10 up Preset If your LCD Screen is already set at 3 50 x 2 00 and shows 10pcs at the top left you are already in the this preset mode If you are not do the following Press Mode Changeover key once Press Start key til your LCD Panel shows Card Size 3 50 x 2 00 Please note there are two 3 5 x 2 Presets one for 8 up and one for 10 up To check which one you have press Mode Cha...

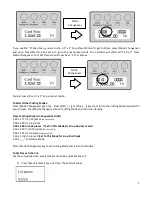
Страница 9: ...oject Press Mode Changeover to set Cutting Mode and return to standby Preset Cutting Modes In Sequential Order 3 50 x 1 77 Inch 10 pieces A4 Sheet Only 3 50 x 2 00 Inch 8 pieces 3 50 x 2 00 Inch 10 pieces Set To This Mode for 10 up Business Cards 3 50 x 2 20 Inch 10 pieces A4 Sheet Only 3 50 x 3 74 Inch 6 pieces A4 Sheet Only 3 50 x 5 Inch 4 pieces Set To This Mode for 4 up Post Cards 3 50 x ___ C...

Страница 10: ...s detected by a mark on the paper Black Mark Datum Selection Details i To properly use the Black Mark Datum Selection feature make sure your printed black mark follows the requirements below a Atleast 50mm 2 wide and 3mm 0 12 height black mark b A minimum of 3mm and maximum of 20mm from frontal edge of paper to front edge of black mark c Black mark should be centered on your page d First Cut line ...

Страница 11: ... return to the standby state 3 Card Length Compensation When adjusting for length discrepancy between card size and actual cut card a When Set Parameter key is pressed six times the LCD panel will show b Select it via or keys Select from 2 0mm to 2 0mm c Press the Mode changeover key to return to the standby state 4 Gutter Compensation When content of the card is cut high or low a When Set Paramet...

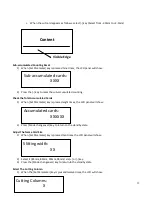
Страница 12: ... key is pressed eight times the LCD panel will show 2 Press Mode changeover key to return to the standby state Adjust The Name Card Size 1 When Set Parameter key is pressed ten times the LCD panel will show 2 Select it 85mm 89mm 90mm 95mm via or key 3 Press the Mode changeover key to return to the standby state Select The Cutting Column 1 When the Set Parameter key is pressed twelve times the LCD ...

Страница 13: ... the blade self sharpening 3 Press button to stop the self sharpening Customize mode Operation Method 1 Continually press the Mode Changeover key til the LCD displays the asterisk after the dimension 2 Press Set Parameter button and hold for more than 2 seconds until the LCD displays 3 Adjust it via or key Note Press or button and hold for more than 1 second to adjust quickly 4 Press Set Parameter...

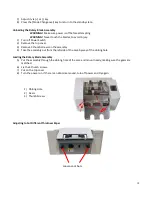
Страница 14: ...e 3 thumb screws on the assembly 4 Take the assembly out from the left side of the case by way of the oblong hole Loading the Rotary Blade Assembly 5 Put the assembly through the oblong hole of the case and mount neatly making sure the gears are matched 6 Fix the 3 thumb screws 7 Put on the top cover 8 Turn the power on If there is an abnormal sound turn off power and try again Adjusting to Cut Di...

Страница 15: ... increment on the dial correlates to approximately 0 02mm thickness Turn it a couple spaces to test c Tighten the Lock Nut d Run the machine Is it still feeding more than 1 sheet If so repeat steps a d until it is feeding 1 sheet at a time Please Note Adjustment is necessary due to differences in paper and user environment If you are experiencing feeding issues see Bad Paper Feeding section of Tro...

Страница 16: ...lade work pressing once for each cut Press to move paper forward Press to move paper backward Press Mode Changeover to return to standby state c Press Mode Changeover to return to the standby state d Restart the machine 5 Black Mark Not Detected a When the LCD Shows Black Mark not detected Press Mode Changeover the LCD will show Possible Reason 1 In the mar k detection mode the mark is not printed...

Страница 17: ...g i Too thick over 0 30mm too thin below 0 20mm See Adjusting To Cut Different Paper Thicknesses to adjust paper feeding ii Too small or too big size of paper iii Too many papers placed No more than 3mm total thickness and no more over the red line iv Excessively curved paper WARRANTY The Akiles Cardmac Pro has a warranty period of 1 year from the date of purchase In the event of a manufacturer s ...

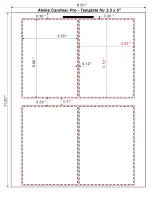
Страница 18: ...3 5 x2 ...

Страница 19: ......

Страница 20: ......

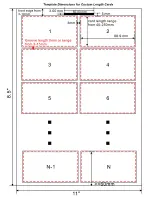
Страница 21: ...T e mp l a t eD i me n s i o n sf o r C u s t o m L e n g t hC a r d s ...

Отзывы:

Похожие инструкции для Cardmac Pro