background image

O

PERATING

I

NSTRUCTIONS

Since  most  of  the  parameters  used  to  set  up  the  AS16x12  are  adjusted  using  the  AS16x12  Software  Control  Panel,  the
operating  instructions  include  instructions  for  the  use  of  the  software.  It  is  recommended  that  you  have  the  software
running, either live or in the demo mode, as you read through this section.

Power Up

When the AS16x12 is powered on, it automatically loads the active setup from Preset 1. Therefore, you should always store
the desired power--up setting for the AS16x12 in Preset 1.

Master/Slave Switch

The Master/Slave switch should be set to the Master position if only one AS16x12 is being used. When multiple AS16x12s
are used in a system, only one is set to Master and the rest are set to Slave. See also the wiring descriptions of the Audio
Expansion In/Out and Expansion In/Out connectors in the Installation section.

Input Preamp Gain

Input preamp gain is set using the dip switches just to the left of each 5 pin input connector. Dip switch settings for 0dB,
+30dB, and +50dB input gain are shown on the rear panel of the AS16x12. Generally, the +50dB position is used for all
dynamic  microphones  and  electret  microphones  where  the  working  distance  from  the  microphone  will  be  greater  than
about 18 inches. The +30dB position is useful for electret microphones with working distances less than 18 inches and most
wireless  microphones.  The  0dB  setting  is  for  line  level  sources.  Remember  to  switch  phantom  power  on  for  electret
microphones and off for dynamic mics or line level sources.

Output Mic/Line Switch (Outputs 9 - 12)

Outputs 9 through 12 may be either Mic or Line level outputs. The dip switch between the output connectors for outputs
9/10  and  11/12  controls  the  output  level.  There  is  approximately  40dB  of  attenuation  introduced  in  the  Mic  position
relative to the Line position.

Using the AS16x12 Software Control Panel

The  AS16x12  software  control  panel  may  be  used  in  one  of  two  ways.  When  launched  from  the  LecNet  Master  Pro
application, you can control all the parameters of the AS16x12 in real time. (Your PC must be connected to the AS16x12
using the supplied LecNet serial cable in order for this to happen.) Alternatively, you can launch the AS16x12 control panel
directly and it will automatically come up in the demo mode. The demo mode is useful for doing system setup (and saving
the setups to a disk file) without the need to be connected to an AS16x12. 

System setup follows the order of the tabs on the control panel. Start at the left tab and work your way to the right. The
only exception to this is when you are using room combining. In this case, after setting up the input gain and input tone
controls, go directly to the room combining tab. Please refer to the AS16x12 Control Panel Software section of this manual
for a complete description of each control panel tab.

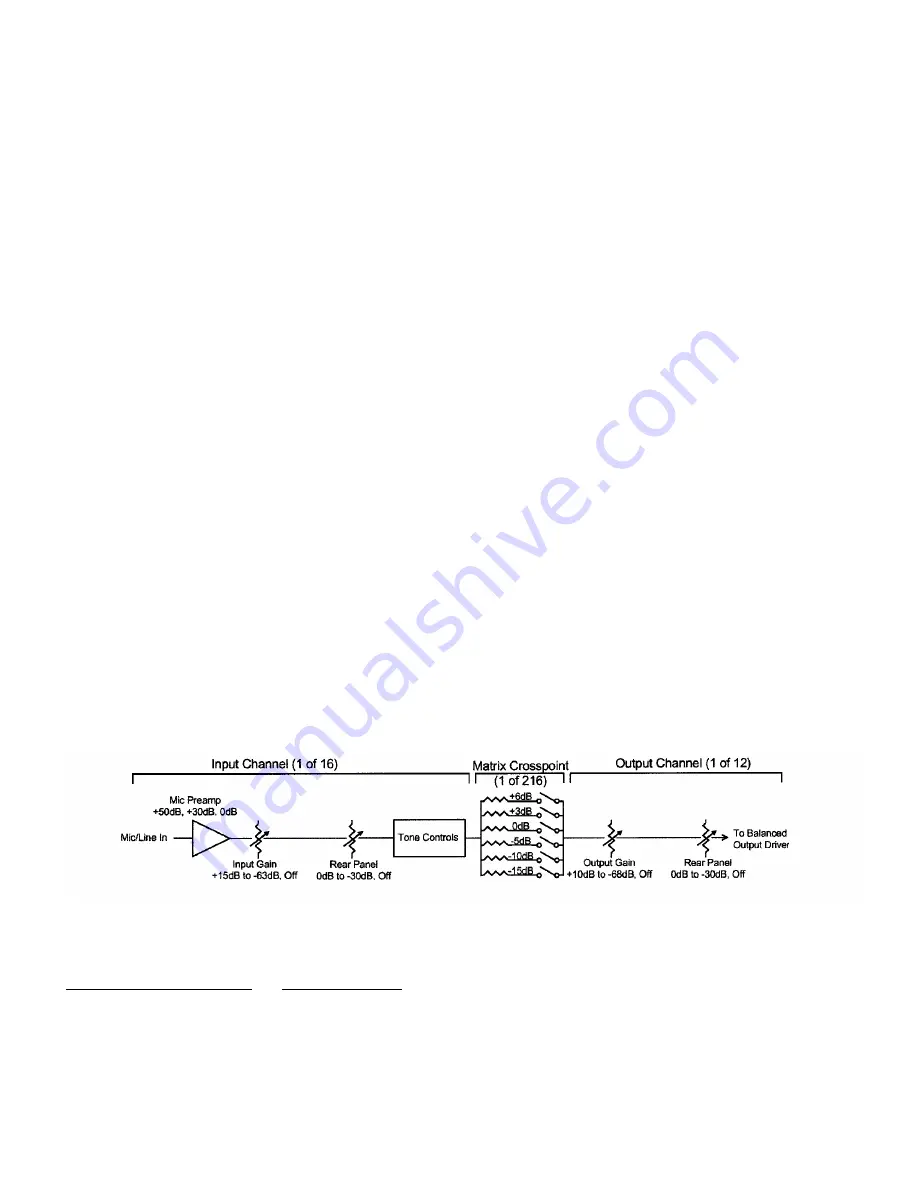
The diagram below represents the signal flow of one input to one output through one matrix crosspoint. Illustrated are all
the gain control points in the signal path.

To adjust this parameter: 

Use this control:

Mic Preamp Gain 

Rear panel dip switches

Input Gain 

Input gain tab on AS16x12 control panel software

Rear Panel (Input) Gain 

Programmable inputs on AS16x12 rear panel

Output Gain 

Output gain tab on AS16x12 control panel software

Rear Panel (Output) Gain 

Programmable outputs on AS16x12 rear panel

9

Содержание A16X12

Страница 1: ...AS16x12 16 Channel Automatic Matrix Mixer OPERATING INSTRUCTIONS and trouble shooting guide...

Страница 2: ...2 each have a mic line level switch to make those outputs compatible with mic level devices like some four channel tape recorders The AS16x12 features a wealth of programmable features With 17 program...

Страница 3: ...ike the TH3A An RS 232 port is available to allow many of the functions of the AS16x12 to be controlled either by a computer or a dedicated control system such as the AMX or Crestron systems 3 PROGRAM...

Страница 4: ...t AS16X12 PROGRAMMABLE INPUTS The AS16x12 has 17 programmable inputs which can control a variety of AS16x12 parameters Each input can respond to either a contact closure or a continuous voltage The di...

Страница 5: ...AS16x12 These two 30 pin headers are just to the right of the LecNet RS232 jack on the rear panel A 3 30 conductor ribbon cable is supplied with each AS16x12 for this purpose When installing the AS16x...

Страница 6: ...e diagrams above for proper interconnections The LecNet Expansion In and Out pinouts are shown below Pin Expansion In Function Expansion Out Function 1 Main In Main Out 2 Mix Minus Out Mix Minus In 3...

Страница 7: ...is less than or equal to 6dB The indication of channel activity is responsive to the Input Qualification and Output Hold time parameters which may be set in the Miscellaneous tab of the AS16x12 contro...

Страница 8: ...l constant is 0 167V dB or 6dB V from 0V to 5V At 0V the channel is turned completely off The control voltage should not exceed 5V PROGRAMMABLE OUTPUTS Allows indication of either channel activity or...

Страница 9: ...s 9 through 12 may be either Mic or Line level outputs The dip switch between the output connectors for outputs 9 10 and 11 12 controls the output level There is approximately 40dB of attenuation intr...

Страница 10: ...microphones which are close to the speaker The possibility of feedback is greatly reduced when this approach is repeated with all system speakers A multichannel amplifier may be used to power each sp...

Страница 11: ...tch between cameras Programmable Input State Used to provide user feedback for certain programmable input functions A programmable output whose function is Programmable Input State will be active i e...

Страница 12: ...up This option does not affect any of the preset memory data Save Active Setup to AS16x12 Preset Allows the active AS16x12 setup to be stored in one of the 15 preset memories in the AS16x12 Note that...

Страница 13: ...r panel dip switches for an input are set such that the preamp gain is 30dB and the input gain box shows 5dB the total gain applied to that input channel excluding matrix crosspoint and output gain wo...

Страница 14: ...ration the Input Gain and the front and rear panel gain contributions INPUT TONE TAB The Input Tone tab allows the low cut frequency and the high frequency cut or boost to be set for each of the 16 in...

Страница 15: ...o the AS16x12 via the expansion cable In this case the TH3A s receive signal would be present at the Exp In connector The crosspoint gains for Exp In to any active outputs would be set to the desired...

Страница 16: ...or decrement the output gain for as long as they are held down PROGRAMMABLE INPUTS TAB The AS16x12 has 17 programmable inputs available on the 25 pin D Sub connector on the rear panel which allow con...

Страница 17: ...to the current programmable input When the Apply button is enabled this indicates that the setting of Function and Applies To in the AS16x12 does not match the setting of Function and Applies To show...

Страница 18: ...s Increase In 1dB control of inputs 1 2 3 and 7 Analog Out Control Allows one or more output gains to be controlled by an analog voltage on a programmable input pin Analog output gain control goes fro...

Страница 19: ...or decrement until it is released or the gain reaches its high or low limit The screen shown to the right indicates that the function of programmable input 1 is Increase Out 1dB control of all output...

Страница 20: ...y preset recall The screen to the right shows input 1 being routed to outputs 1 2 3 and 4 with a crosspoint gain of 0dB This could be a multi zone page setup using input 1 as the paging microphone inp...

Страница 21: ...the Applies To section which are associated with each specific programmable output function will be enabled as you select different functions All other parameters are disabled This eliminates invalid...

Страница 22: ...button and another programmable output is selected by clicking on of the Select Programmable Output buttons all the changes to the first programmable output which were not applied will be lost PROGRAM...

Страница 23: ...ing capability to support up to 4 rooms Note that up to 8 rooms may be combined using the 8 NOM busses available in the AS16x12 but control for setups larger than 4 rooms must be provided by an extern...

Страница 24: ...oom Boundaries Allows the selection of the combinable boundaries based on the physical layout of the rooms Consider room layouts A and B as shown Layout A requires you to select the 1 2 and 2 3 Room B...

Страница 25: ...equivalent to making rear panel output control inactive The Gain Preset scroll bar allows a preset gain to be applied at power on or when subrooms are combined or uncombined to any output s controlle...

Страница 26: ...ar end signal to participate in the automatic mixing algorithm This very effectively suppresses acoustic echo Shown below is the proper setup for teleconferencing or video conferencing assuming all 16...

Страница 27: ...ut function check the state of those programmable inputs using the Programmable Inputs tab If either the front or rear panel controls for the output are set to off you ll get no sound The current gain...

Страница 28: ...a PC or other serial device AMX PROGRAMMING NOTES If you are using an AMX system to control your LecNet equipment you ll want to purchase the Lectrosonics PT3 Protocol Translator The PT3 connects bet...

Страница 29: ...mand 1 byte hex to the LecNet device 4 Host and LecNet device exchange data based on particular command sent Note that some LecNet commands cause LecNet devices to return an additional acknowledgment...

Страница 30: ...preset The AS16x12 will immediately set all of its programmable parameters to the new memory preset The mode byte gives the option of memory recall with or without affecting the current settings of fr...

Страница 31: ...ed with that input or 16 10 hex to return all 16 NOM bus associations starting with input 1 Host receives 1 or 16 bytes NOM bus association for one input or all inputs depending on the value of the pr...

Страница 32: ...byte 5 to the associated output while a 0 in a bit position will not apply the gain to the associated output Byte 5 Output gain value 0 78 0 4E hex which represents 10dB to 68dB 79 4F hex for off 80...

Страница 33: ...e input to be triggered just as if a contact closure on that programmable input had taken place This command is particularly useful when using AMX or Crestron control systems because very complex AS16...

Страница 34: ...15dB 10dB 5dB 0dB 3dB 6dB off Programmable Inputs Programmable Input Range 0VDC 5VDC Analog Control 0dB to 30dB plus off control range 156mV dB control sensitivity Logic Control Active Low Programmab...

Страница 35: ...charge in accordance with the terms of the warranty Out of warranty repairs are charged at a modest flat rate plus parts and shipping Since it takes almost as much time and effort to determine what i...

Страница 36: ...s slip as proof of purchase date We will not repair transit damage under the no charge terms of this warranty Note No other warranty written or oral is authorized by AKG Acoustics Inc This warranty gi...

Отзывы: