background image

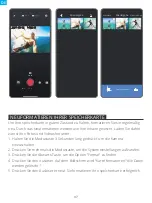
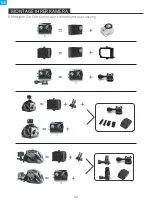
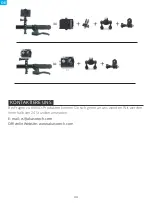
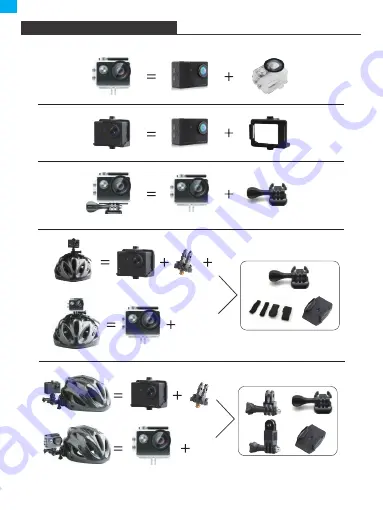
MONTAGE IHRER KAMERA

Befestigen Sie Ihre Kamera an Helmenund Ausrüstung.

43

DE

Содержание EK7000

Страница 1: ...USER MANUAL AKASO EK7000 Action Camera V5 0 ...

Страница 2: ...01 22 English 23 44 Deutsch 45 66 Español 67 88 Français 89 110 Italiano 111 132 日本語 ...

Страница 3: ...ASO GO App Playing Back Your Content Deleting Videos and Photos on Your EK7000 Offloading Your Content Reformatting Your Memory Card Maintenance Your Camera Maximizing Battery Life Battery Storage and Handling Remote Mounting Your Camera Contact Us 02 03 04 06 10 13 13 14 14 16 16 16 17 18 21 22 CONTENTS 01 EN ...

Страница 4: ... the camera to your body 01 50 02 08 How to mount the camera to a self stick 02 09 02 55 How to mount the camera to a bike 02 56 04 34 How to mount the protective backdoor 04 35 04 59 How to mount the camera to a helmet 05 03 11 16 WHAT S IN THE BOX www youtube com watch v UqKtElRXqI8 feature youtu be Waterproof Housing Handle Bar Pole Mount Clip 1 Mount 1 Mount 4 Bandages Mount 3 Battery Mount 5 ...

Страница 5: ...10 YOUR EK7000 1 2 3 4 5 7 8 11 12 6 9 03 EN ...

Страница 6: ...e requirements Class 10 or UHS I rating Capacity up to 64GB FAT32 1 Shutter Select Button 2 Power Mode Exit Button 3 Memory Card Slot 4 USB Port 5 HDMI Port 6 External Mic Port 7 Lens 8 Screen 9 Charging Indicator 10 Working Indicator 11 Up Record Button 12 Down WiFi Button 13 Battery Door Note Camera does not record sound when it is in the waterproof case 13 04 EN ...

Страница 7: ...s light is on When information appears on the LCD display or the camera status screen your camera is on To Power Off Press and hold the Mode button for three seconds The camera beeps while the camera status light is off SWITCHING MODE To Switch Mode Press the Mode button to switch the mode To Exit Mode Press the Mode button to exit mode TURNING ON OFF Wifi To Turn On Wifi Turn on camera press Down but...

Страница 8: ...e default mode when you turn on the camera In Video Mode press Shutter button the camera starts recording video Press Shutter button to stop recording video PHOTO MODE Press Mode button once to switch to Photo Mode after you turn on camera In Photo Mode press Shutter button the camera takes a photo 4K 30FPS TF 08 20 2018 09 20 15 00 05 10 TF 08 20 2018 09 25 21 14M 06 EN ...

Страница 9: ...he Up button for 3 seconds to delete the video PHOTO PLAYBACK MODE Press Mode button several times to switch to Photo Playback Mode In Photo Playback Mode press the Up Down button to scroll through the Photo files Press Shutter button to open photo in full screen view Press and hold the Up button for 3 seconds to delete the photo 1 1 IMG180820 092521F JPG 08 20 2018 09 25 21 1 1 FILE180820 092015F ...

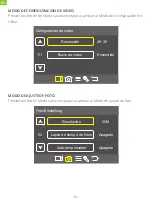
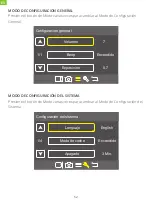
Страница 10: ...o switch to Video Settings Mode PHOTO SETTING MODE Press Mode button several times to switch to Photo Setting Mode 1 2 20M Off Off Photo Resolution Photo Setting Time Lapse Photo Self Timer 1 1 4K 30 Off Video Resolution Video Setting Looping Video 08 EN ...

Страница 11: ... times to switch to General Settings Mode SYSTEM SETTINGS MODE Press Mode button several times to switch to System Settings Mode 1 1 7 On 0 7 Volume General Setting Beep Exposure 1 4 English Off 3 Min Language System Setting Car Mode Power Off 09 EN ...

Страница 12: ...ll not record anymore when the card is full You will then need to format the memory card or change to a new memory card PHOTO SETTING 1 Photo Resolution 20M 16M 14M 12M 8M 5M 4M Default setting is 20M 2 Time Lapse Photo Off 1s 2s 5s 10s 30s 60s Default setting is off Time Lapse Photo captures a series of photos at specified intervals Use this mode to capture photos of any activity then choose the bes...

Страница 13: ... shots where an important region might otherwise be over or underexposed When you change this setting the LCD display immediately shows you the effect on your image If you change modes the camera returns to using the entire scene to determine the correct level of exposure SYSTEM SETTING 1 Language English Español Deutsch Italiano Français Português Pусский Latviski Poiski Română Slovenčina Yкраїнсь...

Страница 14: ... If you select None this camera will not add date stamp to the videos or photos you take 6 Frequence 50 Hz 60 Hz Default setting is 60 Hz 7 Upside Down On Off Default setting is off This setting determines the orientation of your video or photos to help you prevent upside down footage 8 Screen Saver Off 30 Sec 1 Min 3 Min Default setting is 1 minute Turns off the LCD display after a period of inactivi...

Страница 15: ... to their default values 11 FW Version Brand Model Version Updated You can check the brand model version and updated time of your EK7000 You can play back your content on the camera s LCD display your computer TV or smartphone tablet You can also play back content by inserting the memory card directly into a device such as a computer or compatible TV With this method playback resolution depends on...

Страница 16: ...ng also frees up space on your memory card for new content To offload files to a computer using a card reader sold separately and your computer s file explorer connect the card reader to the computer then insert the memory card You can then transfer files to your computer or delete selected files on your card You can also offload files to a Windows computer using a USB cable Note This camera does not suppo...

Страница 17: ...2021 03 02 14 32 01 Video Photo Video Playback 00 05 08 00 00 04 00 03 06 Playback Cancel Select all 1 files selected 00 05 08 00 00 04 00 03 06 15 EN ...

Страница 18: ...For best audio performance shake the camera or blow on the mic to remove debris from the microphone holes 2 To clean the lens wipe it with a soft lint free cloth Do not insert foreign objects around the lens 3 Don t touch the lens with fingers 4 Keep the camera away from drops and bumps which may cause damage to the parts inside 5 Keep the camera away from high temperature and strong sunshine to av...

Страница 19: ...he camera is not covered under the warranty Do not store your battery with metal objects such as coins keys or necklaces If the battery terminals come in contact with metal objects this may cause a fire Do not make any unauthorized alterations to the camera Doing so may compromise safety regulatory compliance performance and may void the warranty WARNING Do not drop disassemble open crush bend defo...

Страница 20: ...ile recording To stop recording Press the Grey Video Button again The camera will emit one beep and the camera light will stop flashing while recording PHOTO To capture a photo verify the camera is in Photo mode To take a photo Press the Red Photo Button The camera will emit a camera shutter sound REMOTE Photo Button Video Button Splashproof only not waterproof 18 EN ...

Страница 21: ...rotate the PCB board to avoid reversing the camera and video button functions CR2032 BATTERY REPLACEMENT FOR EK7000 REMOTE 1 Use a 1 8mm Phillips tip screwdriver to remove the 4 screws on the back cover of the remote allowing you to open it 2 Remove another 4 screws on PCB board 19 EN ...

Страница 22: ...4 Install the new battery keeping the pole facing up 5 Install all 4 screws back onto the PCB board 6 Install all 4 screws back into the cover 20 EN ...

Страница 23: ...Attach your camera to helmets gear and equipment MOUNTING YOUR CAMERA 21 EN ...

Страница 24: ...For any inquiries about AKASO products please feel free to contact us We will respond within 24 hours Tel 888 466 9222 US Email cs akasotech com Web www akasotech com CONTACT US 22 EN ...

Страница 25: ...gabe Ihrer Inhalte Löschen von Videos und Fotos auf Ihrem EK7000 Inhalte entladen Neuformatierung Ihrer Speicherkarte Wartung Ihrer Kamera Maximierung der Akkulaufzeit Lagerung und Handhabung des Akkus Fernbedienung Montage Ihrer Kamera Kontaktiere uns 24 26 27 31 35 35 36 36 37 38 38 39 40 43 44 INHALT DE 23 ...

Страница 26: ...IHRE EK7000 10 1 2 3 4 5 7 8 11 12 6 9 24 DE ...

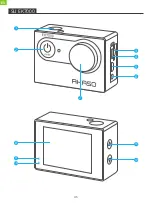
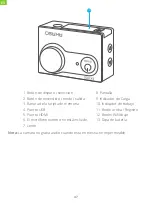
Страница 27: ...tz 4 USB Hafen 5 HDMI Anschluss 6 Externe Weizenschnittstelle 7 Linse 8 Berühren Bildschirm 9 Arbeitsindikator 10 Ladeindikator 11 Auf Aufzeichnung Taste 12 Nach unten Taste Wifi Taste 13 Batteriefach Hinweis Die Kamera nimmt im wasserdichten Gehäuse keinen Ton auf 13 25 DE ...

Страница 28: ...ustaste drei Sekunden lang gedrückt Die Kamera piept während die Kamera Statusanzeige leuchtet Wenn Informationen auf dem LCD Display oder dem Kamerastatusbildschirm angezeigt werden ist Ihre Kamera eingeschaltet Ausschalten Halten Sie die Modustaste drei Sekunden lang gedrückt Die Kamera piept während die Kamera Statusanzeige ausgeschaltet ist SCHALTMODUS So wechseln Sie den Modus Drücken Sie die...

Страница 29: ...Sie die Kamera einschalten Drücken Sie im Videomodus den Auslöser um die Videoaufnahme zu starten Drücken Sie den Auslöser um die Videoaufnahme zu beenden FOTO MODUS Drücken Sie die Modustaste einmal um nach dem Einschalten der Kamera in den Fotomodus zu wechseln Drücken Sie im Fotomodus den Auslöser Die Kamera nimmt ein Foto auf 4K 30FPS TF 08 20 2018 09 20 15 00 05 10 TF 08 20 2018 09 25 21 14M ...

Страница 30: ...aste 3 Sekunden lang gedrückt um das Video zu löschen FOTO WIEDERGABE MODUS Drücken Sie die Modustaste mehrmals um in den Fotowiedergabemodus zu wechseln Drücken Sie im Fotowiedergabemodus die Auf Ab Taste um durch die Fotodateien zu blättern Drücken Sie den Auslöser um das Foto im Vollbildmodus zu öffnen Halten Sie die Aufwärtstaste 3 Sekunden lang gedrückt um das Foto zu löschen 1 1 IMG180820 092...

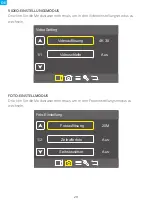
Страница 31: ...ideoeinstellungsmodus zu wechseln FOTO EINSTELLMODUS Drücken Sie die Modustaste mehrmals um in den Fotoeinstellungsmodus zu wechseln 1 2 20M Aus Aus Fotoauflösung Foto Einstellung Zeitrafferfoto Selbstauslöser 1 1 4K 30 Aus Videoauflösung Video Setting Videoschleife 29 DE ...

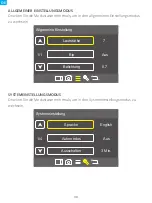
Страница 32: ...emeinen Einstellungsmodus zu wechseln SYSTEMEINSTELLUNGSMODUS Drücken Sie die Modustaste mehrmals um in den Systemeinstellungsmodus zu wechseln 1 1 7 Aus 0 7 Lautstärke Allgemeine Einstellung Bip Belichtung 1 4 English Aus 3 Min Sprache Systemeinstellung Automodus Ausschalten 30 DE ...

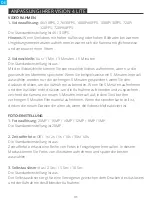
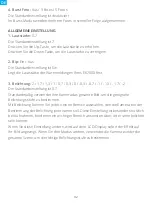
Страница 33: ...uten aufnehmen und den Auslöser nicht drücken um die Aufnahme zu beenden und zu speichern zeichnet die Kamera ein neues 5 Minuten Intervall auf indem Sie über Ihre vorherigen 5 Minuten Filmmaterial aufnehmen Wenn die speicherkarte voll ist decken die neuen Dateien die alten ab wenn die Videoschleife aktiviert ist FOTO EINSTELLUNG 1 Fotoauflösung 20MP 16MP 14MP 12MP 8MP 5MP Die Standardeinstellung i...

Страница 34: ... 3 1 0 7 0 3 0 0 3 0 7 1 1 3 1 7 2 Die Standardeinstellung ist 0 7 Standardmäßig verwendet Ihre Kamera das gesamte Bild um die geeignete Belichtungsstufe zu bestimmen Mit Belichtung können Sie jedoch einen Bereich auswählen den die Kamera bei der Bestimmung der Belichtung priorisieren soll Diese Einstellung ist besonders nützlich bei Aufnahmen bei denen ein wichtiger Bereich ansonsten über oder un...

Страница 35: ...uten 5 Minuten Die Standardeinstellung beträgt 3 Minuten Schaltet Ihren Vision 4 Lite nach einer gewissen Zeit der Inaktivität aus um die Batterielebensdauer zu verlängern 4 Datum und Uhrzeit JJ MM TT HH MM SS Das Datum und die Uhrzeit werden automatisch aktualisiert wenn Sie Ihre Kamera mit der AKASO GO App verbinden Sie können diese Einstellungen jedoch bei Bedarf manuell ändern Hinweis Wenn der...

Страница 36: ...die Systemeinstellungen aufzurufen und drücken Sie dann mehrmals die Abwärtstaste um Format Karte formatieren JA 9 Format Ja Nein Um Ihre Speicherkarte in gutem Zustand zu halten formatieren Sie sie regelmäßig neu Durch die Neuformatierung werden alle Ihre Inhalte gelöscht also stellen Sie sicher dass Sie Ihre Fotos auslagern und Videos zuerst Um Ihre Karte neu zu formatieren drücken Sie die Modus...

Страница 37: ...ldschirm zurückzukehren drücken Sie die Modustaste 5 Um die Galerie zu verlassen drücken Sie die Modustaste WIEDERGABE IHRES INHALTS VERBINDUNG MIT DER AKASO GO APP Mit der AKASO GO App können Sie Ihre Kamera über ein Smartphone oder Tablet fernsteuern Zu den Funktionen gehören vollständige Kamerasteuerung Live Vorschau Wiedergabe download einstellungen Weitergabe von Inhalten sowie Updates der Ka...

Страница 38: ...n mit einem Kartenleser separat erhältlich und dem Datei Explorer Ihres Computers auf einen Computer zu übertragen schließen Sie den Kartenleser an den Computer an und legen Sie die speicherkarte ein Sie können dann Dateien auf Ihren Computer übertragen oder ausgewählte Dateien auf Ihrer Karte löschen Sie können Dateien auch über ein USB Kabel auf einen Windows Computer übertragen Hinweis Diese Ka...

Страница 39: ...hrmals die Modustaste um die Systemeinstellungen aufzurufen 3 Drücken Sie die Abwärts Taste um die Option Format zu finden 4 Drücken Sie den Auslöser Auf dem Bildschirm wird Karte formatieren Alle Daten werden gelöscht 5 Drücken Sie den Auslöser erneut Sie formatieren Ihre speicherkarte erfolgreich NEUFORMATIEREN IHRER SPEICHERKARTE 2021 03 02 14 32 01 Video Foto Video Wiedergabe 00 05 08 00 00 04 ...

Страница 40: ...t den Fingern 4 Halten Sie die Kamera von Tropfen und Stößen fern da diese die Innenteile beschädigen können 5 Halten Sie die Kamera von hohen Temperaturen und starker Sonneneinstrahlung fern um Beschädigungen zu vermeiden Wenn der Akku während der Aufnahme 0 erreicht speichert die Kamera die Datei und schaltet sich aus Befolgen Sie zur Maximierung der Batterielebensdauer nach Möglichkeit diese Ri...

Страница 41: ...d von der Garantie ausgeschlossen Bewahren Sie den Akku nicht zusammen mit Metallgegenständen wie Münzen Schlüsseln oder Halsketten auf Wenn die Batteriepole mit Metallgegenständen in Berührung kommen kann dies einen Brand verursachen Nehmen Sie keine unbefugten Änderungen an der Kamera vor Dies kann die Sicherheit die Einhaltung gesetzlicher Bestimmungen und die Leistung beeinträchtigen und zum E...

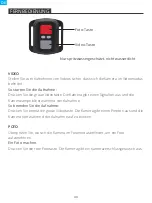
Страница 42: ...ufnahme So beenden Sie die Aufnahme Drücken Sie erneut die graue Videotaste Die Kamera gibt einen Piepton aus und die Kamera hört während der Aufnahme auf zu blinken POTO Überprüfen Sie ob sich die Kamera im Fotomodus befindet um ein Foto aufzunehmen Ein Foto machen Drücken Sie die rote Fototaste Die Kamera gibt ein Kameraverschlussgeräusch aus FERNBEDIENUNG Foto Taste Video Taste Nur spritzwasserg...

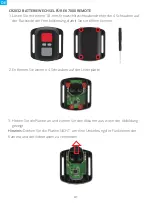
Страница 43: ...er Rückseite der Fernbedienung damit Sie sie öffnen können 2 Entfernen Sie weitere 4 Schrauben auf der Leiterplatte 3 Heben Sie die Platine an und ziehen Sie den Akku heraus wie in der Abbildung gezeigt Hinweis Drehen Sie die Platine NICHT um eine Umkehrung der Funktionen der Kamera und der Videotasten zu vermeiden 41 DE ...

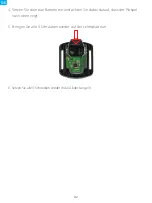
Страница 44: ...ie die neue Batterie ein und achten Sie dabei darauf dass der Pluspol nach oben zeigt 5 Bringen Sie alle 4 Schrauben wieder auf der Leiterplatte an 6 Setzen Sie alle 4 Schrauben wieder in die Abdeckung ein 42 DE ...

Страница 45: ...MONTAGE IHRER KAMERA Befestigen Sie Ihre Kamera an Helmenund Ausrüstung 43 DE ...

Страница 46: ...Bei Fragen zu AKASO Produkten können Sie sich gerne an uns wenden Wir werden innerhalb von 24 Stunden antworten E mail cs akasotech com Offizielle Website www akasotech com KONTAKTIERE UNS 44 DE ...

Страница 47: ...ASO GO APP Reproduciendo su contenido Borrado de videos y fotos en su EK7000 Descarga su contenido Reformate a su tarjeta de memoria Mantener su camara Maximizando la vida de batería Almacenamiento y manejo de baterías Control remoto Montaje de la camara Contáctenos 46 48 49 53 57 57 58 58 59 60 60 61 62 65 66 45 ES ...

Страница 48: ...SU EK7000 10 1 2 3 4 5 7 8 11 12 6 9 46 ES ...

Страница 49: ...ta de memoria 4 Puerto USB 5 Puerto HDMI 6 El micrófono externo no está incluido 7 Lente 8 Pantalla 9 Indicador de Carga 10 Indicador de trabajo 11 Botón arriba Registro 12 Botón Wifi Abajo 13 Tapa de batería Nota La cámara no graba audio cuando está en el estuche impermeable 13 47 ES ...

Страница 50: ...esionado el botón Modo durante tres segundos La cámara emite un pitido mientras la luz de estado de la cámara está encendida Cuando aparece información en la pantalla LCD o en la pantalla de estado de la cámara la cámara está encendida Para apagar Mantenga presionado el botón Modo durante tres segundos La cámara emite un pitido mientras la luz de estado de la cámara está apagada MÉTODOS DE CONMUTA...

Страница 51: ...o cuando la cámara está encendida En el modo de video presione el botón disparador la cámara comienza a grabar videos Presione el botón disparador para detener la grabación de video PHOTO MODO Presione el botón Modo una vez para cambiar al Modo foto después de encender la cámara En el modo de foto presione el botón del obturador la cámara toma una foto 4K 30FPS TF 08 20 2018 09 20 15 00 05 10 TF 0...

Страница 52: ...iba durante 3 segundos para eliminar el video MODO DE REPRODUCCIÓN FOTOGRÁFICA Presione el botón Modo varias veces para cambiar al modo de reproducción de fotos En este modo presione el botón Arriba Abajo para desplazarse por los archivos de video Presione el botón disparador para abrir el video en vista de pantalla completa Mantenga presionado el botón Arriba durante 3 segundos para eliminar la f...

Страница 53: ...de Configuración de Video MODO DE AJUSTE DE FOTO Presione el botón Modo varias veces para cambiar al Modo de ajuste de foto 1 2 20M Apagado Apagado Resolución Foto Einstellung Lapso de tiempo de fotos Auto temporizador 1 1 4K 30 Encendido Resolución Configuración de vídeo Bucle de video ES 51 ...

Страница 54: ...nfiguración General MODO DE CONFIGURACIÓN DEL SISTEMA Presione el botón de Modo varias veces para cambiar al Modo de Configuración del Sistema 1 1 7 Encendido 0 7 Volumen Configuracion general Beep Exposición 1 4 English Encendido 3 Min Lenguaje Configuración del sistema Modo de coche Apagado ES 52 ...

Страница 55: ...os y no presiona el botón del Disparador para detener la grabación y guardar la cámara graba un nuevo intervalo de 5 minutos grabando sus 5 minutos anteriores de grabación Cuando la tarjeta de memoria esté llena los archivos nuevos cubrirán la antigua si la bucle de video está activada CONFIGURACIÓN DE FOTO 1 Resolución de fotos 20MP 16MP 14MP 12MP 8MP 5MP La configuración predeterminada es 20MP 2 ...

Страница 56: ...1 7 1 3 1 0 7 0 3 0 0 3 0 7 1 1 3 1 7 2 El ajuste predeterminado es 0 7 Por defecto su cámara usa la imagen completa para determinar el nivel de exposición apropiado Sin embargo la exposición le permite seleccionar un área que desea que la cámara priorice al determinar la exposición Esta configuración es particularmente útil en tomas en las que una región importante podría estar sobre o subexpuesta...

Страница 57: ...eterminada es de 3 minutos Apague su Vision 4 Lite después de un período de inactividad para prolongar la vida útil de la batería 4 Fecha y hora AA MM DD HH MM SS La fecha y la hora se actualizan automáticamente cuando conecta su cámara a la aplicación AKASO GO Puede cambiar manualmente esta configuración si es necesario Nota Si se retira la batería de la cámara durante un período largo la fecha y ...

Страница 58: ...to Sí No Para mantener su tarjeta de memoria en buenas condiciones vuelva a formatearla regularmente El reformateo borra todo su contenido así que asegúrese de descargar sus fotos y videos primeramente Para reformatear su tarjeta presione el botón de modo para ingresar a la configuración del sistema luego presione el botón hacia abajo varias veces para ingresar a Formato Formatear tarjeta SÍ 10 Rei...

Страница 59: ...ara volver a la pantalla de miniaturas presione el botón Modo 5 Para salir de la galería pulse el botón Modo REPRODUCIENDO SU CONTENIDO CONECTARSE A LA APLICACIÓN AKASO GO La aplicación AKASO GO le permite controlar su cámara de forma remota con un teléfono inteligente o tableta Las funciones incluyen control total de la cámara vista previa en vivo reproducción descarga configuración uso compartido...

Страница 60: ...rgar archivos a una computadora usando un lector de tarjetas se vende separado y el explorador de archivos de su computadora conecte el lector de tarjetas a la computadora luego inserte la tarjeta de memoria Luego puede transferir archivos a su computadora o eliminar archivos seleccionados en su tarjeta También puede descargar archivos a una computadora con Windows usando un cable USB Nota Esta cá...

Страница 61: ... veces para ingresar a Configuración del sistema 3 Presione el botón Abajo para encontrar la opción Formato 4 Presione el botón del obturador la pantalla muestra Formatear tarjeta Todos los datos serán eliminados 5 Presione el botón del obturador otra vez Usted formatea su tarjeta de memoria con éxito REFORMATE A SU TARJETA DE MEMORIA 2021 03 02 14 32 01 Vídeo Foto Vídeo Reproducir 00 05 08 00 00 0...

Страница 62: ...s 4 Mantenga la cámara alejada de caídas y golpes ya que podría dañar las piezas del interior 5 Mantenga la cámara alejada de la temperatura alta y la luz solar intensa para evitar daños Si la batería alcanza el 0 durante la grabación la cámara guarda el archivo y se apaga Para maximizar la vida útil de la batería siga estas reglas cuando sea posible Apague las conexiones inalámbricas Captura vide...

Страница 63: ... el líquido dentro de la cámara No guarde su batería con objetos metálicos como monedas llaves o collares Si los terminales de la batería entran en contacto con objetos metálicos esto puede provocar un incendio No realice alteraciones no autorizadas a la cámara Si lo hace puede comprometer la seguridad el cumplimiento normativo el rendimiento y puede anular la garantía ADVERTENCIA No deje caer des...

Страница 64: ...ideo La cámara emitirá una señal acústica y la luz de la cámara parpadeará durante la grabación Para detener la grabación Presionar nuevamente el Botón Gris del Video La cámara emitirá una señal acústica y la luz de la cámara parpadeará durante la grabación FOTO Para tomar una foto asegúrese de que la cámara esté en Modo Foto Para tomar una foto Presionar el botón rojo de la foto La cámara emitirá...

Страница 65: ...uitar los 4 tornillos de la tapa posterior del control remoto lo que permite que se abra 2 Retirar otros 4 tornillos en la placa PCB 3 Levantar la placa PCB y deslizar la batería hacia afuera como se muestra en la figura Nota NO girar la PCB para evitar invertir las funciones de la cámara y los botones de video ES 63 ...

Страница 66: ...4 Instalar la batería nueva manteniendo el polo hacia arriba 5 Reemplazar los 4 tornillos en la placa PCB 6 Reemplazar los 4 tornillos en la cubierta ES 64 ...

Страница 67: ...Sujete su cámara a cascos equipos y equipo MONTAJE DE LA CAMARA 65 ES ...

Страница 68: ...Para cualquier consulta sobre los productos AKASO no dude en contactarnos Responderemos dentro de 24 horas Correo electrónico cs akasotech com Sitio web oficial www akasotech com CONTÁCTENOS 66 ES ...

Страница 69: ... Votre Contenu Suppression de Vidéos et de Photos sur Votre EK7000 Transferer Votre Reformatage de Votre Carte Mémoire Entretien de Votre Caméra Maximiser la Vie de la Batterie Stockage et Manipulation de la Batterie Télécommande Monter Votre Caméra Contactez Nous 68 70 71 75 79 79 80 80 81 82 82 83 84 87 88 CONTENU 67 FR ...

Страница 70: ...VOTRE EK7000 10 1 2 3 4 5 7 8 11 12 6 9 68 FR ...

Страница 71: ...ire 4 Port USB 5 Por HDMI 6 Port Mic Externe 7 Lentille 8 Écran 9 Indicateur de Fonctionnement 10 Indicateur de Charge 11 Bouton Haut Enregistrement 12 Bouton Bas Wifi 13 Porte de Batterie Remarque La caméra sport n enregistre pas de son lorsqu il se trouve dans le boîtier étanche 13 69 FR ...

Страница 72: ...n Mode pendant trois secondes La caméra sport émet un signal sonore tandis que le voyant d état de la caméra sport est allumé Lorsque des informations apparaissent sur l écran LCD ou le voyant d état de la caméra sport votre caméra sport est allumé Pour Éteindre Appuyez sur le bouton Mode pendant trois secondes La caméra sport émet un signal sonore tandis que le voyant d état de la caméra sport es...

Страница 73: ...t En Mode Vidéo appuyez sur le bouton de Déclencheur la caméra sport commence àenregistrer la vidéo Appuyez sur le bouton de Déclencheur pour arrêter l enregistrement vidéo MODE PHOTO Appuyez sur le bouton Mode pour passer en Mode Photo après avoir allumé la caméra sport En Mode Photo appuyez sur le bouton de Déclencheur la caméra sport prend une photo 4K 30FPS TF 08 20 2018 09 20 15 00 05 10 TF 0...

Страница 74: ...aut pendant 3 secondes pour supprimer la vidéo MODE DE LECTURE PHOTO Appuyez sur le bouton Mode plusieurs fois pour passer en Mode de Lecture Photo En Mode de Lecture Photo appuyez sur le bouton Haut Bas pour faire défiler les fichiers photo Appuyez sur le bouton de Déclencheur pour voir la photo en mode plein écran Appuyez sur le bouton Haut pendant 3 secondes pour supprimer la photo 1 1 IMG180820 ...

Страница 75: ...de de Paramètres Vidéo MODE DE PARAMÈTRES PHOTO Appuyez sur le bouton Mode plusieurs fois pour passer en Mode de Paramètres Photo 1 2 20M Désactivé Désactivé Résolution de photo Paramètres photo Retard Retardateur 1 1 4K 30 Désactivé Taille vidéo Paramètres Vidéo Vidéo en boucle 73 FR ...

Страница 76: ...asser en Mode de Régler MODE LES RÈGLES GÉNÉRALES Appuyez sur le bouton Mode plusieurs fois pour passer en Mode de Réglage général 1 1 7 Vouvrir 0 7 Volume Régler Bip Exposition 1 4 Français Désactivé Large Langue Règles Générales Mode de voiture Angle de vue 74 FR ...

Страница 77: ...istrement Si vous enregistrez pendant 5 minutes et n appuyez pas sur le bouton de Déclencheur pour arrêter l enregistrement la caméra sport enregistre une nouvelle intervalle de 5 minutes en enregistrant vos 5 minutes précédentes de métrage Lorsque la carte mémoire est pleine les nouveaux fichiers couvriront l ancien si le Boucle vidéo est activé PARAMÈTRES PHOTO 1 Résolution de photo 20MP 16MP 14M...

Страница 78: ...1 3 1 7 2 Le réglage par défaut est 0 7 Par défaut votre caméra sport utilise l image entière pour déterminer le niveau d exposition approprié Cependant l exposition vous permet de sélectionner une zone que vous voulez que la caméra sport donne la priorité lors de la détermination de l exposition Ce réglage est particulièrement utile dans les prises de vue où une région importante peut être autrem...

Страница 79: ...ion 4 Lite après une période d inactivité pour économiser la batterie 4 Régl horl JJ MM TT HH MM SS La date et l heure sont automatiquement mises à jour lorsque vous connectez votre caméra sport à l application AKASO GO Toutefois vous pouvez modifier manuellement ces paramètres si nécessaire Remarque Si la batterie est retirée de la caméra sport pendant une période prolongée la date et l heure sero...

Страница 80: ... NON Pour garder votre carte mémoire en bon état reformatez la sur une base régulière Le reformatage efface tout votre contenu assurez vous de sauvegarder d abord vos photos et vidéos sur vos autres appareils Pour reformater votre carte appuyez sur le bouton Mode pour entrer dans le Réglage général puis appuyez sur le bouton Bas plusieurs fois pour entrer dans Format carte TF Format carte OUI 10 Ré...

Страница 81: ... revenir à l écran des pouces appuyez sur le bouton Mode 5 Pour sortir de la galerie appuyez sur Mode PROJETER VOTRE CONTENU CONNEXION À L APP AKASO GO L application AKASO GO vous permet de contrôler votre caméra sport à distance en utilisant un smartphone ou une tablette Les caractéristiques incluent le contrôle complet de la caméra sport l aperçu en direct la lecture téléchargement paramètres le...

Страница 82: ... un ordinateur à l aide d un lecteur de carte vendu séparément et de l explorateur de fichiers connectez le lecteur de carte à l ordinateur puis insérez la carte mémoire Vous pouvez alors transférer des fichiers sur votre ordin ateur ou supprimer des fichiers sélectionnés sur votre carte Vous pouvez également transférer les fichiers sur un ordinateur Windows avec un câble USB Remarque Cette caméra spo...

Страница 83: ...ieurs fois pour entrer le réglage général 3 Appuyez sur le bouton Bas pour trouver l option Format 4 Appuyez sur le bouton de Déclencheur l écran affiche Format carte Ttes données seront effa Toutes les données seront supprimées 5 Appuyez à nouveau sur le bouton de Déclencheur Vous formatez votre carte mémoire avec succès REFORMATAGE DE VOTRE CARTE MÉMOIRE 2021 03 02 14 32 01 Vidéo Photo Vidéo Rejoue...

Страница 84: ... loin des liquides et des chocs qui pourraient endommager les pièces à l intérieur 5 Gardez la caméra sport à l écart des températures élevées et des rayons du soleil plus fort afin de ne pas être endommagé Si la batterie atteint 0 lors de l enregistrement la caméra sport enregistra le fichier et s éteindra automatiquement Pour optimiser la durée de vie de la batterie suivez ces directives si possib...

Страница 85: ... sont pas couverts par la garantie Ne rangez pas votre batterie avec des objets métalliques tels que des pièces de monnaie des clés ou des colliers Si les bornes de la batterie entrent en contact avec des objets métalliques cela peut provoquer un incendie N effectuez aucune modification non autorisée sur la caméra sport Cela pourrait compromettre la sécurité la conformité aux réglementations les per...

Страница 86: ...rrêter l enregistrement Appuyez de nouveau sur le Bouton Vidéo Gris La caméra emmétra un bip et la lumière de la caméra arrêtera de clignoter lors de l enregistrement PHOTO Pour capturer une image vérifiez que la caméra est en Mode Photo Pour prendre une photo Appuyez sur le Bouton Rouge Photo La caméra émettra un son de déclencheur photo TÉLÉCOMMANDE Bouton Photo Bouton Vidéo Résiste seulement aux...

Страница 87: ...au dos du couvercle de la télécommande vous permettant ainsi de l ouvrir 2 Retirez 4 vis supplémentaire sur la carte PCB 3 Soulevez la carte PCB faite coulissez la batterie à l extérieur comme montré sur l image Remarque Ne PAS faite pivoter la carte PCB afin d éviter de renverser les fonctions des boutons caméra et vidéo 85 FR ...

Страница 88: ...4 Installez la nouvelle batterie en gardant le pole tourné vers le haut 6 Réinstallez toutes les 4 vis dans le couvercle 5 Réinstallez toutes les 4 vis dans la carte PCB 86 FR ...

Страница 89: ...Fixez votre caméra sport aux casques au matériel et aux équipements MONTER VOTRE CAMÉRA 87 FR ...

Страница 90: ...Pour toute question concernant les produits AKASO n hésitez pas à nous contacter Nous vous répondrons dans les 24 heures E mail cs akasotech com Site web officiel www akasotech com CONTACTEZ NOUS 88 FR ...

Страница 91: ...iminazione di video e foto sulla tua EK7000 Scaricare il contenuto Riformatura della tua scheda memoria Manutenzione della fotocamera Massimizzare la durata della batteria Conservazione e manipolazione della batteria A distanza Montaggio della telecamera Contattaci 90 92 93 97 101 101 102 102 103 104 104 105 106 109 110 CONTENUTO 89 IT ...

Страница 92: ...LA TUA VISION 4 LITE 10 1 2 3 4 5 7 8 11 12 6 9 90 IT ...

Страница 93: ...memoria Slot 4 USB Porta 5 HDMI Porta 6 Porta per microfono esterno 7 Lente 8 Schermo 9 Indicatore di Lavoro 10 Indicator di Carica 11 Pulsante Su Registra 12 Pulsante Giù Wifi 13 Sportello batteria Nota La fotocamera non registra l audio quando è nella custodia impermeabile 13 IT 91 ...

Страница 94: ...e secondi La fotocamera emette un segnale acustico mentre la spia di stato della fotocamera è accesa Quando vengono visualizzate informazioni sul display LCD o sulla schermata di stato della fotocamera la fotocamera è accesa Per spegnere Tieni premuto il pulsante Modalità per tre secondi La fotocamera emette un segnale acustico mentre la spia di stato della fotocamera è spenta MODALITÀ DI COMMUTAZ...

Страница 95: ...lla fotocamera In modalità video premere il pulsante di scatto la fotocamera inizia a registrare video Premere il pulsante di scatto per interrompere la registrazione del video MODALITÀ FOTO Premere il pulsante Modalità una volta per passare alla Modalità foto dopo aver acceso la fotocamera In modalità Foto premere il pulsante di scatto la fotocamera scatta una foto 4K 30FPS TF 08 20 2018 09 20 15...

Страница 96: ...pulsante Su per 3 secondi per eliminare il video MODALITÀ RIPRODUZIONE FOTO Premere più volte il pulsante Modalità per passare alla modalità di riproduzione foto In modalità di riproduzione foto premere il pulsante Su Giù per scorrere i file video Premere il pulsante di scatto per aprire il video in visualizzazione a schermo intero Tenere premuto il pulsante Su per 3 secondi per eliminare il foto 1...

Страница 97: ...tà di impostazione video MODALITÀ DI IMPOSTAZIONE FOTO Premere più volte il pulsante Modalità per passare alla Modalità impostazione foto 1 2 20M Off Off Risoluzione fotografica Foto Einstellung Time Lapse Foto Autoscatto 1 1 4K 30 Off Risoluzione video Impostazione video Video in loop IT 95 ...

Страница 98: ...ità impostazione generale MODALITÀ DI IMPOSTAZIONE DEL SISTEMA Premere più volte il pulsante Modalità per passare alla Modalità impostazioni di sistema 1 1 7 Off 0 7 Volume Impostazione generale Beep Esposizione 1 4 Italiano Off 3 Min Linguaggio Impostazione dei sistema Modalità auto Spegni IT 96 ...

Страница 99: ...Se si registra per 5 minuti e non si preme il pulsante dell otturatore per interrompere la registrazione e il salvataggio la fotocamera registra un nuovo intervallo di 5 minuti registrando nei 5 minuti precedenti di riprese Quando la scheda memoria è piena i nuovi file copriranno quello vecchio se la registrazione in loop è attiva IMPOSTAZIONE FOTO 1 Risoluzione fotografica 20MP 16MP 14MP 12MP 8MP 5...

Страница 100: ...tazione predefinita è 0 7 Per impostazione predefinita la fotocamera utilizza l intera immagine per determinare il livello di esposizione appropriato Tuttavia l esposizione consente di selezionare un area a cui si desidera che la fotocamera dia la priorità al momento di determinare l esposizione Questa impostazione è particolarmente utile negli scatti in cui una regione importante potrebbe altriment...

Страница 101: ...po un periodo di inattività per prolungare la durata della batteria 4 Data Ora YY MM DD HH MM SS La data e l ora vengono aggiornate automaticamente quando si collega la videocamera all app AKASO GO Tuttavia è possibile modificare manualmente queste impostazioni se necessario Nota Se la batteria viene rimossa dalla fotocamera per un lungo periodo di tempo la data e l ora verranno ripristinate automa...

Страница 102: ... fotocamera 9 Formato Sì No Per mantenere la scheda memoria in buone condizioni riformattala regolarmente La riformattazione cancella tutti i tuoi contenuti quindi assicurati di scaricare prima le foto e i video Per riformattare la scheda premere il pulsante modalità per accedere alle impostazioni di sistema quindi premere più volte il pulsante giù per accedere a Formato Formatta scheda SÌ 10 Rese...

Страница 103: ...tero 4 Premi il pulsante Modalità per tornare alla schermata delle miniature 5 Premi il pulsante Modalità per uscire dalla galleria RIPRODUZIONE DEI CONTENUTI CONNESSIONE ALL APP AKASO GO L app AKASO GO ti consente di controllare la videocamera in remoto utilizzando uno smartphone o un tablet Le funzioni includono il controllo completo della fotocamera l anteprima dal vivo la riproduzione scaricam...

Страница 104: ...cheda memoria per nuovi contenuti Per scaricare i file su un computer utilizzando un lettore di schede venduto separatamente e Esplora file del tuo computer collega il lettore di schede al computer quindi inserisci la scheda memoria È quindi possibile trasferire i file sul computer o eliminare i file selezionati sulla scheda Puoi anche scaricare file su un computer Windows usando un cavo USB SCARICARE ...

Страница 105: ...e Modalità per accedere alle Impostazioni di sistema 3 Premi il pulsante Giù per trovare l opzione Formato 4 Premi il pulsante Otturatore lo schermo mostra Formatta scheda Tutti i dati saranno cancellati 5 Premi di nuovo il pulsante di scatto Formattare correttamente la scheda memoria RIFORMATURA DELLA TUA SCHEDA MEMORIA 2021 03 02 14 32 01 Video Foto Video Riproduzione 00 05 08 00 00 04 00 03 06 ...

Страница 106: ...le dita 4 Tieni la fotocamera lontana da cadute e urti che potrebbero causare danni alle parti interne 5 Tieni la fotocamera lontano da alte temperature e forte luce solare per evitare danni Se la batteria raggiunge lo 0 durante la registrazione la fotocamera salva il file e si spegne Per massimizzare la durata della batteria seguire queste linee guida quando possibile Disattiva le connessioni senz...

Страница 107: ...no coperti da garanzia Non conservare la batteria con oggetti metallici come monete chiavi o collane Se i terminali della batteria entrano in contatto con oggetti metallici ciò può provocare un incendio Non apportare modifiche non autorizzate alla fotocamera Ciò potrebbe compromettere la sicurezza la conformità alle normative le prestazioni e potrebbe invalidare la garanzia AVVERTIMENTO Non far cad...

Страница 108: ...pere la registrazion Premi di nuovo il pulsante video grigio La fotocamera emetterà un segnale acustico e la luce della videocamera smetterà di lampeggiare durante la registrazione FOTO Per catturare una foto verificare che la fotocamera sia in modalità Foto Per fare una foto Premi il pulsante rosso Foto La fotocamera emetterà un suono di scatto della fotocamera A DISTANZA Pulsante Foto Pulsante Vi...

Страница 109: ...r rimuovere le 4 viti sul coperchio posteriore del telecomando consentendo di aprirlo 2 Rimuovere altre 4 viti sulla scheda PCB 3 Sollevare la scheda PCB e sfilare la batteria come mostrato in figura Nota Non ruotare la scheda PCB per evitare di invertire le funzioni della fotocamera e dei pulsanti video IT 107 ...

Страница 110: ...4 Installare la nuova batteria mantenendo il polo rivolto verso l alto 6 Rimontare tutte e 4 le viti nel coperchio 5 Rimontare tutte e 4 le viti sulla scheda PCB IT 108 ...

Страница 111: ...Attacca la tua fotocamera a caschi attrezzi e attrezzature MONTAGGIO DELLA TELECAMERA IT 109 ...

Страница 112: ...Per qualsiasi richiesta di informazioni sui prodotti AKASO non esitate a contattarci Risponderemo entro 24 ore Email cs akasotech com Sito ufficiale www akasotech com CONTATTACI 110 IT ...

Страница 113: ...じめに モード一覧 取扱説明 アプリ AKASO GO に接続する ファイルを再生する ビデオと写真を再生する データをダウンロードする メモリカードの再フォーマッ ト カメラを保護する 電池寿命を最大化にする 電池の保管と取扱方 リモコン カメラの取り付け アフターサービス 112 114 115 119 123 123 124 134 135 136 136 137 138 131 132 目次 111 JP ...

Страница 114: ...製品一覧 10 1 2 3 4 5 7 8 11 12 6 9 112 JP ...

Страница 115: ...1 シャッター 選択ボタン 2 電源 モード 終了ボタン 3 メモリカードスロッ ト 4 USB ポート 5 HDMI ポート 6 外部マイクポート 7 レンズ 8 スクリーン 9 作業インジケーター 10 充電インジケータ 11 UP 録画ボタン 12 Down Wifiボタン 13 電池カバー ご注意 防水ケースに入っていると カメラは音声を録音できません 13 113 JP ...

Страница 116: ...トしてください 再フォーマッ トすると すべてのファイルが削除されるので まず写真やビデオをダウンロードしてください 各 ファイルの保存容量が4GBを超えると メモリカード FAT32 は記録を停止し 新しいファ イルへの記録を再開します 電源オン オフ 電源をオンにする 電源を切る状態で電源ボタンを3秒間押し続けると電源を入れます 電源をオフにする 電源を入れる状態で電源ボタンを3秒間押し続けると電源を切ります 切り替えモード モードを切り替えるには カメラの電源を入れ モードボタンを押してモードを切り替えます モードを終了するには モードボタンを押してモードを終了します をオン オフする Wifi をオンにする カメラの電源を入れ 下ボタンを長押ししてWi Fiをオンにします 画面 SSID iCam xxxx が表示され Wifiを正常にオンします Wifiをオフにする 下ボタンを押してW...

Страница 117: ...定 設定設置 システム ビデオモード ビデオモードは カメラの電源を入れたときのデフォルトモードです ビデオモードには シャッターボタンを押すと ビデオの録画を開始します もう一度シャ ッターボタンを押すと録画を停止します 撮影モード 電源を入れた後 モードボタンを1回押して撮影モードに切り替えます 撮影モードには OKボタンを押すと 写真を撮ります 4K 30FPS TF 08 20 2018 09 20 15 00 05 10 TF 08 20 2018 09 25 21 14M 115 JP ...

Страница 118: ...ッターボタンを押してビデオを全画面表示で再生します 上ボタンを3秒間押し続け ビデオを削除できます 写真再生モード モードボタンを押して写真再生モードに切り替えます 写真再生モードで 上 下ボタンを押して写真ファイルをスクロールします シャッターボタンを押すと 写真が全画面表示で再生します 上ボタンを3秒間押し続け 写真を削除できます 1 1 IMG180820 092521F JPG 08 20 2018 09 25 21 1 1 FILE180820 092015F MOV 08 20 2018 09 20 15 00 05 10 116 JP ...

Страница 119: ...ビデオ設定モード モードボタンを押してビデオ設定モードに切り替えます 写真設定モード モードボタンを押して写真設定モードに切り替えます 1 2 20M オン オン 写真の画素 写真設定 タイムラプス写真 セルフタイマー 1 1 4K 30 オン 解像度 ビデオ設定 ルーピングビデオ 117 JP ...

Страница 120: ...設定設置 モードボタンを押して設定設置モードに切り替えます システム設定 モードボタンを押してシステム設定モードに切り替えます 1 1 7 オン 0 7 音量 設定設置 ビープ音 露光値 1 4 日本語 オン 3分 言語 システム設定 カーモード 自動パワーオフ 118 JP ...

Страница 121: ...保存できま す 撮影が設置した時間に達する時 ビデオは自動的に撮影を中止すると同時にデータを 記録し 撮影を続けます メモリカードがいっぱいになると ビデオが自動的に最初記録し た撮影データを覆い 撮影を続けます 画像設定 1 写真の画素 20MP 16MP 14MP 12MP 8MP 5MP デフォルト値は20MPです 2 タイムラプス写真 オフ 1s 2s 5s 10s 30s 60s デフォルト設定はオフにします タイムラプス写真は 指定した間隔で一連の写真をキャプチャします このモードを使用 してあらゆる活動の写真を撮影し 後で最適な写真を選択します 3 セルフタイマー オフ 3P S 5P S 10P S デフォルト設定はオフにします セルフタイマーは シャッターを押してから写真が撮られるまでの時間を計測するもので す 4 バースト写真 オフ 3写真 5写真 デフォルトの設定はオ...

Страница 122: ...00のアラートの音量を設定します 3 露光値 2 1 7 1 3 1 0 7 0 3 0 0 3 0 7 1 1 3 1 7 2 0 デフォルト値は0 7です デフォルトでは カメラは画像全体によって適切な露出レベルを決定します ただし 露出 を選択すると 露出を決定するときにカメラを優先的に露出させる領域を選択できます この設定は 重要な領域が露出オーバーまたは露出アンダーになる可能性があるショッ トで特に便利です この設定を変更すると LCDディスプレイにすぐ画像への影響が表示されます モードを 変更すると カメラは全体のシーンに戻り 正しい露出レベルを決定します 120 JP ...

Страница 123: ...に なります 車を始動すると自動的にオンになり 車を停止するとオフになります 3 自動パワーオフ オフ 1分 3分 5分 デフォルト設定は3分です バッテリーの寿命を節約するために 一定時間操作しないとカメラの電源を切れます 4 日付と時刻 YY MM DD HH MM SS カメラをアプリ AKASO GO に接続すると 日付と時刻が自動的に更新されます 必要に応じてこれらの設定を手動で変更できます ご注意 バッテリーをカメラから取り外した場合 長時間になると 時間は自動的にリセ ッ トされます 5 日付フォーマッ ト YYYY MM DD MM DD YYYY DD MM YYYY デフォルト設定はMM DD YYYYです 日付スタンプをオンにすると このカメラは撮影したビデオまたは写真に日付スタンプを 追加します なし を選択する場合 このカメラは撮影したビデオや写真に日付スタンプを...

Страница 124: ...ずれかのボタンを押します 9 フォーマッ ト メモリカードをフォーマッ トしますか OK キャンセル メモリカードを良好な状態に保つために 定期的に再フォーマッ トしてください 再フォー マッ トすると すべてのファイルが削除されるので まず写真やビデオをダウンロードして ください メモリカードをフォーマッ トするには モードボタンを押してシステム設定に入り 下ボタ ンを押して フォーマッ ト メモリカードをフォーマッ トしますか はい を選択しま す 10 出荷時設定へ戻ります 出荷時設定へ戻りますか OK キャンセル このオプションは すべての設定をデフォルト値にリセッ トします 11 ファームウェアバージョン ブランド モデル バージョン 更新 EK7000のブランド モデル バージョン および更新時刻を確認できます 122 JP ...

Страница 125: ...downボタンを押してビデオまたは写真ファイルをスクロールします 3 シャッターボタンを押してビデオまたは写真を全画面で表示されます 4 モードボタンを押して サムネイル画面に戻ります 5 モードボタンを押して ギャラリーを終了します ファイルを再生する アプリ AKASO GO に接続する アプリ AKASO GO を使用すると スマートフォンやタブレッ トを使ってカメラを遠隔操作 できます カメラのフルコントロール ライブプレビュー 再生 ダウンロード データの共 有 カメラの設定などの機能を利用できます 1 AKASO GOアプリを開き 画面下の デバイス アイコンをタップし デバイスの追加 を選択します 2 EK7000 を選択し 指示に従います ダウンボタンを押してWifiをオンにします カメラ の画面にWifi名とパスワードが表示されます 3 画面下部の 上記操作を確認しました を...

Страница 126: ...ルをコンピュータに転 送する必要があります 転送すると 新しいデータ用にメモリカードのスペースも解放され ます カードリーダー 別売 を使用してファイルをコンピューターにダウンロードするには カ ードリーダーをコンピューターに接続してから マイクロメモリカードを挿入します ファ イルをコンピュータに転送したり 削除したりできます USBケーブルを使用してファイル をコンピュータにダウンロードすることもできます ご注意 Macコンピュータをサポートしていません スマートフォンまたはタブレッ トにダウンロードする 1 AKASO GO アプリを開きます 2 下画面の左隅にある フォルダ アイコンをタップします 3 トップ画面の右隅にある 編集 アイコンをタップします 4 保存したいファイルをタップします 5 下画面の右隅にある 保存 アイコンをタップする ビデオと写真を削除する データをダウン...

Страница 127: ...の電源を入れます 2 モードボタンを数回押してシステム設定に入ります 3 下ボタンを押して オプション フォーマッ ト を見つけます 4 シャッターボタンを押すと 画面に メモリカードをフォーマッ トしますか と表示されま す すべてのデータが削除されます 5 シャッターボタンをもう一度押します マイクロメモリカードを正常にフォーマッ トしま した メモリカードの再フォーマット 2021 03 02 14 32 01 ビデオ 写真 ビデオ 再生 00 05 08 00 00 04 00 03 06 再生 キャンセル 全てを選択 選択された1ファイル 00 05 08 00 00 04 00 03 06 125 JP ...

Страница 128: ...にするには 柔らかい布で拭きます レンズの周りに異物を入れないで ください 3 レンズに指を触れないでください 4 カメラを落としたりぶつけたり しないでください 内部の部品が損傷する可能性があり ます 5 損傷を受けないように カメラを高温や強い日差しところに置かないでください カメラを保護する 撮影中で バッテリーが0 に達すると カメラはファイルを保存して電源をオフにします 最大限にバッテリーを使用するために できれば以下のガイドラインに従ってください 無線接続をオフにします 低いフレームレートと解像度の動画を撮影します スクリーンセーバー設定を使用します 電池寿命を最大化にする 126 JP ...

Страница 129: ...さないでくだ さい カメラ内部の液体との接触によるカメラまたはバッテリーの損傷は 保証の対象外 です コイン キー ネックレスなどの金属製の物と一緒にバッテリーを保管しないでください 電池の端子が金属製のものと接触すると 火災の原因となることがあります カメラに不正な変更をしないでください カメラの性能や安全性に影響を与えたり 保証 が無効になる可能性があります 警告 カメラやバッテリーを落としたり 分解したり 開けたり つぶしたり 曲げたり 変形 させたり 細断したり 電子レンジで焼却したり 塗装したり しないでください カメラのバッテリー開口部に異物を入れないでください 破損したり 穴が開いたり 水で損傷した場合など カメラやバッテリーが損傷している場 合は使用しないでください バッテリーを分解したり穴を開けたりすると 爆発や火災の 原因となる可能性があります 電池の保管と取扱方 12...

Страница 130: ...いることを確認してください 録画を開始する グレーのビデオボタンを押し カメラからビープ音が1回鳴り カメラのライトが点滅し 録画を開始します 録画を停止する もう一度グレービデオボタンを押し カメラからビープ音が1回鳴り カメラのライトが点 滅しなくなって 録画を停止します 写真 撮影するには カメラが写真モードになっていることを確認します 写真を撮る 赤い撮影ボタンを押します カメラからシャッター音が鳴ります 撮影ボタン ビデオボタン 生活防水のみ 128 JP ...

Страница 131: ...EK7000 のリモコン用のCR2032バッテリー 1 1 8mmのプラスドライバでリモコンの背面カバーにある4本のネジを外して開きます 2 PCBボード上の4本のネジを取り外します 3 図に示すように PCBボードを持ち上げ バッテリーを取り出します ご注意 カメラとビデオボタンの機能を逆にしないため プリント基板を回転させない ようにバッテリーを取り外してください 129 JP ...

Страница 132: ...4 極を上に向けながら 新しいバッテリーを取り付けます 6 4本のネジをすべてカバーに戻して取り付けます 5 4本のネジをすべてPCBボードに取り付けます 130 JP ...

Страница 133: ...カメラをヘルメッ ト ギア 機器に取り付けます カメラの取り付け 131 JP ...

Страница 134: ...akaso jp 当社製品に関するご質問 ご意見 ご感想などは下記アドレス サイトまたはLINEまでお問い合わせください できるだけ早く 対応致します E メール cs akasotech com 公式サイ ト www akasotech com お問い合わせ 132 JP ...

Отзывы: