background image

SlowMotion FastMotion

Wi-Fi

TimeLapse

Loop

Record

Normal

Video

Photo

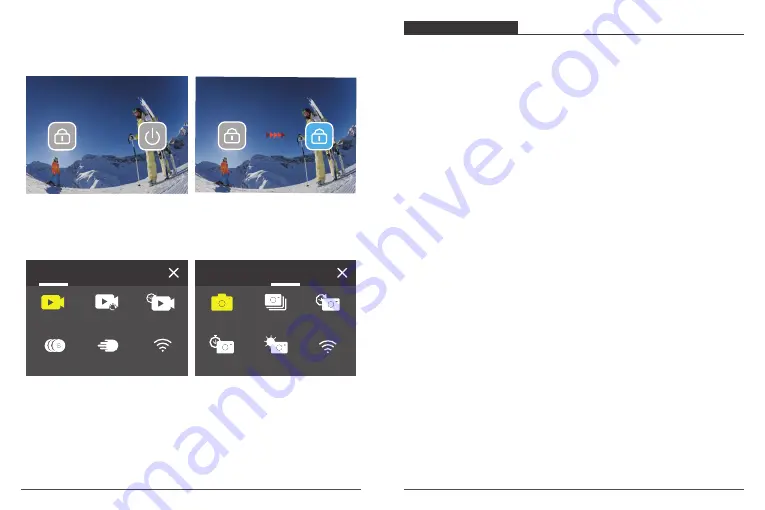
Swipe your finger from the top to the button on the screen, you can quickly turn off
your screen or power off your camera on the shortcut menu. To turn on your screen
again, press the Shutter button or tap the screen then swipe your finger from left to

right on the screen.

Tap the current shooting mode area on the screen to enter the video or photo

shortcut menu. You can switch to different shooting modes by tapping the mode

icon.

Switch Between Front Screen and Touch Screen

Press and hold Mode button to switch between the front screen and the touchscreen
camera view. You cannot switch between the screens while the video is recording.

Note:

 The following instructions are only applicable to the touchscreen, they will not

work on the front screen.

Self-Time

Long

Exposure

Wi-Fi

TimeLapse

Burst

Normal

Video

Photo

GETTING STARTED

Welcome to your AKASO Brave 7 LE. To capture videos and photos, you need a

microSD card to start recording (sold separately).

MICROSD CARDS

Please use brand name memory cards that meet these requirements:

 • microSD, microSDHC or microSDXC

 • Class 10 or UHS-I rating
 • Capacity up to 64GB (FAT32)

Note:


1. Please format the microSD card first in this camera before using. To keep your


 microSD card in good condition, reformat it on a regular basis. Reformatting


 erases all your content, so please make sure to offload your photos and videos

      before reformatting.

2. FAT32 format microSD card stops recording when the file size reaches to 4GB,


 and starts to record again on a new file.

POWERING ON AND OFF 

To Power On:

Press and hold the Power button for 3 seconds. The camera beeps while the camera

status light is on. When information appears on the display, your camera is on.

To Power Off:

Press and hold the Power button for 3 seconds. The camera beeps while the camera

status light is off.

SWITCHING MODE

Turn on the camera, press Mode button or swipe your finger across the screen to

change video or photo mode. More shooting modes are available under the shortcut
menu when you tap the current shooting mode area on the screen.

TURNING ON AND OFF Wi-Fi

Turn on the camera, press Power button to turn on Wi-Fi, and press again Power
button again to turn off Wi-Fi.

05

06

Содержание Brave 7 LE

Страница 1: ...USER MANUAL AKASO Brave 7 LE Action Camera V1 0...

Страница 2: ...Brave 7 LE Connecting to the App Playing Back Your Content Deleting Your Content O oading Your Content Maintaining Your Camera Maximizing Battery Life Battery Storage and Handling Remote Mounting You...

Страница 3: ...your body 01 50 02 08 How to mount the camera to a self stick 02 09 02 55 How to mount the camera to a bike 02 56 04 34 How to mount the protective backdoor 04 35 04 59 How to mount the camera to a h...

Страница 4: ...12 13 12 13 14 Lens 7 MicroSD Slot 14 Normal 4K30 01 19 42 Resolution 4K30 Middle Quallty High Low 2 7K60 1 2 3 4 8 5 6 Mode Recording Time Photos Remaining Playback Current Shooting Mode 1 2 3 4 Bat...

Страница 5: ...ely MICROSD CARDS Please use brand name memory cards that meet these requirements microSD microSDHC or microSDXC Class 10 or UHS I rating Capacity up to 64GB FAT32 Note 1 Please format the microSD car...

Страница 6: ...ton or tap Photo Setup icon to enter Photo Setup mode after you turn on camera You can change photo settings in this mode OVERVIEW OF MODES Video Shortcut Menu 1 Normal Video Default setting is Normal...

Страница 7: ...Setup 1 Video Resolution 4K30fps 2 7K60fps 2 7K30fps 1080P120fps 1080P60fps 1080P30fps 720P240fps 720P120fps 720P60fps Default setting is 4K30FPS Note When capturing video at high resolutions or high...

Страница 8: ...in lower image noise but darker images 3 EV 2 0 1 0 0 0 1 0 2 0 Default setting is 0 By default your camera uses the entire image to determine the appropriate exposure level However exposure lets you...

Страница 9: ...Auto Power O helps to power o camera after a period of inactivity to save battery life 10 Power Frequency 50Hz 60Hz Default setting is 50Hz 11 White Balance Auto Daylight Shade Tungsten Light White F...

Страница 10: ...t side of the screen to enter the Playback Mode In Playback Mode swipe your nger across the screen to scroll through video or photo les PLAYING BACK YOUR CONTENT Please download and install the AKASO...

Страница 11: ...ected les by using le explorer O oading Your Content to Smartphone 1 Open the AKASO GO App Connect the camera with the App 2 Tap Playback icon to see all the videos and photos 3 Select the photo or vi...

Страница 12: ...RNING Do not drop disassemble open crush bend deform puncture shred microwave incinerate or paint the camera or battery Do not insert foreign objects into the battery opening on the camera Do not use...

Страница 13: ...es with AKASO products please feel free to contact us we will respond within 24 hours E mail cs akasotech com Tel 888 466 9222 US Mon Fri except holiday 9am 5pm EST O cial website www akasotech com CO...

Отзывы: