Akai PDP4290 Скачать руководство пользователя страница 9

Remove the fixing bolts from both sides (left and right) of the wall attachment panel. Lift and pull  the
bottom of the display a small amount, to separate the insulation holder point from the bottom of the
wall attachment panel. 
Lift the display and separate the insulation holder point from the groove on top of the wall attachment
panel. 

17

16

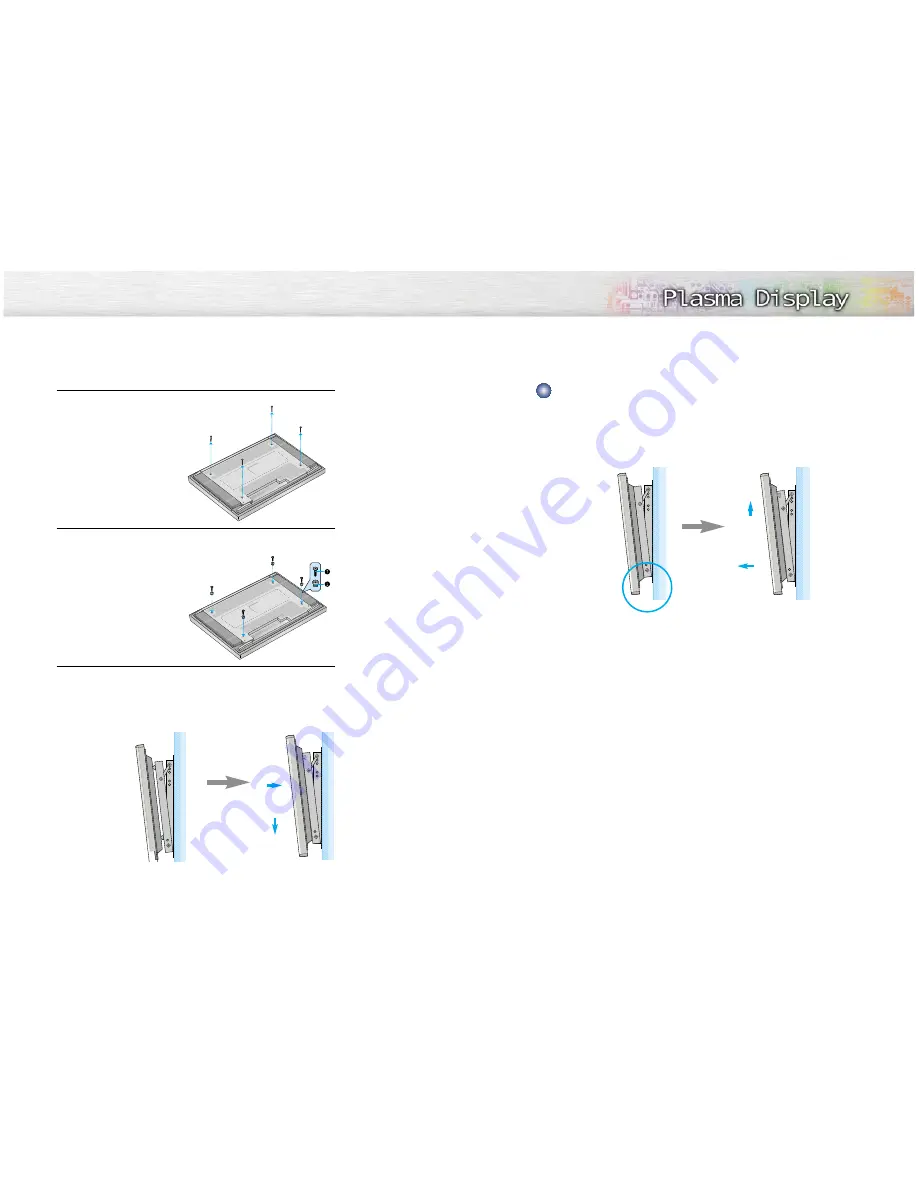
Remove four large screws from the rear side of the display. 

Insert the bolts and insulation sinto the 

four screwholes

as shown in the follow-

ing figure: 

Œ

Bolt 

´

Insulation holder 

Put the insulation rubber point protruding from the rear top of the display in
the groove on the top of the wall attachment panel. Lift up the display a little 

bit so that the insulation rubber point at the bottom of the rear side of the 
display is put in the groove at the bottom of the wall attachment panel. 
(Do not lift the display with any pressure. The insulation rubber at the top may 
be taken off. )  

´

Œ

Separating the Display from the Wall Attachment Panel

´

Œ

Содержание PDP4290

Страница 1: ...BN68 00394A 00 ENG Owner s Instructions PDP4290 ...

Страница 2: ...that there is adequate ventilation and that you ve followed the manufacturer s instructions for mounting Operate your Monitor only from the type of power source indicated on the marking label If you are not sure of the type of power supplied to your home consult your appliance dealer or local power company Use only a grounded or polarized outlet For your safety this Monitor is equipped with a pola...

Страница 3: ...mmission of the European Community Compliance with these directives implies conformity to the following Euro pean Norms EN55022 1998 Class B EN55024 1998 EN61000 3 2 1995 EN61000 3 3 1995 5 Protect the power cord Power supply cords should be routed so that they won t be walked on or pinched by objects placed on or against them Pay particular attention to cords at plugs convenience recepta cles and...

Страница 4: ...ode only 59 Function Description Selecting a Menu Language 62 Setting the Multi Control 63 Using the Key Lock 64 Setting up Your Remote Control 65 Appendix Troubleshooting 68 Care and Maintenance 69 Specifications 70 7 User Instructions Screen Image retention Do not display a still image such as on a video game or when hooking up a PC to this Monitor on the plasma monitor panel for more than sever...

Страница 5: ...P L A S M A D I S P L A Y P A N E L Setup Your New Plasma Display Panel 10 Remote Control Buttons 12 Wall Installation Instructions 14 Turning the PDP On and Off 18 ...

Страница 6: ...t external speakers PC RGB Input jack 15pin Connect to the video output jack on your PC ˇComponent Video Input jacks Y Pb Pr Component 1 inputs are for 480i 480p Component 2 inputs are for 480p 720p 1080i Video Input jack Connect a video signal from external sources such as VCRs or DVD players ˆS Video Input jack Connect a S Video signal from an S VHS VCR or DVD player ØAudio Input Video Component...

Страница 7: ...on Adjust the PDP picture by selecting one of the preset factory settings or select your personal customized picture settings Aspect button Press to change the screen size Mode button Selects a target device to be controlled by the AKAI remote control ie VCR Cable or DVD players Clock Display button Press to display clock on the PDP screen ÔSource button Press to display all of the available video...

Страница 8: ...on the sides of the panel 1 Do not install the PDP in any location other than vertical walls 2 To protect the performance of the PDP and prevent problems avoid the following places Do not install next to smoke and fire detectors Do not install in an area subjected to vibration Do not install in an area subjected to high voltage Do not install near or around any heating apparatus 3 Use only recomme...

Страница 9: ...the display 5 Insert the bolts and insulation sinto the four screwholes as shown in the follow ing figure Œ Bolt Insulation holder 6 Put the insulation rubber point protruding from the rear top of the display in the groove on the top of the wall attachment panel Lift up the display a little bit so that the insulation rubber point at the bottom of the rear side of the display is put in the groove a...

Страница 10: ...ple easy to use menu system that appears on the PDP screen This system makes it con venient and fast to use features on the PDP Your PDP also lets you display the status of many of your PDP s features Viewing the Menus 1 With the power on press the Menu button on the remote control The main menu appears on the screen The Video menu is selected 2 Use the joystick up down button to move items in the...

Страница 11: ...P L A S M A D I S P L A Y P A N E L Connections Connecting Speakers Receiver Connecting Speakers 22 Connecting a VCR Cable Box 23 Connecting a DVD 24 Connecting a Set Top Box 25 ...

Страница 12: ...akers S Video Cable Audio Cable Video Cable Connect Video S Video cable between the Video S Video Output jack on the VCR Cable box and the Video Input jack on the PDP For better video use an S Video cable Connect an Audio cable between the Audio Output jacks on the VCR Cable box and the Audio Input jacks Video on the PDP Videotape Playback 1 Turn on PDP and press the Video or S Video if S Video ja...

Страница 13: ...n For an explanation of Component video see your DVD owner s instructions How to Connect 1 2 Connecting a Set Top Box 480p 720p 1080i Audio Cable Video Y Pb Pr Cable Power Plug Connect a Video cable between the Set Top Box Y Pb Pr Output jacks on the Set Top Box and the Component 2 Video Input Y Pb Pr Input jacks on the PDP Connect an Audio cable between the Audio Output jacks on the Set T op Box ...

Страница 14: ...P L A S M A D I S P L A Y P A N E L Picture Control Customizing the Picture 28 Using Automatic Picture Settings 29 Viewing the Picture in Picture 30 Changing the Screen Size 33 Freezing the Picture 34 ...

Страница 15: ...lect Exit 28 1 Press the Menu button then press the joystick to enter 2 Move the joystick left or right to select Custom You will also see the items Contrast Brightness Sharpness Color and Tint 3 Move the joystick up or down to select the item you wish to change 4 Move the joystick left or right to change the value of the item 5 Press the Menu button to exit Note In the PC mode you can t adjust th...

Страница 16: ...ect On Locate Source Move Adjust Exit PIP Select On Locate Source Move Adjust Exit PIP VIDEO S VIDEO Move Exit 30 Selecting the PIP Screen 1 Press the Menu button Move the joystick up or down to select PIP then press the joystick to enter 2 Move the joystick left or right to select On The PIP image will appear in the corner of the screen 3 Press the Menu button to exit Note The PIP function operat...

Страница 17: ...spect button on the remote control the PDP s screen mode should appear in sequence The screen displays in this order Wide Panorama Zoom1 Zoom2 Stretch 4 3 Note If you watch a still image or the 4 3 mode for a long time over 2 hours an image may be burned onto the screen View the monitor in Wide or Panorama mode as much as possible 32 Changing the Location of the PIP Image 1 Press the Menu button M...

Страница 18: ...ll Press the Still button on the remote control to freeze a mov ing picture Press again to cancel P L A S M A D I S P L A Y P A N E L Sound Control Customizing the Sound 36 Using Automatic Sound Settings 37 Using the Surround 38 ...

Страница 19: ...the Menu button Move the joystick up or down to select SOUND then press the joystick to enter 2 Move the joystick left or right to select Custom You will also see the items Treble Bass Balance and Surround 3 Move the joystick up or down to select the item you wish to change 4 Move the joystick left or right to change the value of the item 5 Press the Menu button to exit SOUND Select Treble Bass Ba...

Страница 20: ...stick up or down to select SOUND then press the joystick to enter 2 Move the joystick up or down to select Surround then move the joystick left or right to select Concert Hall or Stadium 3 Press the Menu button to exit SOUND Select Treble Bass Balance Surround Off Move Adjust Exit Custom 50 50 0 SOUND Select Treble Bass Balance Surround Concert Move Adjust Exit Custom 50 50 0 ...

Страница 21: ...ove the joystick left or right to select hour then move the joystick up or down to select the correct hour 3 Move the joystick left or right to select minute then move the joystick up or down to select the correct minute 4 Move the joystick left or right to select AM then move the joystick up or down to select AM or PM If you want to display the Clock on screen move the joystick down to select Clo...

Страница 22: ...ove the joystick up or down to select TIME then press the joystick to enter 2 Move the joystick up or down to select On time then move the joystick left or right 3 Move the joystick left or right to select hour then move the joystick up or down to select the correct hour 4 Move the joystick left or right to select minute then move the joystick up or down to select the correct minute 5 Move the joy...

Страница 23: ...peration Connecting to a PC 46 Adjusting the PC Screen 50 Changing the Position of the Image 51 Changing the Size of the Image 52 Enlarging the Image Zoom 53 Moving the Zoom Picture 54 Picture Quality Adjustment 55 Information 58 Power Saver PC mode only 59 ...

Страница 24: ... using Display Data Channel DDC protocols Connecting to a PC This PDP is not compatible with Macintosh PC 47 46 Connect a PC 15pin cable between the Video Output jack on the PC and the PC Input jack 15p D SUB on the PDP For an explanation of Component video see your PC owner s instructions Connect a Audio cable between the Audio Output jack on the PC and the Audio Input PC on the PDP To watch the ...

Страница 25: ... 84 997 31 469 37 861 37 861 31 469 37 927 31 469 37 861 37 500 43 269 35 156 37 879 48 077 46 875 53 674 48 363 56 476 60 023 68 677 N N P P P N N N N N P P P P P N N P P P P N N N N N N N N P P P P P N N P P Vertical Frequency Hz Horizontal Frequency KHz Vertical polarity Horizontal polarity IBM PC AT Compatible How to Set up Your PC Software Windows only The Windows display settings for a typic...

Страница 26: ...ng the R G B Preset Press the RGB button to select the PC mode 1 Press the Menu button then press the joystick to enter 2 Move the joystick up or down to select Color Control then move the joystick left or right to enter 3 Move the joystick up or down to select the item you want to change 4 Move the joystick right or left to change the value of the item using the on screen gauge as your guide 5 Pr...

Страница 27: ...eous Move Adjust Exit Zoom 5 Panning Move Adjust Exit 52 Preset Press the RGB button to select the PC mode 1 Press the Menu button Move the joystick up or down to select SETUP then press the joystick to enter 2 Move the joystick up or down to select Scaling then move the joystick left or right to select Wide or 4 3 3 Press the Menu button to exit Changing the Size of the Image Position Language En...

Страница 28: ...set Press the RGB button to select the PC mode 1 Press the Menu button Move the joystick up or down to select SETUP then press the joystick to enter 2 Move the joystick up or down to select Zoom Pan ning then move the joystick left or right to enter 3 Move the joystick up or down to select Panning then move the joystick left or right to enter Adjust the position of screen by using the joystick but...

Страница 29: ...nning Image Lock Miscellaneous Move Adjust Exit Auto Adjustment Frequency 0 Phase 0 Move Adjust Exit Phase 50 56 Frequency Adjustment Preset Press the RGB button to select the PC mode 1 Press the Menu button Move the joystick up or down to select SETUP then press the joystick to enter 2 Move the joystick up or down to select Image Lock then move the joystick left or right to enter 3 Remove picture...

Страница 30: ...ment system saves energy by switching your monitor into a low power mode when it has not been used for a certain amount of time This power management system operates with a VESA DPMS compliant video card installed in your computer You use a software utility installed on your computer to set up this fea ture See the table below for details Table 1 Power saving modes Notes This monitor automatically...

Страница 31: ...Selecting a Menu Language 62 Setting the Multi Control 63 Using the Key Lock 64 Setting up Your Remote Control 65 P L A S M A D I S P L A Y P A N E L Function Description ...

Страница 32: ...e English Color Tone Normal Key Lock Off 1 Press the Menu button Move the joystick up or down to select SETUP then press the joystick to enter 2 Move the joystick up or down to select Color Tone 3 Move the joystick left or right to select the Color Tone Normal Warm1 Warm2 Cool1 Cool2 4 Press the Menu button to exit Note In the PC mode you can t adjust the Color Tone SETUP Move Adjust Exit Language...

Страница 33: ...r VCR or Cable box DVD player should turn on if your remote is set up correctly If your VCR or Cable box DVD player does not turn on after set up repeat steps 2 3 and 4 but try one of the other codes listed for your brand of VCR or Cable box DVD player If no other codes are listed try each code 000 through 089 or Cable box 0000 through 077 DVD player 000 through 008 Notes When your remote control ...

Страница 34: ...P L A S M A D I S P L A Y P A N E L Appendix Troubleshooting 68 Care and Maintenance 69 Specifications 70 66 Remote Control Codes VCR Codes Cable Box Codes DVD Codes ...

Страница 35: ... Adjust the Brightness or Contrast settings Adjust the Size settings The PDP is overheated Power off the PDP and let it cool for a while The cooling fan of the PDP may have a problem Contact an authorized service center With proper care your PDP will give you many years of service Please follow these guidelines to get the maximum performance from your PDP Identifying Problems Do not put the PDP ne...

Страница 36: ...0p COMPONENT 2 480p 720p 1080i RGB D SUB 15P Model Dimensions Display Remote Control Weight Display Remote Control Voltage Power Consumption Number of Pixels Screen Size AUDIO input AUDIO output VIDEO input Memo Exterior design and product specifications are subject to change without prior notice to improve the performance of this product This PDP applies to Class B digital device Note Class B sys...

Отзывы: