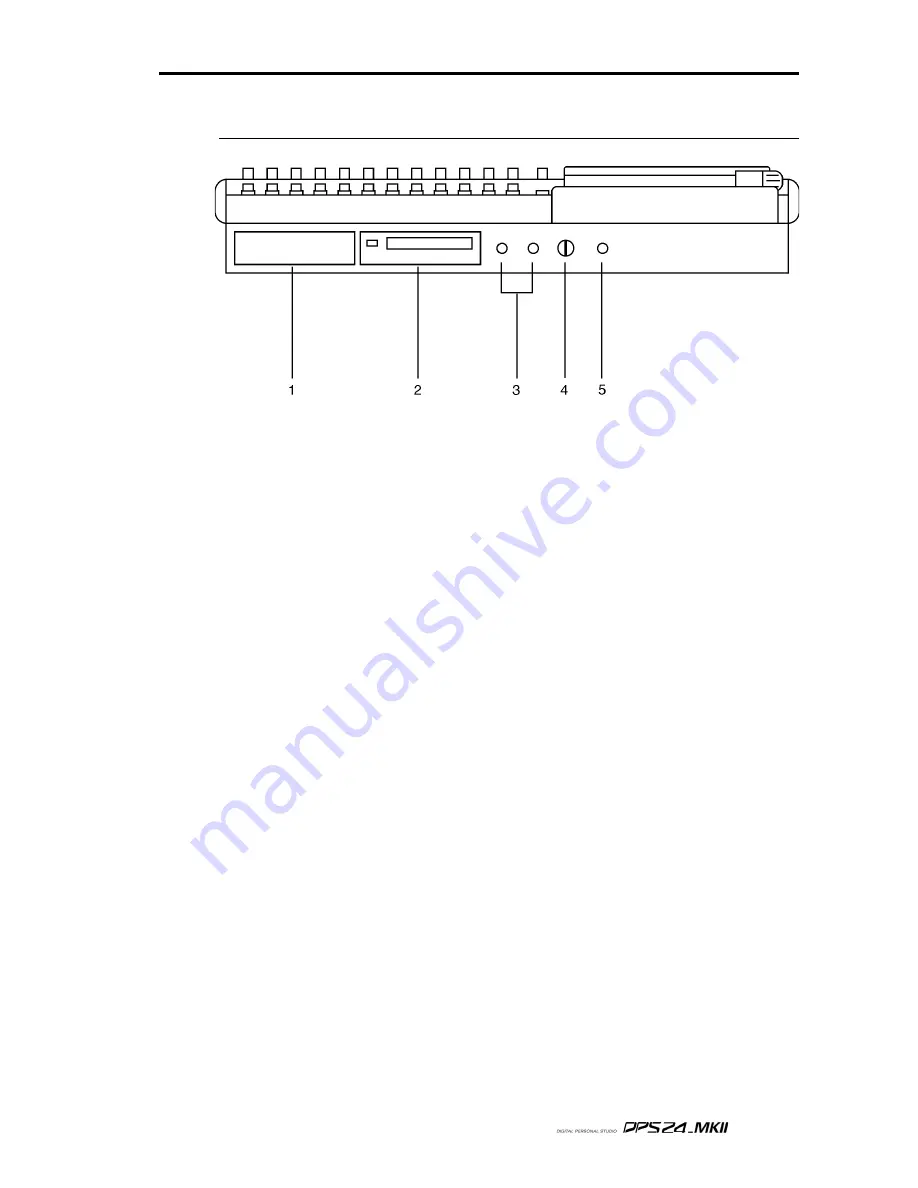
Akai DPS24 Скачать руководство пользователя страница 19


User Guide

7

FRONT PANEL

1. 5inch Bay

Internal Hard Disk drive is installed inside.

An optional Canister may be installeed now.

2. CD-RW/CD-R DRIVE BAY

An IDE CD-RW is installed here.

It is also possible to install a removable IDE hard drive bay.

3. HEADPHONE OUTPUT

Two headphone output connectors are provided. Both are identical (i.e. wired in parallel)
and carry a duplicate of the MONITOR output.

4. HEADPHONE LEVEL

This allows control of the level of the signal appearing at the headphone outputs.

5. HI-Z GUITAR INPUT

An electric guitar (or bass guitar) may be DI'd into this high impedance input.

Note that when a jack is plugged into this input, it uses Input Channel 12, and Inputs 12A
and 12B on the rear panel are overridden and cannot be used.

FRONT PANEL

Содержание DPS24

Страница 1: ......

Страница 2: ...Corp and may not be quoted or reproduced in any form without written permission from the company LIMITED SOFTWARE WARRANTY POLICY All the software provided with or purchased especially for AKAI professional products has been tested for functionality AKAI professional M I Corp will make its best efforts to correct reported software defects for future releases subject to technical practicabilities A...

Страница 3: ...e other A grounding type plug has two blades and a third grounding prong The wide blade or the third prong are provided for your safety If the provided plug does not fit into your outlet consult an electrician for replacement of the obsolete outlet 10 Protect the power cord from being walked on or pinched particularly at plugs convenience receptacles and the point where they exit from the apparatu...

Страница 4: ... IT BE INSERTED INTO A 13 AMP SOCKET ELSEWHERE The wires in this mains lead are coloured in accordance with the following code GREEN and YELLOW Earth BLUE Neutral BROWN Live As the colours of the wires in the mains lead of this apparatus may not correspond with the coloured markings identifying the terminals in your plug please proceed as follows The wire which is coloured GREEN and YELLOW must be...

Страница 5: ...tes applicables aux appareils numériques de la Class B prescrites dans le Règlement sur le brouillage radioélectrique édicté par le ministère des Communications du Canada 27 F This digital apparatus does not exceed the Class B limits for radio noise emissions from digital apparatus set out in the Radio Interference Regulations of the Canadian Department of Communications 27 En VENTILATION Do not p...

Страница 6: ...ENCODERS 13 CHANNEL ENCODERS 13 FADER FLIP 14 Q CHANNEL SELECT Q CHANNEL ENCODERS 15 Q STRIP Q CHANNEL ENCODERS 17 FADERS FADER BANKS 18 MASTER SECTION 20 MONITOR SECTION 21 LCD POD 23 LCD LAYOUT 24 SOFT KEYS 24 PROJECT INFO BAR 24 SAVE INDICATOR 25 PROJECT OVERVIEW 26 WAVEFORM GENERATION INDICATOR 26 METER BRIDGE 26 Q LINK CONTROLS 27 MOVING AROUND THE LCD 28 NAMING 30 PROMPTS 31 MAIN CONTROL SEC...

Страница 7: ...IT MODE 52 EDITING AND AUTOMATION 56 COPY 57 CUT 58 ERASE 58 INSERT 59 PASTE 60 MOVE 61 WAV AIFF IMPORT 63 IMPORTING MULTIPLE WAV FILES TO MULTIPLE TRACKS 68 WAV AIFF FILES EXPORT 71 DSP MODE 76 TIMESTRETCH 77 PITCH SHIFT 79 BPM 80 VARI SPEED 80 REVERSE 81 NORMALISE 82 RESAMPLE 82 MIXER MODE 84 MIXVIEW 86 CHANNEL 87 CHANNEL DYNAMICS PROCESSOR 92 EQ COMPRESSOR GATE PRESET LIBRARIES 94 EQ AND DYNAMI...

Страница 8: ...OMATED SCENE SNAPSHOT RECALL 122 NOTES REGARDING AUTOMATED SCENE RECALL 123 AUTOMATION EVENT EDITOR 125 EDITING EVENTS 126 EFFECTS MODE 132 EDITING EFFECTS 129 STORING EDITED EFFECTS 129 EFFECTS LIBRARY 130 FX LIBRARY FACTORY PRESETS 131 FX PARAMETERS 132 REVERB 132 DELAY 134 COMBINED 137 CHORUS 138 FLANGER 139 PHASER 140 ROTARY SPEAKER PAN 141 PITCH SHIFT WAH 142 EQ ENHANCER DISTORTION 143 DYNAMI...

Страница 9: ...NAL HARD DRIVES 159 COPY BACKUP RESTORE USER PRESETS 159 RESTORING PROJECTS 160 RESTORING TO EXTERNAL DRIVES 160 VIRTUAL TRACKS 161 UTILS 162 USING THE VIRTUAL TRACKS 163 OPTIONS 165 SETUP MODE 166 SAMPLE RATE 166 DIGITAL SYNC 167 T C RATE 167 TIME SYNC 167 BIT DEPTH 168 MMC SETUP 169 TEMPO MAPS 170 PREFERENCES 172 PLAY TO 172 PLAY FROM 172 METRONOME 172 FOOTSWITCH 172 24 TRACK RECORD 173 PEAK HOL...

Страница 10: ...194 LOADING SAVING MBCX PRESETS 198 MASTERING ON THE DPS24 199 CD PLAYER 201 EXT SYNC KEY 202 SETTING EXT SYNC OFFSETS 203 INTEGRATING ADAT MACHINES 203 24 TRACK TRANSFER ADAT TO DPS24 205 24 TRACK TRANSFERS DPS24 TO ADAT 205 OTHER APPLICATIONS FOR THE ADAT EXPANSION OPTION 205 ADAT AND DIGITAL CLOCK 206 SURROUND MIXING 207 SURROUND MIXING TABLE OF CONTENTS 208 INTRODUCTION 209 CREATING A SURROUND...

Страница 11: ...lementation Chart 225 Block Diagrams 226 Insatllation of Options To service Technicians 230 OS Upgrade via USB PC only 231 OS Upgrade via CD PC only 232 ASCII Keyboard commands 233 ADAT LRC Key Assignment 233 SPECIFICATIONS 234 INDEX 236 ...

Страница 12: ...x Table of Contents User Guide ...

Страница 13: ...hannel 2 sends per channel at 88 2kHz and 96kHz sample rates Over 50 real time effects x 4 channels which include reverb delay chorus flanger phase shifter pitch shifter auto pan wah rotary speaker simulation distortion EQ noise gate compressor limiter enhancer and real time pitch corrector x2 channels at 88 2 and 96kHz 24 x balanced analogue inputs 12 x 2 banks reduces the need for re patching Ba...

Страница 14: ... mixer and line sources are patched to the line inputs The effects sends are connected to the effects processors and the outputs of these are connected to the mixer s effects return channels The mixer s stereo L R outputs are connected to a stereo mastering machine The outputs of the stereo recorder can be patched through a mastering compressor expander before feed ing a CD recorder not shown here...

Страница 15: ... surface As you will see everything in the DPS24 is laid out very logically The Multi Track recorder editor is controlled using the 24 RECORD EDIT SELECT keys for arming editing the 24 Tracks and the full TRANSPORT section including the GOTO and MEMORY keys for auto locate functions as well as the JOG SHUTTLE wheel for audio scrubbing A scrolling graphic view of the 24 tracks is displayed using th...

Страница 16: ...hough each channel of the DPS24 has a compressor gate you may want to use external valve units or other devices The channel insert sends 3 can also be used as balanced direct outputs and the channel insert returns 4 can also be used to accept external pre amps or 19 channel strips therefore by passing the internal pre amps on the DPS24 for these channels 5 SCSI CONNECTOR OPTION The optional 68pin ...

Страница 17: ...vocals in a separate studio are or vocal booth for example The key mapping of the LRC to DPS24 functions is shown in the appendix section 14 MASTER STEREO OUTPUT These balanced outputs should be connected to the line inputs of your stereo mastering machine 15 MAIN MONITOR OUTPUT These balanced outputs should be connected to the line inputs of your main control room monitor amplifier or powered spe...

Страница 18: ... wish 20 EXPANSION SLOTS These three slots can be used to accept a variety of optional expansion cards such as IB 24ADT ADAT Expansion card adding 16 more channels of ADAT digital input output and an ADAT SYNC OUT connector to control the transports of ADAT machines from the DPS24 IB 24LTC SMPTE EBU Time Code Reader Generator card for synchronization with other devices such as Tape machines and Vi...

Страница 19: ... output connectors are provided Both are identical i e wired in parallel and carry a duplicate of the MONITOR output 4 HEADPHONE LEVEL This allows control of the level of the signal appearing at the headphone outputs 5 HI Z GUITAR INPUT An electric guitar or bass guitar may be DI d into this high impedance input Note that when a jack is plugged into this input it uses Input Channel 12 and Inputs 1...

Страница 20: ... the appropriate channel s using the channel SELECT keys press the Q CHANNEL key and adjust the EQ using the Q CHANNEL encoders Need to tweak an effect Press FX and use the Q LINK controls to modify parameters and with the Q CHANNEL selected you can adjust the channel parameters AND the effects pa rameters simultaneously If you are working with artists in separate rooms set up a foldback cue mix u...

Страница 21: ...long the top switch between Input A or B A is the XLR combo B is the 1 4 jack LINE MIC The next row of switches set the input TRIM sensitivity between line 15dB 45dB and mic 0dB 60dB TRIM This pot allows you set the input channel s initial gain according to the setting of the LINE MIC switch SIG CLIP This tri coloured LED shows the level of the input signal after the input pre amp It illuminates a...

Страница 22: ...nation the group outputs are patched to the disk tracks and channels are routed to them by way of the Groups Groups 1 8 routed to Tracks 1 8 9 16 and 17 24 So for example to route Input 5 to Track 3 you would assign it to GROUP 3 4 To route say Tracks 1 2 3 and 4 to say Tracks 13 and 14 for a stereo bounce down you would assign them all to GROUP 5 6 NOTE Because of the flexible patching facilities...

Страница 23: ...s that the channel in question cannot be routed to that bus This applies to GROUP AUX and MIDI mixer channels NOTE 2 Almost any channel can be assigned to any group However it is not possible to assign groups to groups Groups can be assigned to the stereo L R bus however NOTE 3 In normal operation i e when not assigning channels to groups the GROUP keys should not be flashing To assign a channel t...

Страница 24: ...hat you have control over these elements with a single Group fader Routing groups to the stereo L R bus is done simply by pressing the L R key and in the GROUPS FX fader bank pressing the group channels 1 8 SELECT key s as appropriate This is consistent with assigning other channels to groups NOTE Channels which are routed to a sub group need to be taken out of the stereo L R bus to avoid them app...

Страница 25: ... as PAN controls with one pan control for each of the channels of the current Fader Bank However they may be used to set FX AUX send levels This functionality is selected using the Q STRIP FUNCTION keys PAN Sets the rotary encoders to act as pan controls for each of the channels FX AUX 1 4 Sets the rotary encoders to act as send levels for the internal effects channels or to the AUXILIARY bus NOTE...

Страница 26: ...ment To flip the faders simply double click the FX Aux buttons Press the FX Aux key once to select it Press it again to flip When flipped the faders set FX Aux send level and the encoders now set channel level When flipped the LED in the key will flash to indicate its status Press it again to return to normal operation NOTE If the sends are configured as stereo sends when FX AUX1 is flipped the fa...

Страница 27: ...and FX Aux sends This mode is enabled by press ing the Q CHANNEL switch located centrally on the upper panel When the Q CHANNEL key is on illuminated the encoders function as a complete channel strip for the selected Channel as follows from left to right as labelled underneath the encoders PAN LOW SHELF EQ FREQUENCY LF GAIN SWEEP EQ FREQUENCY SWEEP EQ GAIN SWEEP EQ Q HIGH SHELF EQ FREQUENCY1 HF GA...

Страница 28: ...X AUX 1 4 as pre or post fade Of course for the Q CHANNEL mode to be applicable you must select a channel for edit ing i e you should press a channel s SELECT key just under the row of encoders The SE LECT key of the selected Channel is illuminated On power up the default selection is the Master Channel NOTE Enabling Q CHANNEL automatically calls up the MIXER CHANNEL page of the selected Channel o...

Страница 29: ...inates as well This is to assist with viewing the encoder s at an angle where the top middle LED may not be visible LEVEL CONTROL When the encoders are used as level controls e g FX AUX SEND the LEDs illuminate as follows EQ GAIN When the encoders are being used to set EQ gain in the Q CHANNEL the LEDs illuminate as follows EQ Q When the encoder is used to set EQ Q in the Q CHANNEL its LEDs illumi...

Страница 30: ... s LED flashes and a large SOLO LED flashes in the MASTER section SOLO operation is described later in the manual A channel can be selected for tweaking using the channel SELECT key above each fader The SELECT keys are also used in conjunction with the ASSIGN keys to route channels to the L R bus and or to Groups and hence to disk tracks for recording The SELECT keys can be used to link adjacent o...

Страница 31: ... L R inputs to be mixed to the main L R bus with level and mute control only This channel has a fixed source MIDI CONTROLLER 16 channels each providing 2 MIDI controllers which can be assigned to any MIDI channel or controller Controller 1 is controlled by the channel fader and Controller 2 is controlled by the channel s PAN control By default these are configured to send MIDI Volume CC 7 on Contr...

Страница 32: ...e engineer in the control room can talk to the talent in a separate studio area The key is a press to make switch that needs to be held down for the talkback mic to be routed to the STUDIO outputs NOTE To facilitate this the AUX 3 4 sends need to be configured to be sent to the STUDIO L R outputs This is set in the MIXER FX AUX SETUP page The illuminated SELECT key allows you to select the master ...

Страница 33: ...mple Input 5 may be solo d but the current FADER BANK might be say Tracks 1 12 As a result it may not be clear that a channel is solo d This master SOLO LED helps over come this by showing that a channel somewhere is solo d 2 TRACK This switches the 2 TRACK input into the main monitor output over riding the main L R mix Normally this will be used to check the output of an external stereo recorder ...

Страница 34: ...erence checking NEAR This switches the monitor output from the MAIN outputs to the NEARFIELD connections on the rear panel Typically the MAIN outputs of the DPS24 will be connected to a high quality high power amp speaker monitoring system whilst the NEARFIELD outputs will be connected to a smaller system perhaps even a domestic hi fi amp powering smaller speakers Thus with NEAR switched OFF monit...

Страница 35: ...talkback mic Its level can be regulated using the TB LEVEL pot directly below it Underneath the function keys is a dedicated timecode display This can be switched between timecode hours minutes seconds frames and BBC Bars Beats Clocks using the DIS PLAY SELECT key to its right Display status is indicated by two small LEDs between the display and the DISPLAY SELECT key Finally the CONTRAST control ...

Страница 36: ...oft keys along the bottom of the LCD This is typical do it style key This is a typical go to another page key Some soft keys are also uses as ON OFF switches or Indicates that a function is on or Indicates that a function is on Double width equivalents also exist PROJECT INFO BAR In all pages at the top of the screen the project drive and the currently active project are shown along with the curre...

Страница 37: ... reminder However please keep in mind that it is still possible to damage project data if you power off the DPS24 while writing to the disk The DPS24 is writing to the disk after any recording editing or mixing operation as simple as touching a fader or after changing any setting It usually takes only 10 20 seconds to complete a write operation of the last changes Please wait until the icon disapp...

Страница 38: ...DPS24 calculates each audio file s waveform for display if the WAVE GEN function is enabled in SETUP PREFS as described later in this manual This operation is performed by the DPS24 in the background In the MAIN SCREEN and also in the main page of EDIT DSP modes a Waveform Genera tion indicator icon is displayed in the System Info bar in the center of the screen shows the status of this background...

Страница 39: ... in the FX or CHANNEL Dynamics pages or select option parameters For instance in the SETUP pages scroll through lists data entry In particular Q5 and Q6 knobs are often used for scrolling data entry in as many pages as possible In general if Q5 Q6 are not used for page specific Q Controls Q5 moves left right and Q6 moves up down unless one direction is meaningless in which case the Q Link knob for...

Страница 40: ... type with the cursor keys and set the parameters directly with the Q LINK controls Most of the DPS24 s pages are like this and have no parameters to set via tedious cursor movement There are a few pages however which have multiple parameters to select One example is the CHANNEL page In a page such as this you use the CURSOR keys to move around from parameter field to parameter field You can also ...

Страница 41: ...t of fields and unfortunately there is no option but to cursor around them with the cursor keys or Q5 and use the numeric keypad s DATA keys or Q6 to set values An example of this would be the PATCH pages However there are not that many pages like this and also these are the kind of pages which once set do not require constant usage after that For the most part parameters are set using dedicated c...

Страница 42: ...dollars and works well with the DPS24 When you go to name something you will see this pop up You can use Q1 to set upper case characters A Z You can use Q2 to set lower case characters a z You can use Q3 or the numeric keypad to enter numbers 0 9 You can use Q4 to enter the following special characters You can use Q6 or the cursor keys to move the cursor left right You can use F3 to insert spaces ...

Страница 43: ...1 User Guide PROMPTS The DPS24 uses prompts to guide you through certain function of the user interface For example The DPS24 also uses progress displays for functions that take time For example PROMPTS ...

Страница 44: ... It s SHIFT function allows you to set a timecode offset MAIN SCREEN This is the main operating screen that one normally works in It shows the project name meters and an overview of the project It s SHIFT function GRID shows an enlarged project display EDIT Allows you to edit audio with functions such as copy cut paste etc This mode s SHIFT function gives access to the DPS24 s off line DSP functio...

Страница 45: ...ndo and redo operations 20 undo redo operations are possible If the UNDO Confirm parameter in SETUP PREFERENCES is ON a temporary confirmation pop up message will be displayed If there is nothing to undo redo a prompt will inform you as such PRE ROLL The PRE ROLL key allows you to add an offset to locate points and CYCLE loops When switched on any locates you do will be to the lo cate point minus ...

Страница 46: ...NPUT MONITOR is switched off the default monitoring is as follows on the selected RECORD tracks PLAYBACK Monitor disk RECORD Monitor input STOP Monitor input Thus when playing up to a record punch in manual or automatic you hear the track s selected for record playing back At the point of the punch in monitoring switches to INPUT and you will hear what you are playing recording At the point of pun...

Страница 47: ...ored in Mix Scene Also saved in a Mix Scene are Global FX AUX Setup and FX selection and settings for all 4 Effects Scenes are recalled using the SCENE RECALL key and are stored not surprisingly using the SCENE STORE key The MIX SCENE STORE and RECALL keys are also used to store and recall EQ or DYNAMICS SNAPSHOTs for individual Mixer Channels and FX SNAPSHOTs for individual effects channels SNAPS...

Страница 48: ...ng one the new name will overwrite the original You can also rename an existing scene using RENAME F5 You will note the extra parameter at the bottom of the prompt window This allows you to select exactly what will be stored You can select the following options ALL Everything will be stored in the selected scene fader position pan posi tions FX Aux send settings channel on off status EQ and FX set...

Страница 49: ...list and you can press the ENTER key or F6 RECALL to recall the selected scene The prompt will close when the scene is recalled When recalling a scene you can also decide what will be recalled For example you may have stored Scene 03 as ALL everything stored but when you come to recall that event you can decide to only recall for example static controls As with STORE use Q5 to select what it is yo...

Страница 50: ... All Pan centered All Mono Channels INPUTS and TRACKS EQ ON FLAT EQ DYN OFF SENDS 1 4 GLOB POST 120dB FX RTN Channels SENDS 1 4 OFF POST 120dB L R ASSIGN TRACKS and FX RTNS L R INPUTS and GROUPS not assigned GROUP ASSIGN all signals not assigned FX AUX SETUP 4 x MONO FX 1 4 MIDI CHANNELS Fader OFF Controller 007 default value 104 Pan OFF Controller 010 default value 64 FX MBCX OFF FX1 ON Big Hall ...

Страница 51: ...mation is switched ON whenever you press PLAY at any point in the project the automation refers to Scene 00 so that it knows where it should be and what automation data it should be playing This means that Scene 00 sets the initial mix settings for the project If you subsequently change any of the parameters that are not dynamically automated these will be reset to Scene 00 s settings when you pre...

Страница 52: ...escribed later in this manual STOP Stops playback rewind fast forward etc PLAY Plays the selected project Pressing PLAY whilst recording will cause the DPS24 to drop out of record RECORD This allows you to record To drop into record whilst the project is play ing press and hold PLAY and then simultaneously press RECORD i e like a normal MTR You can also start recording from stopped press and hold ...

Страница 53: ...the value set for PLAY TO and PLAY FROM in the SETUP PREFERENCES mode IN OUT Plays between the IN OUT markers and returns to the original location It s SHIFT function LOOP allows you to play the IN OUT region repeatedly in a seamless loop and is useful for auditioning how an edit may sound when played repeatedly i e when pasted or inserted sev eral times end to end NOTE1 When using the edit play k...

Страница 54: ...locate to one of 100 00 99 previously stored locate memory points to the IN OUT points to the Project START END to the PREVIOUS NEXT cue return to zero or roll back by the pre roll time Pressing SHIFT GOTO pops up a window that allows you to enter a locate time value with the numeric keypad MEMORY Pressing this key allows you to store a locate point ...

Страница 55: ... time when you press F6 STORE or the ENTER key By default the stored locate point is named Memory nn however you may also name the locate point before storing it by pressing F3 F4 NAME STORE IN that case the NOW time is captured at th etime when you press F6 OK in the Name Locator window Storing the locate memory also closes the prompt You can also close the pop up without storing a locate memory ...

Страница 56: ...UMERIC keypad to type in a 2 digit locate memory number fol lowed by ENTER or GOTO F6 or GOTO PLAY F4 F5 or GOTO CONTINUE F2 F3 Press GOTO and use the CURSOR UP DOWN keys or the Q6 knob to select a memory to locate to followed by ENTER or GOTO F6 or GOTO PLAY FF4 F5 or GOTO CON TINUE F2 F3 Pressing ENTER or GOTO F6 will simply locate to the memorised point minus pre roll time if PRE ROLL is enable...

Страница 57: ...s quick locates So for example if you have a bunch of useful locate points in Locate memories 50 59 these can be nominated as your quick locate memories GOTO NEXT PREV CUE Another option allows you to locate to the next or previous cue without opening the GOTO MEMORY windows This is a quick way of moving around a project where locate markers have not been set To go the to the next and previous cue...

Страница 58: ...te to a specific timecode position by pressing SHIFT GOTO This will pop up a prompt where you can enter the timecode value using the numeric keypad If DISPLAY SELECT is set to BARS BEATS CLOCKS instead of Time Code you can enter the locate time in Bars and Beats ...

Страница 59: ... locate points etc NOTE During critical playback live shows etc it is recommended to switch WHEEL OFF to avoid possible interruptions caused by unintentionally moving the Jog shuttle wheel IN OUT KEYS Pressing either of these keys marks the current NOW time as the IN or OUT points IN and OUT points can be marked on the fly even when a project is playing there is no need to have to stop playback to...

Страница 60: ...drive if the option is installed NOTE If your LCD appears blank during power up check to make sure that the LCD CONTRAST control is not set to minimum The contrast can be turned down such that the screen can appear almost completely blank from some viewing angles If your DPS24 does not power up as described above for example you get an error message saying NO DRIVES DETECTED or your CD drive if in...

Страница 61: ...you may select and edit the DPS24 s internal effects PROJECT Allows you to load create copy backup restore delete or rename projects Its SHIFT function gives access to the Virtual Tracks function SETUP Allows you to set global parameters such as timecode and digital sync op tions preferences etc that affect the DPS24 as a whole Its SHIFT function allows access to the CD R functions for backing up ...

Страница 62: ...drive if the option is installed NOTE If your LCD appears blank during power up check to make sure that the LCD CONTRAST control is not set to minimum The contrast can be turned down such that the screen can appear almost completely blank from some viewing angles If your DPS24 does not power up as described above for example you get an error message saying NO DRIVES DETECTED or your CD drive if in...

Страница 63: ...you may select and edit the DPS24 s internal effects PROJECT Allows you to load create copy backup restore delete or rename projects Its SHIFT function gives access to the Virtual Tracks function SETUP Allows you to set global parameters such as timecode and digital sync op tions preferences etc that affect the DPS24 as a whole Its SHIFT function allows access to the CD R functions for backing up ...

Страница 64: ...the CYCLE function on or off When it is switched on playback is cycling between the IN and OUT markers with pre roll and post roll if enabled NOTE Cycle playback is not seamless and there will be a pause as the region cycles For seamless loop playback use the LOOP function SHIFT IN OUT METER VIEW Allows you to select whether metering is pre eq pre or post fader METRO Switches the metronome on off ...

Страница 65: ... view also allows you to see autolocate points shown as white triangles across the bottom of the display and the track numbers on the left side of the GRID Track names can be shown in the GRID view However if you don t want them shown they can be optionally switched on or off in the SETUP PREFS MORE page When an IN OUT region is marked both track displays highlight the region GRID Graphic Interfac...

Страница 66: ...of waveform display can be shown in the EDIT page you can actually edit any number of tracks Other tracks waveforms may be viewed using the cursor up down keys to scroll through the tracks i e with tracks 1 and 2 shown pressing CURSOR DOWN would show tracks 2 and 3 pressing CURSOR DOWN again would show Tracks 3 and 4 etc You can also use the Q6 knob to scroll though tracks However you can select t...

Страница 67: ...T SELECT track key two tracks will be shown You can also use SHIFT CURSOR UP DOWN to increase or decrease vertical i e ampli tude resolution for the selected track s When editing you can use the JOG wheel to fine tune your edit jog to the point in the waveform display and press IN or OUT to re define the edit region EDIT MODE ...

Страница 68: ...y At any resolution you can use the numerical keypad s keys or the Q5 knob to nudge the NOW time forwards or backwards by one pixel increments to fine tune your edit points At the maximum horizontal zoom one pixel of the LCD represents one sample This means that you can set sample accurate edit points ...

Страница 69: ... function The Edit Tracks graphic shows you which tracks are selected for edit same as the 24 RECORD EDIT SELECT keys The CLEAR F3 and ALL F4 buttons give you a quick way of deselecting or selecting all tracks for edit F6 or the ENTER key performs the selected edit function and returns to the main EDIT screen CANCEL F1 or the CANCEL key returns to the main EDIT screen without performing the edit Q...

Страница 70: ...ng you to decide how the automation will be affected when editing The options are OFF Automation data will not be carried with the audio edit SELECTED Automation data on the tracks selected for editing will be carried with the edit ALL Automation for all channels will be carried with the audio edit This latter option is only useful if you are doing extensive multi track edit ing for example editin...

Страница 71: ... COPY Now load the project you want to place the edit in select the destination tracks and locate to the position you want the edit to be placed and use the PASTE or INSERT function explained later to place the region in that project CUT and ERASE also copy the region to the clipboard so you can place audio regions you remove in other projects as well Destination Q2 allows to select between the re...

Страница 72: ...ey will remove the selected IN OUT region to the clip board and close the gap shifting all subsequent audio backwards ERASE Pressing ERASE F3 displays this screen Pressing ERASE F6 or the ENTER key will remove the selected IN OUT region to the clipboard but subsequent audio will not slip in time ...

Страница 73: ...ing Q5 No of Inserts This will insert in the cue n times up to 99 with each one appended to the end of the previous one For example with 4 repeats specified you would get this result All audio after the point of insertion is shifted accordingly Pressing SILENCE F5 allows you to insert a section of silence that is equal to the IN OUT region All audio on the selected track s after the IN point will ...

Страница 74: ...you may specify the number of times the pasted cue will be re peated up to 99 However the results are somewhat different than with INSERT NOTE In this case it could be that multiple repeats could paste over existing audio on the track Please consider this when pasting with repeats If the action tramples over audio you want to keep don t forget that you can use UNDO Source Q2 allows to select betwe...

Страница 75: ...ou can slip move the selected edit region to the NOW time referenced either to its IN point or OUT point IN NOW F6 moves the IN OUT region to start at the NOW time OUT NOW F5 moves the IN OUT region to end at the NOW time Pressing MORE F2 displays this screen MOVE ...

Страница 76: ...TO TRACK Although easily achieved using ERASE and PASTE this function al lows you to move audio from one track to another quickly and easily Pressing TO TRACK F6 will pop up this prompt The source tracks are those selected for editing using the EDIT SELECT keys before pressing TO TRACK F6 The destination tracks are those where you want the source tracks to be moved to To select the destination tra...

Страница 77: ...ct the source of the PASTE INSERT By default this is set to CLIPBOARD and the paste insert will be as normal from the DPS24 s internal clipboard However it is possible to use Q2 to select any of the installed or externally connected drives When a drive is selected in the example shown above the internal CD on IDE 1 is the selected drive F6 changes to show BROWSE This allows you to see the contents...

Страница 78: ...ported are 16 or 24bit Mono Stereo or Multi channel WAV Broadcast WAV wav or bwf extensions or AIFF files aif extension NOTE The extension must be present for the DPS24 to recognize the file The DATE RANGE parameter Q4 allows you to select what files you will view when using BROWSE based on their creation date The options are ALL You will see all files PAST YEAR You will only see files from the pa...

Страница 79: ...will see the contents of the selected folder In the example shown above you can see the wav files listed You can move the cursor up and down through the list to see the various files When the cursor is placed over a compatible audio file the file information is displayed at the bottom of the screen Number of Channels Sample Rate Bit Depth Length and Timestamp WAV AIFF IMPORT ...

Страница 80: ... keys select the tracks to import the audio file to so that the number to selected tracks is at least equal to the number of Channels in the audio file If there are more tracks selected than the number of Channels the file will be imported to the lowest track numbers If there are less tracks enabled for EDIT than the number of Channels to be imported the following error message will be displayed P...

Страница 81: ... For example in the example shown above tracks 1 and 2 will automati cally be named 120bpm loop 1 this can be very useful when importing material that will form an entire track but please note that if you are importing several different files onto the same track for example im porting sound effects one after each other on the same track the track name will be that of the most recently imported fil...

Страница 82: ...one pass To recap the import process locate to the point where you want to import the files press EDIT and select the required number of tracks for edit Go to PASTE or INSERT and select the appropriate source drive that contains the files you want import Press BROWSE and navigate the disk to find the files you want to import To import multiple files select them using the CURSOR keys and use the SE...

Страница 83: ...nd 2 Tracks 5 6 wav Tracks 3 and 4 You would press the SELECT key in the following order 1 Tracks 3 4 wav 2 Tracks 5 6 wav 3 Tracks 1 2 wav And you would see this on the screen with the files allocated to the tracks accordingly When you re ready and you have selected all the files you want to import simply press IMPORT on F6 As with importing a single file you will receive a prompt asking you to c...

Страница 84: ...ctly being able to read each file s timestamp on the DPS24 allows you to effectively re create the Q List from the project on that system However please note one thing It s quite possible that the original project created on the other system has several cues at different times on one track Of course all these small cues have unique timestamps but because it is not possible to assign more than one ...

Страница 85: ...ort mark an IN OUT region and copy it The difference is that you are copying it to a CD HD instead of the internal clipboard To access the EXPORT function press EDIT press COPY F1 You will see this screen Using Q2 select the Destination drive you want to export the tracks to The available drive selections are the same as for Import IDE SCSI or HOST The display changes to the EXPORT REGION screen a...

Страница 86: ... a system that doesn t support Broadcast WAV timestamps One thing to note is that all audio within any of the selected options will be rendered In other words if for example a particular track has a load of small individual cues in the original DPS24 project when exported that track will be one continuous wav file For example Original track The exported version Q5 allows you to select the Export T...

Страница 87: ...cific functions In both cases Q2 allows you to select the Export file Format as WAV or AIFF AIFF is only intended for use with older Apple Macintosh based systems However the AIFF file format does not include timestamps Most current Macintosh based systems now support WAV or Broadcast WAV files When WAV is selected the DPS24 exports Broadcast WAV files Q5 allows you to select the Export Region opt...

Страница 88: ...be used to enter a specific name If left blank it returns to auto naming For named MONO or STEREO exports the resultant filename has the track number appended Since MULTI CHANNEL export will always generate a single file only nothing is appended to the name For auto named MONO or STEREO exports the resultant filename is the Channel Name of the track STEREO exports use the left channel and remove L...

Страница 89: ...ASE F4 the disc if it is a CD RW media If the selected drive is a CD drive you can also see the type and status of the Disc at the top right of the screen The various types are No Disc Audio CD Data CD ISO9660 CD and the various states are Blank Open or Closed The DPS24 can only export audio files to ISO9660 CDs that are Blank or Open With an ISO9660 CD you will only see the Root directory of the ...

Страница 90: ...f line DSP functions generate new processed audio files on the disk As for EDIT you can select as many tracks as you need to process However please note that processing time increases proportionally as each track or pair of stereo tracks is processed For example if processing a stereo track of X length takes Y sec onds processing two stereo tracks of the same length will take twice as long NOTE Ti...

Страница 91: ...al with little bass content or bass content that is short DANCE 2 This works well with rhythmic material HF and MF is handled well and short as are sharp bass sounds DANCE 3 This is also suitable for rhythmic material but will handle longer bass components better PERC 1 This works on very rhythmic material especially solo drums etc but can upset bass content PERC 2 This also works well on percussi...

Страница 92: ...y one preset and allows you to make adjustments to the preset with one easy to use control Q3 AMOUNT allows you set the timestretch amount as a percentage with a range of 50 200 100 is absolute and represents no change F2 SLIP on off allows you to select whether audio after the timestretch re gion will slip in time or not The key is a simple ON OFF switch with status being denoted by a simple on o...

Страница 93: ...the pitch of the selected edit region without changing its length Pressing PITCH F2 displays this screen As in the TIMESTRETCH page you may select a preset adjust it manually But instead of the strech amount here you set the tuning offset that you want to apply PROCESS F6 or the ENTER key initiates the process Because the length of the processed version doesn t change the SLIP function key does no...

Страница 94: ...need to know the tempo of the original audio This is entered in the SOURCE TEMPO field You then need to set the tempo you want the edit region to play at in the NEW TEMPO field PROCESS F6 or the ENTER key initiates the process F2 SLIP allows you to select whether audio after the tempo matched region will slip in time to accommodate the new length VARI SPEED Allows you to speed up down the selected...

Страница 95: ...eature is known as Rendering also known as Consolidate Audio By setting the Amount to 100 the speed and pitch of the selected au dio region will remain unchanged but if the region is composed of sev eral smaller cues as a result of editing or multiple recording punches this processs will create one continuous audio file instead REVERSE Allows you to reverse the selected edit region so that it play...

Страница 96: ...ormalises according to the loudest section of audio on any of the selected tracks so if tracks 1 2 3 4 5 and 6 are normalised and there is a loud section on track 4 tracks 1 2 3 5 and 6 will be normalised according to this audio level RESAMPLE Allows you to convert the sampling rate of the selected edit region This also includes a dithering function to convert the Bit depth Pressing MORE F6 follow...

Страница 97: ...te the varispeed The main application of the Resample feature is to convert the sample rate of a region that is being pasted into a Project set at a different sample rate than the Project it was copied from This can also be used to dither a 44 1kHz 24bit stereo project down to 16bit before burning it to CD DSP MODE ...

Страница 98: ...k tracks Under the meters block you can see an overview of a selected parameter for all the channels The displayed parameter is selected using Q6 The default parameter is LEVEL showing the Fader position for all channels This is useful as it allows you to see all faders in one glance without having to switch Fader Banks You may also view different parameters such as Pan Channel ON FX AUX Sends 1 4...

Страница 99: ...85 User Guide Channel ON Mute For this parameter a clear circle indicates that the Channel is ON while a black circle indi cates that the Channel is OFF muted FX AUX Send MIXER MODE ...

Страница 100: ...disk tracks Pressing INPUTS FX GROUP F3 4 shows this screen Here you can see the same for the Inputs FX AUX send master levels FX return and the 8 x Group sends The master fader or L R meters are not shown as these are always visible on the front panel Neither of these pages are editable as such they merely reflect the controls positions as set on the front panel and update in real time as these c...

Страница 101: ...ate sub page Channel Utilities page There are also several Channel types The Channel types are Input Channel Mono Track Channel Mono FX Return Channel Stereo Aux L R Input Stereo Group FX AUX Master Send Master Channel MIDI Controller Channel The Channel pages only show the parameters available for the type of selected channel For instance only Mono Input or Track Channels have EQ and Dynamics con...

Страница 102: ...f the selected channel is a Track channel Q1 selects the Disk Record source The choices are the same as the Input Channel s Input sources plus INP 1 12 Stereo L Group 1 8 Stereo R no assignment INPUT SOURCE If the selected channel is a stereo FX Return channel Q1 selects the in put source pair The choices are FX1 L R Digital In L R FX2 L R Aux In L R FX3 L R 2 Track L R FX4 L R ADAT 1 2 ADC1 2 ADA...

Страница 103: ...be changed by entering a 16 character name of your own choos ing in the NAME window accessed from the channel Utilities page EQ CURVE Shows a graphic representation of the EQ for the selected channel as it the EQ controls are adjusted EQ CONTROLS Shows allows you to set the EQ parameters High Frequency and Gain Mid Frequency Gain and Q Low frequency and Gain The parameter values update as you use ...

Страница 104: ...X AUX1 is set to INTERNAL FX When you select say Input channel 3 it will show GLOB and FX1 i e that channel is using the global bus setting which is INTERNAL FX However you can change this to AUX 1 it will show AUX 1 All the other channels will show GLOB FX1 for this send bus but you have individually overridden this on Input 3 The same can be done for other channels and sends of course When a pai...

Страница 105: ...e see below DYN F3 Takes you to a page where you can set the channel s dynamics proces sors see below FLAT EQ F4 Will flatten the EQ but will leave other channel parameters intact EQ ON OFF F5 Allows you to toggle the EQ ON OFF LIBRARY F6 Takes you to the EQ Library page see below Pressing UTILS F2 takes you to the Mix Channel Utilities page NAME Pops up a prompt where you can name the selected ch...

Страница 106: ... gate s hysteresis setting If this parameter is set at or close to 0dB the grey block will not be shown The Compressor Expander parameters are COMP EXPANDER Allows you to select whether the processor is a compressor or an expander THRESHOLD Sets the level at which the compressor starts to work Signals below this level pass through the compressor unaffected signals above the thresh old level are pr...

Страница 107: ...gher range can be useful if the gating effect is too abrupt ATTACK Sets the length of time it takes for the gate to open Typically this will be set to 0mS RELEASE Set the time it takes for the gate to decay to the threshold level HOLD Determines the length of time the gate is open after the attack cycle has reached full level In the Compressor Noise Gate sub pages EQ ON OFF key F5 is replaced with...

Страница 108: ...ed a number of factory presets that you can recall and tweak to suit your own needs The LIBRARY F6 key on the channel page will take you to the preset library for the param eters you re viewing so pressing the LIBRARY key on the EQ page will take you to the EQ preset library In the EQ preset library page simply choose the preset you would like to recall and press the RECALL button F3 You will be r...

Страница 109: ...e LIBRARY button while looking at the Noise Gate parameters will take you to the Noise Gate preset library NOTE If the Compressor parameters are on the screen the LIBRARY button on F6 will access the Compressor preset library Similarly for the EQ library on the main mixer channel page pressing LIBRARY will take you to the EQ library page EQ COMPRESSOR GATE PRESET LIBRARIES ...

Страница 110: ...tings as a new User preset You will see this screen Give the preset a name the name must be unique to the Noise Gate preset library and press OK the preset is stored for future use NOTE This will only store the Noise Gate settings _ Compressor presets are stored in a separate library ...

Страница 111: ...ny channel that has dynamics processing First select the source channel from which you want to store the dynamics snapshot by pressing its SELECT button for example Track3 Then press the MIX SCENE STORE button to display this page Select the snapshot ID you would like to store to with the cursor keys or use Q6 to scroll up and down the list if you prefer and press STORE F6 or ENTER NOTE 1 The Scen...

Страница 112: ...L button to display the SNAPSHOT RECALL page Now select the snapshot you just stored Press RECALL F6 or ENTER to recall the snapshot NOTE You don t have to have the channel page on the screen to store and recall Dynamics and EQ snapshots _ it just makes explaining it easier but the snapshots will always be stored from and re called to the selected mixer channel Q Channel regardless of the page dis...

Страница 113: ... onto a mixer channel then store it as a snapshot Conversely storing snapshots into the global preset libraries can be achieved by recalling the snapshot onto a mixer channel then storing the recalled settings as a preset However bear in mind that the Dynamics snapshot stores both Compressor and Noise Gate settings but the Compressor and Noise Gate preset libraries are separate EQ AND DYNAMICS SNA...

Страница 114: ...el s automation data will be used If you press the odd numbered channel first and then the even numbered channel the odd numbered channel s parameters will be copied across to the adjacent even numbered channel and the odd numbered channel s automa tion will be used When two channels are linked as stereo anything you do on one channel will be reflected on the other including level EQ FX Aux sends ...

Страница 115: ...e SOLO SETUP screen where you can set how the SOLO keys will function for the Monitor outputs The different SOLO modes are selected using F3 F6 PFL Pre Fade Listen monitors the signal before the fader and ON switch AFL After Fade Listen monitors the signal after the fader and ON switch SOLO SETUP ...

Страница 116: ...e applied to it For example you may have a guitar part recorded to which you have added chorus delay and reverb Normally when you solo the guitar channel that s all you ll here the guitar without effects With DSIP it is possible to isolate the FX return channels so that when you solo the guitar the FX returns won t be muted and you will hear all the treatments applied to that channel Note that bec...

Страница 117: ...at you don t want to be solo d when SOLO is pressed using the ISOLATE key on F2 Pressing this will show this screen Pressing MORE on F2 will show this screen Those channels that are ticked will not be muted when another channel is solo d SOLO SETUP ...

Страница 118: ...DSIP In all SOLO modes except DSIP a SOLO LEVEL parameter on Q1 sets the level of the solo d signal This is most useful when PFL is selected i e the signal appears at full level to pre vent the solo d signal blowing your speakers The SOLO setting affects all channels equally and is not specific to any given channel USING SOLO To solo a channel simply press SHIFT CHANNEL ON The key will flash to in...

Страница 119: ...t in setting these sends to stereo when using the internal effects as all the internal effects have a mono input However you could use a stereo send and use the pan control FX Aux 2 to morph between the two channels That you can also automate the movement of the pan control means that some special effects could be created FX AUX 1 Allows you to route the FX Aux send to the INTERNAL FX or to the AU...

Страница 120: ... for this application NOTE When STUDIO L is selected AUX 3 s output is muted Similarly when STUDIO R is used AUX 4 s output is muted TALKBACK TO STUDIO OUT The DPS24 s internal talkback mic is permanently hardwired to the STUDIO outputs and is activated using the TALKBACK button located above the MASTER fader The level of the talkback mic can be adjusted with the TB LEVEL pot just under the built ...

Страница 121: ...d METRONOME In this way you can patch any analogue or digital audio source to any channel The default for each input is to have as its source a corresponding ADC However these can changed to your own requirements It also allows the input channels to be used for mixing audio sources other than analogue inputs For example you could patch in the internal FX outputs into two input channels so that the...

Страница 122: ...e assignment allows many possibilities For example you could patch the ADCs directly to the track inputs Not only would this provide very clean unprocessed recording direct to disk but would also free up the 12 input mix channels for other audio sources such as ADAT the digital individual outputs of an S5 6000 for example The stereo FX RTN SOURCES allow you to configure the FX RETURNS channels The...

Страница 123: ... IN R AUX SEND BUS 3 no assignment ADAT 1 8 AUX SEND BUS 4 ADAT 9 24 GROUPS 1 8 MAIN L default MAIN R default with IB 24ADT option board installed STEREO OUTPUTS ASSIGN allows you set which of the above audio sources will appear at the STEREO outputs the default of course is ST L and ST R stereo bus left and right AUX OUTPUT ASSIGN allows you to set which of the above audio sources is sent to the ...

Страница 124: ...channels you want to assign to that group DISK RECORD GROUP ASSIGN allows you to select which groups the 24 disk tracks will be routed to and any track may be assigned to inputs 1 8 As with the input channels that routing is done in pairs Regarding the NOTE above you may find it easier to assign disk tracks to groups in the same way FX RTN GROUP ASSIGN allows you to select which groups the interna...

Страница 125: ... bus and hence the master STEREO output All channels inputs disk tracks FX return and group outputs can be assigned to the L R bus The options here are simple off or L R As with the group assignments you may find it easier to route channels to the L R bus using the control surfaces dedicated keys L R ...

Страница 126: ... is that it is easy to record Input 1 to Track 1 Input 2 to Track 2 etc and you can still process the incoming signal using the Inout Mixer Channel processing EQ Dynamics You may prefer a more direct approach in ADCs Tracks Direct where an analog input goes directly to a disk track without going through the Input mixer Channel However in both cases if you want to for example record Input 3 to say ...

Страница 127: ...rol movements will be recorded FADER Only fader movements will be recorded The default is for ALL events to be recorded but this may not be appropriate in some circumstances For example you may want to record a pass of CHANNEL ON switching to reduce the risk of accidentally catching a fader and moving it you could set the RECORD EVENTS to CHANNEL ON so that only this switching will be recorded REC...

Страница 128: ...y to drop that channel into record much like dropping audio into record using the TRACK SELECT keys DROPOUT MODE Allows you to select what will happen when you drop out of an automation record pass The options are STOP The automation recording continues until STOP is pressed on the trans port key In the case of OVERWRITE mode recording on a given channel will stop if it is de selected using the CH...

Страница 129: ...ress play and play over the point you muted it Press STOP Now when you playback over that area the channel will remain on and the mute will effectively have been erased The AUTO DROP selection is probably the easiest mode to use Because of the touch sensitive faders when AUTO DROP is selected automation recording only starts when you grab a fader Similarly the other controls pan and FX Aux sends o...

Страница 130: ...not match the original When the automation is played back the result will be The level will stay constant after the drop out point until a fader movement is detected at which point it will jump abruptly to the new value A way around this is to enable RETURN Setting a longer value in the RETURN field will result in the following With judicious setting of the RETURN TIME parameter the value will ret...

Страница 131: ...ed Channels can be protected by moving the cursor to the appropriate channel s and using the DATA keys to switch protection on or off When a channel is protected it is checked When a channel is safe any control movement or switch action is ignored when automation is being recorded The MORE F1 key allows you to access the Record Safe controls for the other Channels RECORD SAFE ...

Страница 132: ... only to find the whole thing needs to be 3dB higher Rather than re record the whole thing again you can use TRIM to add 3dB to that channel Pressing TRIM FADERS F5 F6 snaps all the faders to midway position switches the fader motors off and shows the following screen Initially theAUTOMATION TRIM window is blank you can adjust the fader positions at this point Simply move a fader or faders and the...

Страница 133: ...roject needs to be trimmed In this case identify the region you wish to trim and set IN OUT points for that region and use Q1 to select IN OUT only automation data within that region will be affected NOTE 1 The TRIM functions only apply to fader movements it is not possible to trim pan and or FX Aux automation data NOTE 2 The TRIM operation does not have to be a static automation edit process perf...

Страница 134: ...vely press ALL F4 to select all disk tracks or select ALL in the Channels Q5 field to select all channels i e all inputs all tracks FX returns etc Pressing F5 6 will clear the automation on the selected channels NOTE 1 Only the dynamic automation is cleared scenes are not affected NOTE 2 In the event of making a mistake and inadvertently clearing some tracks automation data don t forget that you c...

Страница 135: ...advance select the scene or snapshot you want to insert and then at the appropriate mo ment press EXECUTE RECALL When recalling a scene you can also decide what will be recalled e g ALL controls STATIC controls or NO FADERS as described earlier in this manual NOTE 1 While a Snapshot Recall is immediate a Scene Recall can take a second or so to be regis tered in the dynamic mix automation That is a...

Страница 136: ...rent scenes and recall them as appropriate Completely re configure your mix by recalling static fader settings Although it is more likely you will use gradually evolving dynamic mixing it can still be very useful to completely re configure your fader settings with a simple scene recall especially in live applications where it is common to re configure a mix Mute grouping sometimes it might be nece...

Страница 137: ...o You are adjusting the EQ on a particular channel in real time as a project is playing You get so far with the adjustment but the project finishes You press stop locate to the start of the project or wherever and press play and The settings for the scene at the point you re commence playback are restored and all the adjust ments you have just made have been lost In other words Be sure to save all...

Страница 138: ...he DPS24 s dynamic automation to regulate channel track level but use SCENE RECALL to switch between certain static control settings of pan FX Aux sends EQ etc In other words fader automation will be unaffected as you make static scene recalls of other parameters such as pan FX Aux sends EQ etc If your automation requirements are different and or are more demanding for example you want to graduall...

Страница 139: ...l show the type of Scene recall as follows Scene Rcl A All controls Scene Rcl S Static controls only Scene Rcl NF No faders The Value column shows the scene number In the case of Snapshot Recall the Type column will show the type of Snapshot as follows EQ Rcl Tr n or DYN Rcl Ip n FX Rcl Fxn Where n is the channel number Tr for Track and Ip for Input The Value column shows the snapshot number In th...

Страница 140: ...ake and accidentally delete an event you can use UNDO To move an event press MOVE EVENT F3 F4 You will see this prompt You can either type in a new value or you can move the cursor to the appropriate digit and nudge the value using the DATA ENTRY keys Press MOVE to actually move the event or CANCEL to abort If you make a mistake you can use UNDO ...

Страница 141: ...type assigned to them A graphic depiction of the selected channel s effect is shown and the effect s parameters are available down the right side of the panel for editing Channels are selected using the CURSOR UP DOWN keys The effect assigned to the selected channel is shown in the EFFECTS list and its parameters EFFECTS MODE ...

Страница 142: ...lumn where you can select effects To select a different effect use CURSOR UP DOWN The new effect is not active until RECALL F3 is pressed Pressing RECALL will assign the effect type to the selected effects channel The FX Channel shows the new effect assignment and the new effect s parameters are avail able for editing The effect window s title also shows the new effect assignment ...

Страница 143: ...e associated with the project Edited effects are stored as part of the current scene so that when you subsequently load that scene the correct effects assignment and their customised settings are recalled STORING EDITED EFFECTS If you have edited an effect that you think you may want to keep for use in other projects press the STORE key F4 You will receive the usual naming prompt where you may ent...

Страница 144: ... press FX LIBRARY F1 F2 in the main FX page You will see this screen Here you can also change the current FX Channel using the CHANNEL F2 key Using the CURSOR UP DOWN key or Q6 you can select an effects category such as reverb delay chorus etc In this way effects are easily found and selected by category rather than scroll ing through a long list of different types of effects To select an actual e...

Страница 145: ...nd Presets are available as Facotry Presets Category Effect Category Effect REVERB Small Room FLANGER Mono Flanger Big Room Stereo Flanger Small Hall Xover Flanger Big Hall Pan Flanger Non Linear Reverse PHASER Mono Phaser Studio Stereo Phaser Live House Xover Phaser Medium Hall Pan Phaser Bright Hall Std Plate ROTARY SPEAKER Std Hall Rotary Speaker Drum Booth Bright Plate PAN Auto Pan Std Room Tr...

Страница 146: ...or that effect REVERB Although the parameter values of the following reverb types are different the available pa rameters are common to all reverb types except Non Linear and Reverse reverb Pre D 1ms 100ms Adjusts the Pre Delay time of early reflections Time 0 1sec 10sec Adjusts the Time of attenuation of reverberation Diff 0 100 Adjusts the Diffusion density of reverberation HFDamp 20Hz 20kHz Fre...

Страница 147: ...ation at a specified time For this reverb the Time parameter is replaced by Hold 0 127 Adjusts the time duration until reverberation is stopped It has no HFDamp parameter REVERB REVERSE This special stereo reverb effect reverses the reverberations It has no HFDamp nor Near parameter REVERB STUDIO This stereo reverb effect simulates reverberations in a recording studio REVERB LIVE HOUSE This stereo...

Страница 148: ... stereo reverb effect simulates reverberations in a room with standard character REVERB VOCAL PLATE This stereo reverb effect simulates reverberations of a plate suitable for vocal sound DELAY The basic parameters for Delay effects are Delay 1ms 1500ms Adjusts the Delay time Fdback 0 100 Adjusts the amount of delay Feedback HFdamp 20Hz 20kHz Sets the frequency at which the higher range of the feed...

Страница 149: ...eed back sound Left channel is cut RDelay 1ms 1500ms Adjusts the delay time of the Right channel Fdback 0 100 Adjust the amount of delay Feedback Right channel HFdamp 20Hz 20kHz Sets a frequency at which the higher range of the feed back sound Right channel is cut XOVER DELAY This is a variation of the STEREO DELAY The feedback from the L R channels is input to the opposite channels LDelay 1ms 150...

Страница 150: ...ck HFdamp 20Hz 20kHz Sets a frequency at which the higher range of the feed back sound is cut Pan 60 60 Adjusts the stereo image of the effect sound MULTI TAP DELAY This delay effect creates a special effect by adjusting the interval between feedback sounds and the level change curve of the feedback sounds Delay 1ms 1500ms Adjusts the delay time Width 0 100 Adjusts the width and spread of the ster...

Страница 151: ...odulation effect Delay 1ms 1500ms Adjusts the delay time of the delay effect Fdback 0 100 Adjusts the amount of the delay effect feedback Bounce ON OFF Sets whether the delay sound is panned ON or not CHORUS DELAY This effect consists of a chorus effect and a delay effect connected in series FLANGE DELAY This monaural effect consists of a flanger effect and a delay effect connected in series PHASE...

Страница 152: ...the depth of LFO2 MONO CHORUS This is a typical chorus effect with mono in and mono out You can adjust the pan setting of the effect sound with the additional Pan parameter Pan 60 60 STEREO CHORUS This is a stereo chorus effect mono in stereo out You can adjust the width and spread of the stereo image with the additional Width parameter Width 0 100 XOVER CHORUS This is a variation of the STEREO CH...

Страница 153: ... in and mono out You can adjust the pan setting of the effect sound with the additional Pan parameter Pan 60 60 STEREO FLANGER This is a stereo flanger effect mono in stereo out You can adjust the width and spread of the stereo im age with the additional Width parameter Width 0 100 XOVER FLANGER This is a variation of the STEREO FLANGER The feed back from the L R channels is input to the opposite ...

Страница 154: ...just the pan setting of the effect sound with the additional Pan parameter Pan 60 60 STEREO PHASER This is a stereo phaser effect mono in stereo out You can adjust the width and spread of the stereo im age with the additional Width parameter Width 0 100 XOVER PHASER This is a variation of the STEREO PHASER The feedback from the L R channels is input to the opposite channels The parameters are the ...

Страница 155: ...ates the stereo image of the sound between left and right Rate 0 1Hz 10 0Hz Adjusts the speed of panning Mode Pan A common auto pan L R Simulates a sound source that rotates counterclockwise R L Simulates a sound source that rotates clockwise Width 0 100 Adjusts the panning width TRIGGERED PAN This auto pan effect becomes enabled when the output level of one of AUX sends 1 4 exceeds a certain leve...

Страница 156: ...0 Delay feedback adjustment for the L channel Fdback R 0 100 Delay feedback adjustment for the R channel Note The value displayed for both Semi and Cents controls is the total Pitch Shift amount WAH AUTOWAH This monaural effect adds a swelling wah Rate 0 1Hz 10 0Hz Adjusts the speed rate of swelling of the wah effect Depth 0 100 Adjusts the depth of the effect Reso 0 100 Adjusts the amount of reso...

Страница 157: ...or EQ3 Output 24dB 24dB Offsets the ouput level of the EQ ed sound ENHANCER Enhancer This monaural effect gives frame to the sound by adding new overtones Drive 0dB 30dB Adjusts the gain of the signal input to the harmonics generator Tune 0 100 Adjusts the filter cut off frequency Damp 0 100 Adjusts the filter attenuation curve slope Harm 0 100 Adjusts the signal level of the emphasized harmonics ...

Страница 158: ...the effect Pressing the F5 MORE softkey provides access to another set of parameters Detect Peak Changes in the signal level are closely detected RMS Averaged level changes are detected Thresh 60dB 0dB Adjusts the threshold level at which the noise gate opens Release 0ms 127ms Adjusts the release time of the noise gate Link parameter If you select the COMPRESSOR LIMITER effect for both FX1 and FX2...

Страница 159: ... effect Pressing the F5 MORE softkey provides access to another parameter Hold 0 127 Adjusts the hold time of the effect NOISE GATE This monaural effect mutes signals below a certain level threshold This is useful for cutting noise during silent parts of a performance Link ON OFF Links FX1 and FX2 or FX 3 and FX4 See previous page Thresh 60dB 0dB Adjusts the level at which the gate opens or closes...

Страница 160: ...e See diagram below Sets the standard scale Key C C A B Sets the standard twelve keys Smoothing 0 100 Affects the vibrato components in the input signal to make it sound more natural A setting of 100 takes all vibrato components away and making it smaller value makes vi brato sound more natural INHIBIT ON OFF When this is ON no pitch correction is applied Scale parameter You can select from the fo...

Страница 161: ...essor The level should be even and not less than 20dB This offers 13 preset scales for Scale parameter The pitch of the input signal is always corrected to the nearest pitch of the scale In another word if the deviation of the input signal is less than 40 cents 100 cent 1 semitone the result is always correct even if you choose CHROMA the chromatic scale which contains all 12 keys in octave In pra...

Страница 162: ...ed Here s an example storing the settings on FX channel 2 to a snapshot then recalling it onto FX channel 4 In the FX page select FX channel 2 Press the MIXER SCENE STORE button to display the SNAPSHOT STORE page _ it will already be set up to store a snapshot from FX CHANNEL 2 Select the snapshot ID you want to use with the cursor you can use Q6 to scroll and press the STORE F6 button or ENTER to...

Страница 163: ... settings Once in the Store or Recall page you can always set SNAPSHOT mode using the SCENE SNAPSHOT button F2 and set the Snapshot Type to the desired FX channel using the Q5 knob NOTE 2 To store FX presets from the global library as an automate able snapshot simply recall the chosen preset onto an FX channel then store as a snapshot Conversely storing snapshots into the global preset library can...

Страница 164: ... FX channels For example with the following combination of effects FX1 Chorus FX2 Phaser FX3 Ping Pong Delay FX4 Large Hall By sending a proportion of FX1 RETURN to FX2 i e via FX2 send on the FX1 RETURN channel you can add some phasing to the chorused sound By sending a proportion of FX2 RETURN to FX3 echo can be added to that and by sending a proportion of FX3 RETURN to FX reverb can be added Wi...

Страница 165: ...FOLDBACK MIX Similarly vocalists working in a vocal booth like to hear their voice with reverb in their headphones during the track laying process Using the same example as above and assuming AUX 3 and or 4 are being used as pre fade foldback mix outputs to the STUDIO outputs connected to a suitable headphone monitoring system 1 Route Input 1 to Group 4 select Track 4 for record 2 Monitor the voca...

Страница 166: ...udio was recorded into the project the audio may have a different sample rate and bit depth LOADING PROJECTS To load a project simply use the CURSOR UP DOWN keys or le Q6 knob to select the project and press LOAD F6 While a project is loading a Loading project Please wait prompt is displayed Once the project is loaded the DPS24 will take you directly to the MAIN SCREEN CREATING NEW PROJECTS It is ...

Страница 167: ... 7 8 in stereo whatever and this setup is re used between projects you will probably want to use the currently loaded project s settings If however you work in a studio where the setup constantly changes between projects you might find it more convenient to reset to the factory defaults After selecting either option the new Project will be created and you will be taken back to the MAIN page where ...

Страница 168: ...ELECT DRIVE F1 F2 takes you to this page Select the drive you want use with the CURSOR UP DOWN keys and confirm by pressing not surprisingly SELECT DRIVE F5 6 You will be returned to the main PROJECT page where you may load or create new projects as normal Because it is possible to record to playback from any internal IDE or external SCSI hard drive you can see that the current Project drive s ID ...

Страница 169: ...tore on the external SCSI drive However please note that you cannot backup or restore whilst playing or working on another project that might be loaded You can also select a USB HOST drive to perform a Project Copy from the HOST to the DPS24 When switching drives the current edit clipboard is lost to prevent the audio from projects spanning different drives Use WAV export import or project copy to...

Страница 170: ... rename the selected project in the usual way Press OK F6 at this prompt to confirm and commit the rename or press CANCEL to abort To delete a project use the CURSOR UP DOWN keys to select the project to delete Pressing DELETE F5 will pop up a prompt asking you to confirm the deletion Press YES F6 at this prompt to confirm the deletion or press NO F5 or the CANCEL keyto abort NOTE It is not possib...

Страница 171: ...and press SELECT PROJECT F2 F3 for each one you want to copy The selected items will be marked with a tick If you mistakenly select the wrong project it can be de selected by pressing SELECT PROJECT again As you select and de select Projects the Total copy size and number of files to be copied display fields are automatically updated Now move the cursor across to the right hand column on the scree...

Страница 172: ... not possible to actually play record projects directly from a HOST drive the NEW and LOAD options do not appear BACKING UP PROJECTS Pressing BACKUP F3 will show this screen This page allows you to backup projects from a Hard Disk Drive onto a CDR drive You should use the CURSOR UP DOWN keys to select the project s you want to back up and you should press SELECT PROJECT F2 3 to mark the files The ...

Страница 173: ...rocess is simple use SELECT DRIVE to select the drive you want to back up from and press BACKUP The process is exactly the same as described for the Internal HD except of course that you are backing up an external drive COPY BACKUP RESTORE USER PRESETS It is also possible to copy back restore any user presets you may have created These in clude FX library presets Patch presets EQ Compressor Noise ...

Страница 174: ...n the HD Drive list on the right using the cursors To restore a backup press RESTORE F6 You will receive an ARE YOU SURE prompt and you should respond accordingly If you proceed you will see a progress display If the backup exists across several CDs you will be prompted to insert the appropriate CD during the backup process always start with CD 1 RESTORING TO EXTERNAL DRIVES When restoring CD back...

Страница 175: ...erent versions of a guitar solo or vocal or whatever and use the best one For example you could record a guitar overdub on Track 4 but you think you might be able to better But rather than just record over the original you could swap Track 4 out with an empty virtual track and record onto that you can keep doing this as many times as you like well 232 to be precise 256 virtual tracks minus the 24 ...

Страница 176: ... be unused Otherwise the default name will be V Track nn xxx where nn is the number of the physical track it is assigned to nn will be if the V track is not assigned to any physical track and xxx is an auto incremented number DEFAULT SETUP Pressing this will re assign virtual tracks 1 24 to physical tracks 1 24 You are prompted respond accordingly ERASE Allows you to erase virtual tracks NOTE This...

Страница 177: ...recorded an electric guitar solo onto Track 6 It s good but you think you might be able to do better You don t want to record over it you just want to have another go at it in case you can do a better job In the V TRACKS page place the cursor on Physical Track 6 Press N TAKE F4 The first unused virtual track will be found auto named and assigned USING THE VIRTUAL TRACKS ...

Страница 178: ...e the cursor to the appropriate V Track and use the manual ASSIGN key on F6 Of course this process can be performed on any physical track or pair of tracks However the DPS24 s implementation of virtual tracks differs from other systems Whereas most sys tems limit you to a fixed number of virtual tracks per physical track the DPS24 has 256 V Tracks that are freely assignable to any physical tracks ...

Страница 179: ...manually move the cursor around With ASSIGN STEREO checked any tracks that were paired as stereo will be dealt with automatically in any of the V Track swapping functions So for example if Tracks Channels 7 and 8 were linked as a stereo pair and V Track 25 is assigned to Physical Track 7 V Track 26 will automatically be assigned to Physical Track 8 NOTE As for theWAV Export feature Tracks are iden...

Страница 180: ... set the following functions using Q1 Q6 SAMPLE RATE Here you can set the sample rate for the DPS24 The options are 32kHz 44 1kHz 48kHz 88 2kHz and 96kHz NOTE Themixprocessing trackcountandFXarereducedbyhalfwhenusingthehighsamplerates 88 2kHzor96kHz When a project is loaded and already contains audio should you attempt to change the sample rate you will be prompted ...

Страница 181: ...d the top of the LCD will show Certain operations will also be unavailable to you on the DPS24 To remedy this situation you should either select INTERNAL or you should attend to the digital sync source s problem T C RATE Sets the SMPTE EBU TimeCode rate The options are 24 FPS 25 FPS 29 97 FPS 29 97D FPS 30 FPS and 30D FPS The T C RATE should match any incoming external timecode If it does not sync...

Страница 182: ... wild i e without external sync BIT DEPTH The options are 16 bit or 24 bit This sets the bit depth for any subse quent recordings you make A project can contain recordings made at different bit depths If this parameter is changed after recording it does not affect the bit depth of the existing recordings These and other SETUP settings are saved to disk as part of the current project and will subse...

Страница 183: ... for transmission this should match the ID of the machine you want to control ID 127 is Broadcast to all connected MMC machines RECEIVE ID sets the MMC ID for control by external machines The setting here should match the MMC ID of the controlling device It is possible to nominate whether the DPS24 is an MMC master or slave using the MASTER SLAVE parameter MMC SETUP ...

Страница 184: ...et the Song Start time locate to the start of the song and carefully jog over it until you have the exact start point Now press RESET START F2 3 All tempo changes and or time signature changes you enter into the map will now be referenced to that song start point However please note that in the MAIN SCREEN pressing COUNTER RESET F2 will not only reset the relative timecode to 00 00 00 00 but will ...

Страница 185: ...s simply inserted If you add an event accidentally simply press DELETE F4 NOTE 1 Because tempo and time signature changes can only occur at the start of a bar adding a tempo or time signature event will place it at the start of the current bar NOTE 2 It is not possible to have several time signature tempo changes at the same time This is mentioned because you may attempt to enter a time signature ...

Страница 186: ...r playing stopping and dropping in and out of record Pressing the footswitch once will cause the DPS24 to play pressing it again will cause it to drop into record on the selected track s Pressing it again will cause it to drop out of record and pressing it again will stop playback PUNCH IN OUT When the DPS24 is playing pressing the footswitch once will drop into record on the selected track s and ...

Страница 187: ...llows performing a one pass transfer from a 24 track ADAT sys tem with the IB 24ADT ADAT option board installed NOTE When 24 TK RECORD is enabled tracks 21 24 cannot be used for playback After perform ing a 24 track recording to the DPS24 you should switch 24 TK RECORD OFF in order to play the 24 tracks you have just transferred PEAK HOLD TIME Sets the Peak Hold Timefor the meters both for the LCD...

Страница 188: ...l For example a 10 second 16 bit recording will be around 1Mb but its waveform file is less then 4kb Although principally included to show waveforms in ak Sys this function also benefits wave form display when using the DPS24 s editing functions and it is possible to zoom out much further when Wave File Gen is enabled If you try to zoom out on a track before the waveforms are calculated you will g...

Страница 189: ... names are now shown in the GRID view SHIFT MAIN However if you don t want them shown for whatever reason they can be optionally switched on or off in the SETUP PREFS MORE page using the SHOW GRID NAMES Q3 option PROJECT INFO Because the sample rate and bit depth info has to be calculated each time you enter the PROJECT page this will cause a slight delay before the PROJECT page is displayed If yo...

Страница 190: ...key the DPS24 will go into normal high speed rewind or fast forward no audio until PLAY or STOP is pressed To use the x5 shuttle with audio you have to press and hold both the PLAY key and either the REW or FF key and then release the REW or FF key at the appropriate moment the DPS24 will revert to playing back at normal speed UNDO CONFIRMATION It is possible to display a pop up to confirm that an...

Страница 191: ...re both used for 8 channel ADAT signals ADAT 1 8 while the RCASPDIF I O connectors are used for Stereo SPDIF signals DIGI IN L R and stereo DIGITAL OUTPUT However when MPLP is set to SPDIF the optical I O connectors are both used for Stereo SPDIF signals DIGI IN L R and stereo DIGITAL OUTPUT In this case the SPDIF Input RCA connector is disabled and the SPDIF Out put RCAconnector is used for Stere...

Страница 192: ...o sample rate converter on the ADAT inputs and therefore the digital clocka of the DPS24 and of the selected ADAT source shoudl always be locked HEADPHONE LEVEL Q6 Here you can set the output level of the headphone outputs The options are HIGH MID or LOW NOTE The control by software of Headphone Level was not available on the very first production of DPS24 If you have such a unit the Headphone Lev...

Страница 193: ... USER BANK key will light up as well as the key pressed to indicate that you have an extended user bank selected The PREV F3 and NEXT F4 keys in this page allow you to select which user bank you want to edit The User Bank you are working on is shown in the title of the right hand column in the example above Extra User Bank 3 s assignments are shown To assign a channel to a user channel use CURSOR ...

Страница 194: ...DI CONTROLLER 1 16 Pan EQ and effects sends are not available on these channel assignments The default assignments for the main USER BANK are 1 FX SEND 1 2 FX SEND 2 3 FX SEND 3 4 FX SEND 4 5 AUX SEND 1 6 AUX SEND 2 7 AUX SEND 3 8 AUX SEND 4 9 AUX L R 10 MIDI 1 11 MIDI 2 12 MIDI 3 You can return to the PREFS page by pressing EXIT F1 OS UPDATE Pressing SYSTEM OS shows this screen ...

Страница 195: ...gate your way to it Once the OS file selected press UPGRADE the new OS will be loaded into the DPS24 s FlashROM You can also update the OS via USB using the free OS Loader utility software for PC only MS DOS In this case set Upgrade Device field to USB and follow the step by step instructions found in the Appendix section However please note that updating the OS via USB from a Windows PC or Macint...

Страница 196: ...es or external SCSI drives When the DPS24 is connected to a computer via USB and either akSys TrackView V1 21 or akSysServer are running all the valid folder paths are shown in the DPS24 as additional HOST drives However DISK TOOLS and CLEAN UP functions are not available for HOST drives HOST drives are named as Remote HD and Free shows the size of the whole volume ...

Страница 197: ...thus freeing up space Cleanup Disk is found in the SETUP DISK page on F5 6 Pressing this will cause a pop up to be issued confirming you want to proceed assuming you do you will see a progress display at the end of which a prompt will tell you how many pieces of unused audio were deleted If no items were deleted you will be informed DISK TOOLS Pressing DISK TOOLS F3 4 will show something like this...

Страница 198: ...surface test it is relatively fast It should only be done if the drive is known to be error free otherwise the DPS24 might try to use bad blocks on the disk If you are at all doubtful a FULL FORMAT is recommended to prevent potential errors later on IMPORTANT NOTE Both format functions will erase the selected disk drive THERE IS NO UNDO FOR EITHER FORMAT FUNCTION Pressing either format function wi...

Страница 199: ...ld simply hit UNDO However When a new project is created or another is loaded the UNDO history is re initialised So if after deleting a cue you were immediately to load a different project or create a new one you could not use UNDO to get the cue you deleted back and the audio it referred to would exist on disk but orphaned from its pointers This is a highly unusual scenario and unlikely to happen...

Страница 200: ...to recover all orphaned audio select ALL However if your problem occurred a few days ago you can specify PAST WEEK or if it only just happened a few minutes ago you could specify TODAY Pressing BROWSE will show something like the following You can see that the filenames are shall we say somewhat obscure However you should be able to decide which files you want need to recover from the date time sh...

Страница 201: ...ed the UNDO history you can t undo the deletion either Panic sets in Don t worry all is not lost if you follow these ten simple steps 1 With NEW SONG 3 loaded press EDIT and select Track 6 for edit 2 Press SETUP 3 Press DISK 4 Press DISK TOOLS 5 Press AUDIO RECOVERY 6 Select TODAY as the DATE RANGE 7 Press BROWSE 8 You will see the orphaned audio file 9 Select that file by pressing SELECT F5 10 Pr...

Страница 202: ...e BLANK appears if a Blank CDR is inserted in the drive NOT FINISHED appears if the Finish process has not been performed FINISHED appears if the Finish process has already been performed DATA DISK appears if an ISO Data CD is inserted in the drive TOTAL TRACKS Displays the total number of tracks on the CD USED ON DISC Indicates the total time recorded on the CD FREE ON DISC Indicates the total ti...

Страница 203: ...age where you can create a stereo mixdown suitable for writing to CD R NOTE It is not possible to mixdown a multitrack project directly to CD RW CD R To do this you should first use the MIXDOWN function to create a stereo mixdown and then burn that stereo mix to CD This process is described on the following pages DRIVE F2 Allows you to select the CD R drive Internal or External PLAYER F3 Takes you...

Страница 204: ...new project As the project is being converted you will see a progress display You can abort the process at any time After the process is complete you will have a 44 1kHz 16 bit project that will be suitable for mastering onto audio CD When you perform the conversion the project is re sampled at 44 1kHz and is dithered down to 16 bit using TPDF triangular probability density function a well known d...

Страница 205: ... want to put on the CD are placed end to end thus You could just make your CD from this However you will probably want to put track mark ers on your CD This is done using the autolocator At the start of each track mark an autolocate point and give each locator memory names such as shown below Those locate points that are prefixed with will register as track marker points on the CD HOW TO PREPARE M...

Страница 206: ...e previous page NOTE 3 The locators used for Track IDs and Indexes must be stored in ascending order for correct operation NOTE 4 The minimum time between two Track IDs is 4 seconds Once you have set up your track markers you can proceed to the CD R page Set the param eters as follows Assuming you have a blank CD R inserted in the drive press WRITE CD You will be asked if you want to proceed to wh...

Страница 207: ... up to mixdown To confirm Mix down via Effects is displayed at the top of the LCD screen as long as the DPS24 is in Mixdown mode Press PLAY and RECORD to record your stereo master mixdown At the end of the mixdown drop out of record in the usual way You can also use AUTO punch to start and stop recording automatically between the IN and OUT markers After recording in the PROJECT mode you will see ...

Страница 208: ...free of phase errors When MBCX is enabled either PRE FADERor POST FADER in the MIXDOWN page the four internal effects processors are replaced by the MBCX Therefore pressing the FX key takes you to the MBCX page that looks like this The first page allows you to set the crossover frequencies for each of the bands These are set in the various XOVER fields The frequencies available are 50Hz 80Hz 125Hz...

Страница 209: ... F2 will show this screen Each band LF LM HM HF is selected using Q1 As you select each band it is highlighted in the window to the left In this way it is clear to see which band of the compressor you are editing MULTI BAND COMPRESSOR EXPANDER ...

Страница 210: ...his simple example demonstrates The incoming signal level has a huge dynamic range going from very loud to very quiet By setting the compressor and expander thresholds to the same value the output of the processor will be the signal shown with the dashed line as you can see its dynamic range is now much more even However because the loud signal is now reduced in level quite dramatically the overal...

Страница 211: ...er controls that affect the MBCX globally are found in the left hand window and are accessed using the CURSOR keys These are DELAY This parameter allows the MBCX to predict the signal that is coming in other words the effect is delayed What this means in practice is that if a signal is coming that has a very large transient the MBCX will be ready for it so that when it arrives at the MBCX s input ...

Страница 212: ...uch in this case it is best to insert it per fade so that the MBCX is always receiving the full level of the stereo mix bus However when using the MBCX as a limiter compressor ratio set to maximum it is best to insert it post fade When adjusting parameters on the MBCX as with other static controls be sure to either save your work as a preset see above or store Scene 00 before re commencing playbac...

Страница 213: ...om the PROJECT page and proceed as follows 1 Press CD R SHIFT SETUP 2 Press MIXDOWN F1 3 Enable the MBCX using F2 3 The MBCX can be off pre fader or post fader and this can be selected by pressing F2 3 repeatedly When the MBCX is enabled the graphic changes to show the MBCX 4 Press PLAY in the transport controls to playback your stereo mix 5 Press FX the MBCX parameters will be displayed and you c...

Страница 214: ...reo mix project it is likely that it will have the internal effects selected in Scene 00 Even though you may enable the MBCX as described in Step 3 on the previous page when you commence playback it may switch over to the internal effects because this is what is stored in Scene 00 To overcome this when you select the MBCX in Step 3 store Scene 00 this will store the MBCX selection in the initial s...

Страница 215: ...ext track During playback you can use the rewind and fast forward keys to stutter through a track When a track is playing the status of F6 changes slightly PLAY When idle F6 is a play key PAUSE During playback F6 becomes a pause control NOTE It is not possible to play the CD through the DPS24 s monitoring system You can listen to it on the CD RW s headphone socket if the model installed has one of...

Страница 216: ... will now only play upon reception of external timecode unless the optional IB 24LTC SMPTE board is fitted MTC SLAVE is the only source for external MTC While the DPS24 is waiting for external time code the LED of the PLAY key flashes In addition the type of Time Sync source is displayed to the right of the Project info bar in the MAIN SCREEN when the EXT SYNC key is enabled Also the EXT SYNC key ...

Страница 217: ...ly for transferring legacy material from your ADAT s to the DPS24 or for transferring projects created on the DPS24 to ADAT machines With the ADAT board installed simply connect your ADAT machines to the optical connections ADAT 1 i e the one you regard as being tracks 1 8 should be connected to the internal ADAT connection and ADATs 2 and 3 i e tracks 9 24 should be connected to the ADAT connecto...

Страница 218: ... OUTPUT ASSIGN section of the PATCH OUTPUTS page you can now patch internal audio sources to any of the 24 ADAT outputs The available audio sources are With such routing flexibility it is possible to use the PATCH pages as a digital audio patchbay between the DPS24 and your ADAT machine s Also if you need to get any of the ADAT sources to an analogue machine don t forget that they can be assigned ...

Страница 219: ...e worth pointing out that the DPS24 s tracks are routed to the ADAT outputs post fader through the disk channels allowing you to transfer the audio with EQ dynamics and level Of course if you simply want to transfer the audio raw as it is on disk you simply turn off eq dynamics etc on the tracks and set their faders to 0dB To assist with 24 track transfers an additional 24 Track ADAT Transfer Patc...

Страница 220: ... DPS24 Digital Sync parameter should be set to INTERNAL as the DPS24 is the master of the system In this configuration the ADAT machines are locked together to the clock of the DPS24 via the ADAT SYNC connection If the ADAT SYNC connection is not used it is possible to either lock the ADAT devices to the DPS24 master clock DPS24 Digital Sync still set to INTERNAL via the ADAT lightpipe the ADAT de...

Страница 221: ...207 User Guide S U R R O U N D M I X I N G SURROUND MIXING ...

Страница 222: ...214 GROUPS 214 PATCH 215 RECORD 216 SOLO 217 MBCX 217 METERING 218 METRONOME 218 AUX INPUT 218 MIXING IN SURROUND 219 Surround Bus Routing 219 Surround Bus Metering 219 Monitoring 219 Surround Mixdown 220 2 TRACK 220 Surround Panning 220 Pan Fader Flip 222 Mixer View 222 Surround Panning Automation 222 FX Return Channels 223 ...

Страница 223: ...hat you back up all files and data before installing any new version of DPS24 operating system In particular it should be noted that in order to support surround mixing new mixer controls and project settings have been added and these will not be recognized by earlier versions of the DPS24 OS This means that if a surround project created with this version of the DPS24 OS is loaded into an earlier ...

Страница 224: ...ts Any new project that you create with this version will be a Stereo Project by default In order to mix your project in surround you will need to convert it to a surround project This operation is performed in the new MIXER MODE page In MIXER mode a new MODE SET softkey F4 is available Pressing MODE SET F4 takes you to the MIXER MODE page ...

Страница 225: ...urround project from your current project You will be asked to enter a new name for the surround project The default name for the new project is the current project name with the suffix SM as long as there s space for the suffix but you can name it whatever you want Once you ve entered an appropriate name press the ENTER key to proceed to the next stage CREATING A SURROUND PROJECT ...

Страница 226: ... will be created as a copy of your original stereo project and will be automatically loaded This operation does not modify your original stereo project Once this process is complete you will be returned to the MIXER MODE screen The mixer mode is now shown as 5 1 Surround and the graphics illustrate the monitor layout for the 5 1 surround format The list to the right shows which DPS24 outputs are u...

Страница 227: ...ed to the LFE output A look back at the PROJECT page will reveal that the mixer mode is also reflected there for easy identification of surround and stereo mixes when you re selecting which project to load NOTE The mixer mode information is only shown in the PROJECT page if the Show Project Info prefer ence is enabled If you don t see this information on the screen go to the SETUP page and enable ...

Страница 228: ... surround mixing certain changes have been made in the operation of the DPS24 in Surround modes GROUPS Perhaps the first thing you will notice is that there are no GROUP channels The space left by the group meters in the MIXER and MAIN pages has been used to display surround output meters Also there are no group controls in the MIXER pages ...

Страница 229: ...oject or as a preset in which GROUP channels are used as disk record sources or patched to physical outputs the GROUP source will be replaced with silence Information on the patching of surround bus components to DPS24 monitor outputs is shown in the PATCH OUTPUTS page This routing is fixed Surround bus components can addi tionally be patched to available ADAT DIGITAL or AUX outputs DIFFERENCES AN...

Страница 230: ...is complete As such recording functionality is limited in surround mode The 24 track record mode is not supported in surround modes You can simultaneously record up to 6 independent sources in 5 1 mode or 4 in LCRS and 2 2 mode This allows you to record a surround stem from an external source while in surround mode if required or to perform limited track laying once the surround project has been c...

Страница 231: ...y is fixed to Destructive Solo In Place mute all channels not in SOLO when in surround mode AFL SIP and PFL solo modes are not supported MBCX MBCX facilities are unavailable for surround mixdown DIFFERENCES AND LIMITATIONS IN SURROUND MODE ...

Страница 232: ... surround modes the metronome is not routed directly to the monitor outputs when turned on To hear the metronome you need to select it as the source for an input channel and route that channel to the surround bus AUX INPUT The AUX input remains a stereo input with no pan controls and as such is only routed to the Front Left and Right components of the surround bus ...

Страница 233: ...MONO key enables a fold down of the surround mix to Mono output via the Main L R DPS24 outputs Front Left and Front Right speakers in all configurations All other surround monitor outputs are muted while this function is in operation The MONO key will flash when the mono fold down function is active Surround monitoring Mute Solo In the MASTER CHANNEL page it is also possible to MUTE or SOLO indivi...

Страница 234: ...TRACK key has been expanded to allow direct monitoring of an outboard Surround source from analog or ADAT inputs Two new options have been added to the 2 Track Source option in the AUDIO SETUP screen ADC 1 n routes the 2 TRACK input from ADC 1 to n to the surround monitor outputs on activation ADAT 1 n routes the 2 TRACK input from ADAT 1 to n to the surround monitor outputs on activation n is dep...

Страница 235: ...n is moved to the left the level will decrease in the right speaker and increase in the left speaker As the LR pan is moved to the right the level will decrease in the left speaker and increase in the right speaker Intermediate settings of the Divergence control will result in a balance between these two situations As a demonstration set the FB Pan to front the LR Pan central and the Divergence at...

Страница 236: ...f to access the Pan Fader Flip function You can still view the pan placement graphic for the channel you are adjusting by manually selecting the MIXER CHANNEL page then pressing the select key for the desired channel Mixer View The MIXVIEW page displays the position of Pan LR and Pan FB controls using a small sur round pan placement graphic for each channel Furthermore Pan Front Back Divergence an...

Страница 237: ...annel routed as a mono source to all sur round bus components All Pan controls active same as panning a mono source This setting is useful for panning Mono effects FRONT LR ONLY FX Return Channel routed as a stereo source to Front Left and Right components of the surround bus only Left leg is routed to Front Left Right leg is routed to Front Right Divergence and Pan Front Back are disabled Pan Lef...

Страница 238: ...mix 220 Fader Flip 222 Fold down 213 Front Back 221 FX Return 223 Groups 214 Left Right 219 LFE 221 LFE Filter 213 MBCX 217 Metering 218 Metronome 218 Mixdown 220 MIXER MODE 212 213 Mixview 222 MODE SET 210 Monitoring 219 PAN 220 Pan Mode 213 Patch 215 Project Info 213 Record 216 Routing 219 Solo 217 Surround Panning 220 Surround Route 219 ...

Страница 239: ...ter Touch Key X X Channel X X Pitch Bend X X Control Change O X Program Setting Range Change OFF 1 16 OM X System Exclusive O O MTC MMC System Common Song Position O X Song Select X X Tune X X System Real Time Clock O 1 X Command O Continue Stop Start Aux Messages Local On Off X X All Notes Off X X Active Sense X X Reset X X Notes 1 SSP and CLOCK Mode 1 OMNI ON POLY Mode 2 OMNI ON MONO O Yes Mode ...

Страница 240: ... 2 TRACK IN ADAT 1 8 2 TRACK IN FX 1 4 METRONOME L R GRP 1 2 GRP 3 4 GRP 5 6 GRP 7 8 SEND 2 SEND 3 SEND 4 SEND 1 L R GRP 1 2 GRP 3 4 GRP 5 6 GRP 7 8 SEND 2 SEND 3 SEND 4 SEND 1 L R GRP 1 2 GRP 3 4 GRP 5 6 GRP 7 8 SEND 2 SEND 3 SEND 4 SEND 1 SOLO SOLO SOLO ADC 1 12 FX RTN 1 4 DISK TRACKS INPUTS FX RETURNS AUX IN To Disk DISK TRACKS 1 24 The default channel sources are shown in bold text Block Diagr...

Страница 241: ...1 8 SPDIF IN AUX IN 2 TRACK IN FX 1 4 STEREO L R BUS METRONOME RECORD SOURCES GROUPS 1 8 TO INTERNAL FX GROUPS BUS FX BUS AUX BUS L R BUS SOLO BUS FX MASTER SENDS AUX MASTER SENDS GROUP MASTER LEVELS GROUPS TO L R BUS GROUP SOLO MASTER FADER SOLO LEVEL AUX OUTPUTS TO DISK TRACKS L R MASTER SOLO MONITOR RECORD SOURCES BUSSES Block Diagrams ...

Страница 242: ...x Send 3 Aux Send 4 Studio L Studio R 1 2 3 4 Talkback TB Switch Mic MONO MONITOR LEVEL MAIN L MAIN R NEAR L NEAR R PHONES 2 Track input SOLO bus STEREO L R bus AUX bus LEVEL 2 TRACK switch STUDIO CR switch SOLO NEAR switch Stereo L Stereo R OUTPUTS ...

Страница 243: ...229 User Guide Installation of Options To Services Technicians ...

Страница 244: ... back that have been removed in the previous step IB 24SCSI 1 From the bottom of the unit remove the screws for the bottom cover and open the bottom 2 Remove the screws for the cover of SCSI option slot on the Rear Panel and remove the cover Save the screws 3 Place the board as illustrated making sure that connectors are securely connected 4 Mount the board with the screw included in the option bo...

Страница 245: ... open right click on My Computer and select Properties In System Properties select the Hardware tab Click on Device Manager In the list of devices you should see AKAI Digital Personal Studios Click on the in front of that This should show AKAI DPS24 24 Track Personal Studio Right click on that and select Update Driver This will launch the Hardware Wizard utility In the Hardware Wizard select Insta...

Страница 246: ...heck your OS Version DPS24 OS Upgrade via CD You can check the current O S Version in the SETUP page 1 Download the latest OS Version dps24 zip from akaipro com 2 Unzip the downloaded file If your computer does not already have an UnZip utility For Windows computers use WinZip www winzip com For Mac computers use ZipIt www maczipit com The unzipped file is called DPS24 BIN 3 Write the unzipped fil...

Страница 247: ...old SET LOCATE and press IN or OUT to set In Out points Press IN OUT or RTZ to Goto In Out points or Zero Hold AUTO PLAY and press IN OUT or RTZ to Goto In Out points or Zero and Play Press IN OUT to Play from In to Out points Hold AUTO PLAY and press IN OUT to enter LOOP play ...

Страница 248: ...z 0 2dB FS 32kHz 10Hz 15kHz 0 2dB ADC 24bit 128 times oversampling enhanced dual bit delta sigma modulation DAC 24bit 8 times oversampling advanced segment delta sigma modulation Dynamic Range 104dB or more 30kHz LPF FS 44 1kHz Distortion Ratio 0 003 or less 1kHz 44 1kHz Channel Crosstalk 80dB or less 10kHz referenced 100 ohms terminated Wow Flutter Below measurable level Analog Audio Input Inputs...

Страница 249: ... ohms load Impedance Stereo Out 1k ohms balanced Main monitor 1k ohms balanced Nearfield monitor 1k ohms balanced Studio Out 1k ohms balanced Direct Out 1k ohms balanced AUX Sends 1 4 1k ohms balanced Stereo Phones Output x 2 6 3mm Stereo Phone Jack adjustable Max Output 155mW 32 ohms Digital Audio Input x 1 RCA SPDIF 2 channels assignable x 1 MP Light Pipe adat SPDIF 8 channels 2 channel assignab...

Страница 250: ...ropping Out or record 40 DSIP 102 DSP 76 Dynamics Processor 92 E EDIT 32 49 52 Edit Play keys 41 Editing FX 129 EFFECTS LIBRARY 130 ENTER 34 EQ 89 ERASE 58 Expansion Slots 6 EXT SYNC 32 202 EXT SYNC Offset 203 F Fader Bank 18 Fader flip 14 FADER MOTORS 114 Faders 18 FAST FORWARD 40 Features 1 FOOTSWITCH 5 172 FORMAT 184 FROM 41 Front Panel 7 FULL FORMAT 184 FX 32 49 127 FX Category 131 FX Edit 129...

Страница 251: ...UICK FORMAT 184 Quick Locators 45 R RANGE 93 RATIO 92 REAR PANEL 4 Recall Locate Memory 43 Recall Scene 37 Recalling FX 128 149 RECORD 40 Record Abort 40 Record Drop Out 40 RECORD EVENTS 113 RECORD MODE 113 RECORD SAFE 117 RECORD SOURCE 88 Record Edit Select Keys 10 REDO 33 RELEASE 92 93 RESAMPLE 82 Reset Mixer 39 Restoring Projects 144 RETURN TIME 114 REVERSE 81 REWIND 40 S SAMPLE RATE 166 Scene ...

Страница 252: ...Printed in China ...

Отзывы: