background image

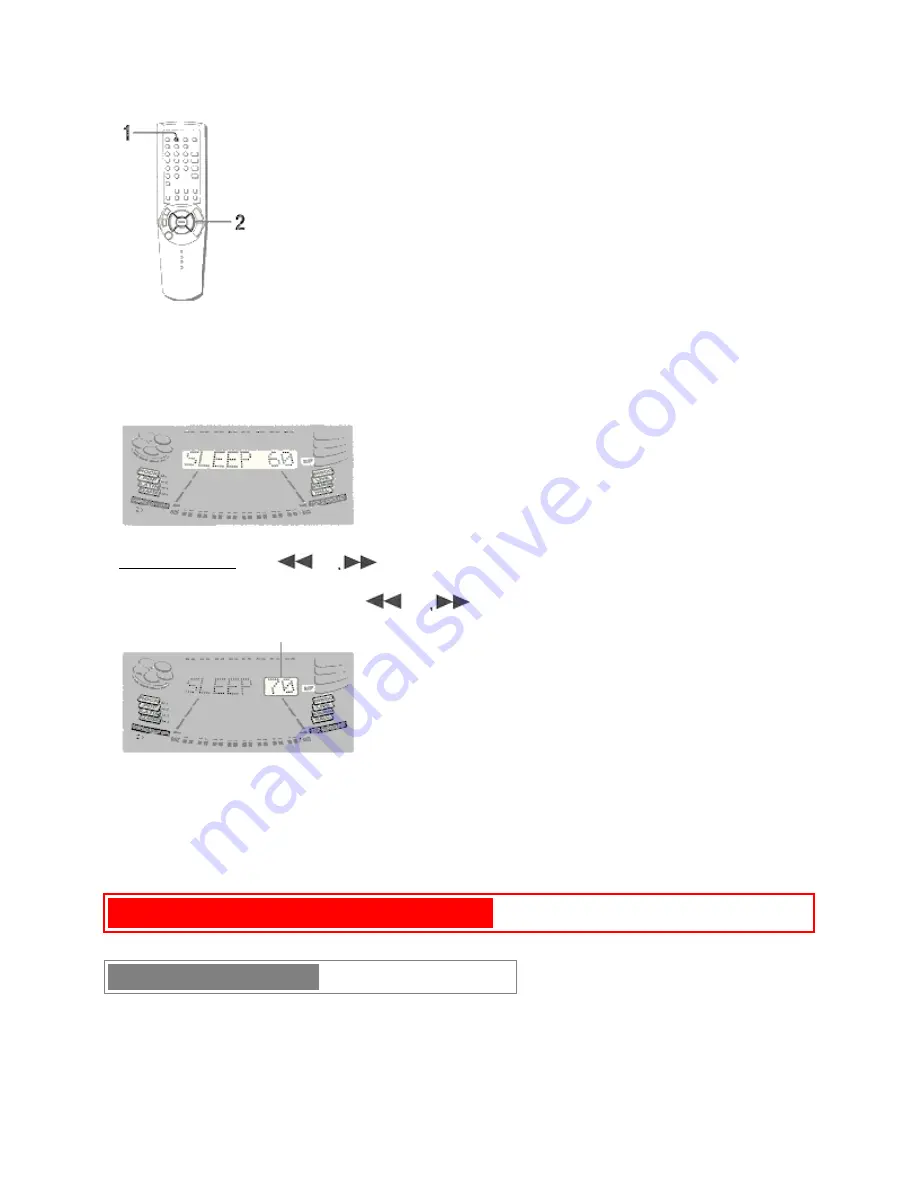
The unit can be turned off automatically at a specified time.

Use the remote control.

1 Press SLEEP.

2 Within 4 seconds, press  

or  

 to specify the time until the power is turned off.

Each time the button is pressed, the time changes between 5 and 240 minutes in 5-minute steps.

MULTI JOG is also available instead of 

and 

.

                                      Specified time

To check the time remaining until the power is turned off
 
Press SLEEP once. The remaining time is displayed for 4 seconds.

To cancel the sleep timer
Press SLEEP twice so that "SLEEP oFF appears on the display.

CLOCK AND TIMER (cont)      pg. 28

SETTING THE TIMER

Содержание NSX-MTD9

Страница 1: ...er to the presence of uninsulated dangerous voltage within the product s enclosure that may be of sufficient magnitude to constitute a risk of electric shock to persons The exclamation point within an...

Страница 2: ...d stands When placed or mounted on a stand or cart the unit should be moved with care Quick stops excessive force and uneven surfaces may cause the unit or cart to overturn or fall 7 Condensation Mois...

Страница 3: ...e protection against unexpected voltage surges or static electricity build up Article 810 of the National Electric Code ANSI NFPA70 provides information on proper grounding of the mast supporting stru...

Страница 4: ...SLEEP TIMER 27 SETTING THE TIMER 28 OTHER CONNECTIONS CONNECTING OPTIONAL EQUIPMENT 29 LISTENING TO EXTERNAL SOURCES 29 CONNECTING A DVD PLAYER 30 GENERAL CARE AND MAINTENANCE 31 TROUBLESHOOTING GUID...

Страница 5: ...ion on or below the TV set if connecting a TV set to the unit 3 Surround speakers Place the surround speakers directly to the side of or slightly behind the listening area Align them horizontally abou...

Страница 6: ...ls and the left to SPEAKERS L terminals The cords with white stripes should be connected to the terminals and the other cords to the terminals 2 Connect the surround speakers to the main unit Connect...

Страница 7: ...et The game Demo will begin when the AC cord is plugged into an AC outlet See page 6 Game Demo for details To position the antennas FM feeder antenna Extend this antenna horizontally in a T shape and...

Страница 8: ...ain rails Do not bring the AM antenna near other optional equipment the stereo system itself the AC cord or speaker cords since noise will be picked up Do not unwind the AM antenna wire CONNECTING AN...

Страница 9: ...h the same names as those on the main unit can be used as well PRESET on the remote control This function is the same as that of on the main unit If the unit is not going to be used for an extended pe...

Страница 10: ...urn back on repeat the above Do not perform this operation furring recording To change the brightness level of the display 1 Press ECO so that ECO MODE is displayed 2 Within 4 seconds turn MULTI JOG t...

Страница 11: ...u lose To reset the game Demo press DEMO twice To cancel the game Demo press DEMO To change the probability of equalizing the three number Press or repeatedly to select one of the three probability le...

Страница 12: ...he display brightness level is set to DIMMER page 6 all button lamps are off and the volume is set to minimum level 0 The display brightens only when operating the unit When the unit has not been used...

Страница 13: ...hen the power is turned off with the volume level set to 21 or more To change the left right balance Press MANUAL SELECT on the remote control L R is displayed for 2 seconds Press or on the remote con...

Страница 14: ...cancel the T BASS system Using the headphones Connect the headphones to PHONES with a stereo standard plug 6 3 mm 1 4 inch No sound is output from the speakers while the headphones are plugged in Whe...

Страница 15: ...porated in this product are Yamaha Corporation s copyrightable property and we are licensed by Yamaha Corporation SOUND cont pg 9 To adjust the tempo of the rhythm pattern 1 Press RHYTHM repeatedly un...

Страница 16: ...ess BEAT ON OFF BEAT toggles between On and Off When you interrupt or stop the playback of the sound source the BEAT function is automatically switched off Using the AUTO mode The AUTO mode automatica...

Страница 17: ...the synced up tempo Depending on sound sources such as songs whose tempo is varying however you may see different tempos appearing one after the other in the display After one synced up if the sync lo...

Страница 18: ...m To use the FILL IN function During playback with the BEAT function switched on press FILL IN at the desired moment FILL IN is displayed and when the current cycle of the rhythm pattern is over you l...

Страница 19: ...l holding down the button turn MULTI JOG Depending on the direction in which you turn MULTI JOG different scratches are produced The Scratch mode is disabled when you release the A button SOUND cont p...

Страница 20: ...Press SPICE B and repeat step 3 to select the desired sound for B 5 To adjust the level of the A and B sounds press RHYTHM repeatedly until LEVEL X is displayed then turn MULTI JOG within 4 seconds T...

Страница 21: ...ine treble Press PRGM MANU so that one of the PRGM indicators is selected and then press ROCK POP LATIN or CLASSIC To cancel the selected mode Press the selected button again GEQ OFF is displayed To s...

Страница 22: ...is stored The equalization curve has been memorized to M1 To select a manual preset GEQ 1 Press PRGM MANU to select the manual mode One of the MANUAL indicators is selected 2 Press one of the graphic...

Страница 23: ...e music performance LIVE stadium STADIUM or concert hall HALL can be obtained Press DISCO LIVE STADIUM or HALL Equalization curves are selected automatically to match the DSP SURROUND modes and can al...

Страница 24: ...open the disc compartment Load disc s with the label side up To load one or two discs place the disc s on the tray s in the direction of the arrows as illustrated To load three to five discs press DI...

Страница 25: ...point during playback keep or or pressed and release it at the desired point To skip to the beginning of a track during playback press or repeatedly or turn MULTI JOG To remove discs press OPEN CLOSE...

Страница 26: ...ons other than DISC CHANGE or OPEN CLOSE Doing so may cause malfunctions In this case reset the unit referring To reset on page 31 When loading an 8 cm 3 inch disc make sure to put it onto the inner c...

Страница 27: ...between tracks recorded on a CD can be skipped during playback 1 Press CD BLANK SKIP CD BLANK SKIP ON is displayed and a small dot will appear in the display 2 Press to start playback The silent port...

Страница 28: ...nters KARAOKE PROGRAM page 24 2 Press DISC DIRECT PLAY then press one of the numbered buttons 1 5 within 3 seconds to select a disc Go to the next step when the tray stops rotating 3 Press the numbere...

Страница 29: ...play During programmed play you cannot perform random play check the remaining time and select a disc or track Can t USE is displayed if you attempt to select a track or random play FULL is displayed...

Страница 30: ...is 9 kHz step change the tuning interval Press POWER while pressing To reset the interval repeat this procedure When the AM tuning interval is changed all preset stations are cleared The preset stati...

Страница 31: ...time is pressed the next higher number is selected To clear a preset station Select the preset number of the station to be cleared Then press CLEAR and press SET within 4 seconds The preset numbers of...

Страница 32: ...s pressed the reverse mode changes To play one side only select To play from front side to reverse side once only select To play both sides repeatedly select When tapes are loaded in both decks on the...

Страница 33: ...lay press To pause play deck 2 only press To resume play press again To change the playback side press DIRECTION PRESET in play or pause mode To fast forward or rewind press or in stop mode Then press...

Страница 34: ...erall recording levels CONTINUOUS PLAY After playback on one deck finishes the tape in the other deck will start to play without interruption 1 Insert tapes into deck 1 and deck 2 2 Press TAPE DECK 1...

Страница 35: ...BASIC RECORDING This section explains how to record from the tuner CD player or external equipment Preparation Set the tape to the point where recording will start Use Type I normal and Type II high...

Страница 36: ...RDING The output volume of the speakers or headphones may be freely varied without affecting the level of the recording But BBE and Rhythm play function BEAT AUTO SPICE FILL IN SPICE A B will affect t...

Страница 37: ...ted 3 Set the reverse mode by pressing REV MODE DECK 2 4 Press REC REC MUTE to start the erasure RECORDING cont pg 20 DUBBING A TAPE MANUALLY Preparation Set the tape to the point where recording will...

Страница 38: ...Dolby NR does not affect recording 1 Press TAPE DECK 1 2 2 Insert the original tape into deck 1 and the tape to be recorded on into deck 2 Insert each tape with the side to be played back or recorded...

Страница 39: ...h When a CD is inserted the unit automatically calculates the total track length If necessary the order of tracks is rearranged so that no track is cut short Al Artificial Intelligence Al edit recordi...

Страница 40: ...recording press CD EDIT CHECK to select side A or B and press or repeatedly or turn MULTI JOG To add tracks from other discs to the edit program If there is any time remaining on the tape after step...

Страница 41: ...d while checking the remaining time on each side of the tape The programmed edit recording will not start from a point halfway in the tape The tape must be recorded from the beginning of either side 1...

Страница 42: ...longer than the remaining time cannot be programmed 7 Press CD EDIT CHECK to select side B and program the tracks for side B After confirming B on the display repeat step 5 8 Press REC REC MUTE to st...

Страница 43: ...r sound field while ambient sounds like cars and crowds are reproduced on all sides of the listener for an incredibly lifelike audio video experience Please read the following carefully to tune the sy...

Страница 44: ...UAL SELECT again to stop the noise signal NOTE If the surround speakers or the center speaker level of the DOLBY PRO LOGIC is changed that of the SURROUND system page 12 and the DOLBY DIGITAL SURROUND...

Страница 45: ...r or each surround speaker can be adjusted during playback of laser discs or video software 1 Press MANUAL SELECT on the remote control repeatedly to select CEN center or S R right surround speaker or...

Страница 46: ...cannot be obtained when using software without mark In this case use the SURROUND system instead See page 12 The DOLBY PRO LOGIC is automatically cancelled when the ECHO level is changed the SURROUND...

Страница 47: ...microphones from MIC jacks MIC and ECHO are reset to OFF automatically when the function is changed the power is turned off or the AC cord is disconnected When the ECHO level is changed the SURROUND...

Страница 48: ...n to the initial setting select MPX L When the power is turned off MPX L is restored To change the time lag setting in Auto Vocal Fader or Auto Multiplex function The muted singer s voice can be resto...

Страница 49: ...Press CD and load the discs 2 Press PRGM once 3 Press DISC DIRECT PLAY then press one of the numbered buttons 1 5 within 3 seconds to select a disc Then press the numbered buttons 0 9 and 10 to progr...

Страница 50: ...o clear all the reservations Press repeatedly until K P00 is displayed Press it once more to cancel the Karaoke program The display returns to that of CD play If the reserved track number does not exi...

Страница 51: ...e previous time setting This cancels any new setting To view the clock when another display is in the display Press CLOCK The time is displayed for 4 seconds and then the original display reappears Ho...

Страница 52: ...button is pressed the time changes between 5 and 240 minutes in 5 minute steps MULTI JOG is also available instead of and Specified time To check the time remaining until the power is turned off Pres...

Страница 53: ...the display Time and audio source name flash alternatively 3 Within 6 seconds turn MULTI JOG to designate the timer on time then press ENTER or Turning MULTI JOG changes both the hour and the minute o...

Страница 54: ...tep 3 To check the timer setting Press TIMER The selected source the timer on time and the duration for the timer activated period will be displayed for 6 seconds To change any of the previous setting...

Страница 55: ...ords Consult your local Aiwa dealer for optional equipment VIDEO AUX JACKS This unit can input analog sound signals through these jacks Use a cable with RCA phono plugs to connect audio equipment turn...

Страница 56: ...Y DIGITAL SURROUND sound 5 1 CH INPUT JACKS This unit can input sound signals from the audio equipment DVD player LD player etc that contains a Dolby Digital decorder with the 5 1 ch output terminals...

Страница 57: ...same as that of other function sources During recording the sound level cannot be adjusted OTHER CONNECTIONS cont pg 30 CONNECTING A DVD PLAYER 5 1CH INPUT jacks of this unit support the DOLBY DIGITA...

Страница 58: ...e function is changed from the 5 1 CH to the VIDEO when the headphones are plugged in the DSP SURROUND system the DOLBY PRO LOGIC or the Karaoke function is turned on the MIC or ECHO level is changed...

Страница 59: ...f the cleaning cassette for details To demagnetize the heads The tape heads may become magnetized after long term use This may narrow the output range of recorded tapes and increase noise After every...

Страница 60: ...occurs Reset the unit as stated below The power is not turn on Disconnect the AC cord and connect it again in a few seconds TUNER SECTION There is constant wave like static Is the antenna connected p...

Страница 61: ...z to 1602 kHz 9 kHz step Usable sensitivity 350 V m Antenna Loop antenna Amplifier section Power output Front 155 W 155 W 50 Hz 20 kHz THD less than 1 6 ohms Rear Surround 33W 33W 50 Hz 20 kHz THD les...

Страница 62: ...urable General Power requirements 120 V AC 60 Hz Power consumption 220 W Dimensions of main unit 300 x 383 5 x 380 mm W x H x D 11 7 8 x 15 1 8 x 15 in Weight of main unit 13 kg 28 lbs 11 oz Standby p...

Страница 63: ...installed and used in accordance with the instructions may cause harmful interference to radio communications However there is no guarantee that interference will not occur in a particular installati...

Страница 64: ...M4 11 12 PRGM MANU 11 12 3 PHONES 4 4 POWER 6 16 31 5 SET 13 16 27 28 CLEAR 6 13 15 22 26 27 31 DIRECTION PRESET 6 13 18 DOWN 6 7 12 15 18 21 24 30 UP 6 7 12 13 15 18 21 24 26 30 REC REC MUTE 19 22 S...

Страница 65: ...O SPICE FILL IN 10 11 CLOCK 27 TIMER 28 13 DISC DIRECT PLAY 1 5 13 21 22 26 DISC CHANGE 13 OPEN CLOSE 13 14 TIMER 28 SLEEP 27 MONO TUNER 16 CLOCK 27 15 0 9 10 13 16 21 22 26 DISC DIRECT PLAY 13 21 22...

Страница 66: ...2 6 17 20 TUNER BRAND 16 VIDEO AUX 29 30 CD 6 13 20 SURROUND 12 MANUAL SELECT 7 12 23 24 30 DOLBY PRO LOGIC 23 24 21 VOL 7 For assistance and information call toll free 1 800 BUY AIWA United States a...

Отзывы: