background image

– 14 –

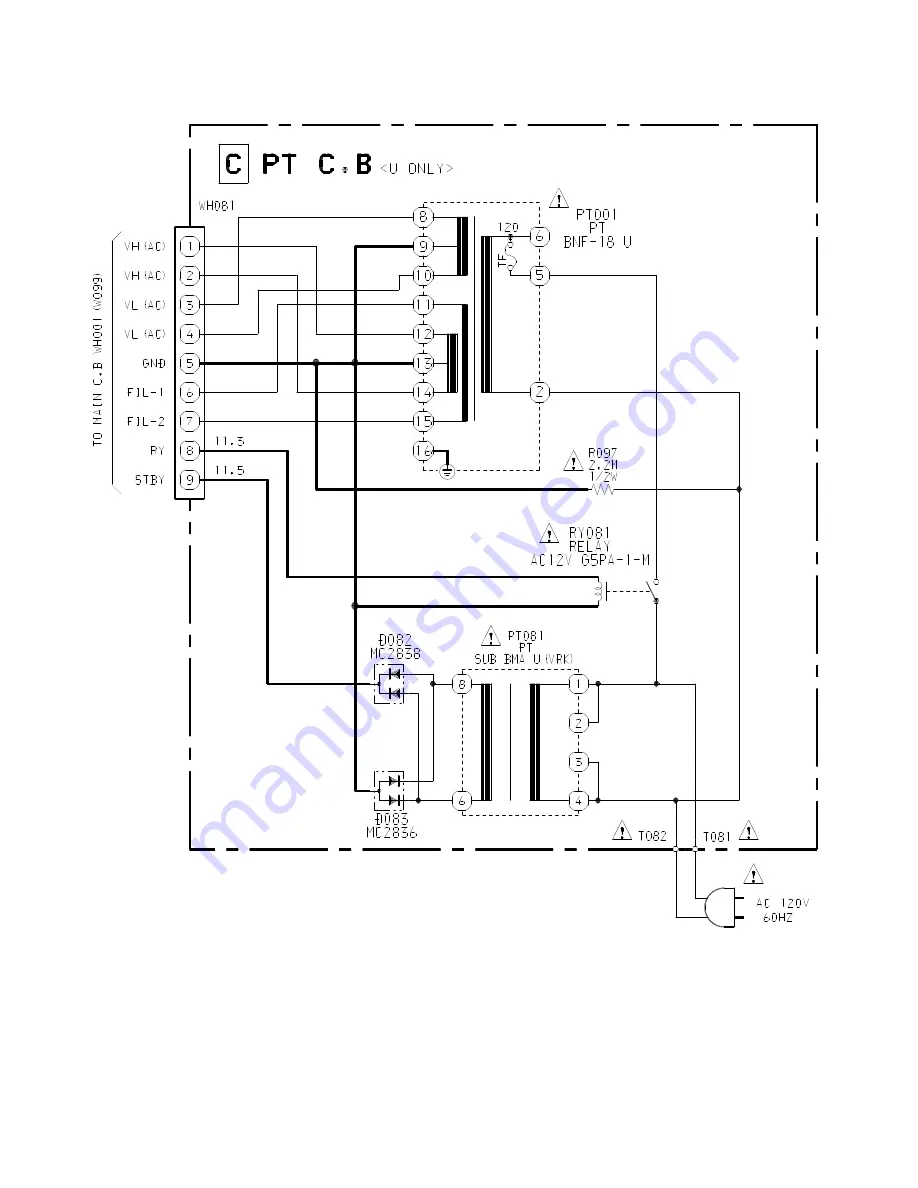
SCHEMATIC  DIAGRAM _ 3  (PT) <U>

Содержание NSX-AJ700

Страница 1: ...53 3N2 This Service Manual is the Revision Publishing and replaces Simple Manual NSX AJ700 U NSX SZ700 LH NSX SZ705 LH S M Code No 09 012 441 7T1 BASIC TAPE MECHANISM 2ZM 3MK2 PR9NM ZZM 3 PR1NM BASIC CD MECHANISM BZG 5 ZD3N1M NSX AJ700 SYSTEM CD CASSEIVER CX NAJ700 NSX SZ700 CX NSZ700 NSX SZ705 CX NSZ705 TAPE MECHANISM ZZM 3 PR1NM 2ZM 3MK2 PR9NM SPEAKER REMOTE CONTROLLER SX NAJ702 RC BAS02 SX WNSZ...

Страница 2: ...layback x 1 erase x 1 Speaker system SX NAJ702 U Speaker system 2 way bass reflex magnetic shielded Speaker units Woofer 160 mm 63 8 in cone Tweeter 60 mm 23 8 in cone Impedance 6 ohms Dimensions 230 x 324 x 253 mm W x H x D 91 8 x 127 8 x 10 in Weight 4 6 kg 10 lbs 2 oz SPECIFICATIONS Speaker system SX WNSZ703 700LH Speaker system 3 way built in subwoofer magnetic shielded type Speaker units Subw...

Страница 3: ...paraten används på annat sätt än vad som specificeras i denna bruksanvising kan användaren utsättas för osynling laserstrålning som överskrider gränsen för laserklass 1 PROTECTION OF EYES FROM LASER BEAM DURING SERVICING CAUTION Use of controls or adjustments or performance of proce dures other than those specified herin may result in hazardous radiation exposure ATTENTION L utillisation de comman...

Страница 4: ...in power 2 2 2 2 2 Confirm that the main power is turned on and the HOLD terminal of the MICROCOMPUTER keeps the H level or not 3 3 3 3 3 When the HOLD terminal is L level the abnormality detection circuit is judged to be working correctly and the MICROCOMPUTER is judged to be good 1 Forced discharge of electrolytic capacitor of power supply block When repair is going to be attempted in the set th...

Страница 5: ... ends of the electrolytic capacitor C113 that is connected to VDD of the MICROCOMPUTER with tweezers 3 3 3 3 3 Connect the AC power cord again If the MICROCOMPUTER returns to the normal operation the MICROCOMPUTER is good Note The reference number or MICROCOMPUTER pin number of transistor Q110 and electrolytic capacitor C113 can change depending on the models Be sure to check the reference numbers...

Страница 6: ...ELON LH C21 87 A12 780 090 CAP E 4700 35 M 85 SKR C22 87 A12 780 090 CAP E 4700 35 M 85 SKR C31 87 A12 091 080 CAP E 10 50 SMG C32 87 012 286 080 CAP U 0 01 25 C33 87 A12 062 080 CAP E 100 10 SMG U C34 87 A12 072 080 CAP E 100 25 SMG C35 87 A12 071 080 CAP E 47 25 SMG C36 87 A12 067 080 CAP E 330 16 SMG C38 87 012 286 080 CAP U 0 01 25 C60 87 A12 089 080 CAP E 3 3 50 SMG C61 87 A12 071 080 CAP E 4...

Страница 7: ...33 50 SMG C800 87 010 829 080 CAP U 0 047 16 C801 87 A12 089 080 CAP E 3 3 50 SMG C802 87 010 829 080 CAP U 0 047 16 C803 87 010 787 080 CAP U 0 022 25 C804 87 A12 062 080 CAP E 100 10 SMG C807 87 A12 086 080 CAP E 0 47 50 SMG C808 87 A12 087 080 CAP E 1 50 SMG C809 87 A12 087 080 CAP E 1 50 SMG C810 87 010 831 080 C CAP U 0 1 16F C814 87 012 286 080 CAP U 0 01 25 C815 87 A12 086 080 CAP E 0 47 50...

Страница 8: ... CH C166 87 010 552 040 CAP E 22 16 M 5L SRE C171 87 012 369 080 C CAP S 0 047 50F C172 87 A12 094 080 CAP E 47 50 SMG C173 87 010 421 040 CAP E 4 7 50 5L C174 87 010 421 040 CAP E 4 7 50 5L C180 87 010 759 080 C CAP U 0 1 25F C185 87 010 759 080 C CAP U 0 1 25F C186 87 012 274 080 CHIP CAP U 1000P 50B C188 87 012 369 080 C CAP S 0 047 50F C191 87 012 286 080 CAP U 0 01 25 C192 87 010 759 080 C CA...

Страница 9: ...11G04M S333 87 A90 095 080 SW TACT EVQ11G04M MOTOR C B CN912 87 099 210 010 CONN 5P H BLK 6216 S911 87 036 109 010 SW MICRO SPPB61 S912 87 036 109 010 SW MICRO SPPB61 BOX SW C B S901 87 036 252 010 SW MICRO SPPB51 S902 87 036 252 010 SW MICRO SPPB51 DECK C B U CN1 87 099 753 010 CONN 11P H 9604 SFR1 87 024 581 010 SFR 3 3K H KVSF637A SOL1 82 ZM3 627 010 SOL ASSY 27 SOL2 82 ZM3 627 010 SOL ASSY 27 ...

Страница 10: ...2SA1235F 2SC2714O 2SC3052F KRA102S KRA107S KRC104S KRC107S CMBT5401 CMBT5551 RT1P141C 2SA1980G 2SA1981Y 2SA1979O Y 2SC5343G 2SC5342Y CSD655E E C B CC5551 CDA1585BC CSC4115BC KTA1266GR E C B S G D 2SK2158 B C E G D S CSB1370EF 2SK2937 FN1016 FP1016 2SA933AS R E C B B C E ...

Страница 11: ...IRING 1 MAIN PT 32 31 30 29 28 27 26 25 24 23 22 21 20 19 18 17 16 15 14 13 12 11 10 9 8 7 6 5 4 3 2 1 11 A B C D E F G H I J K L M N O P Q R S T U TO PT C B CN001 CNA001 LH TO PT C B WH081 W099 U WHT V ...

Страница 12: ... 12 SCHEMATIC DIAGRAM _ 1 MAIN 1 2 AMP SECTION ...

Страница 13: ... 13 SCHEMATIC DIAGRAM _ 2 MAIN 2 2 TUNER SECTION ...

Страница 14: ... 14 SCHEMATIC DIAGRAM _ 3 PT U ...

Страница 15: ...S901 BOX 2 SW S902 BOX 1 SW TP8 LED401 WIRING 2 FRONT MOTOR BOX SW 32 31 30 29 28 27 26 25 24 23 22 21 20 19 18 17 16 15 14 13 12 11 10 9 8 7 6 5 4 3 2 1 15 A B C D E F G H I J K L M N O P Q R S T U ...

Страница 16: ...WIRING 3 M OP PANEL S OP PANEL 32 31 30 29 28 27 26 25 24 23 22 21 20 19 18 17 16 15 14 13 12 11 10 9 8 7 6 5 4 3 2 1 16 A B C D E F G H I J K L M N O P Q R S T U ...

Страница 17: ... 17 SCHEMATIC DIAGRAM _ 4 U FRONT M OP PANEL S OP PANEL MOTOR BOX SW DECK ...

Страница 18: ... 18 SCHEMATIC DIAGRAM _ 5 LH FRONT M OP PANEL S OP PANEL MOTOR BOX SW DECK ...

Страница 19: ...TO MAIN C B WH001 CNA001 WIRING 4 PT LH 15 14 13 12 11 10 9 8 7 6 5 4 3 2 1 A B C D E F G H I J K L M N O P Q R S T U 19 ...

Страница 20: ... 20 SCHEMATIC DIAGRAM _ 6 PT LH ...

Страница 21: ...WIRING 5 LH DECK HEAD 1 HEAD 2 32 31 30 29 28 27 26 25 24 23 22 21 20 19 18 17 16 15 14 13 12 11 10 9 8 7 6 5 4 3 2 1 21 A B C D E F G H I J K L M N O P Q R S T U ...

Страница 22: ... 13 12 11 10 9 8 7 6 5 4 3 2 1 22 A B C D E F G H I J K L M N O P Q R S T U WIRING 6 U DECK SW5 CAM2 SW1 CAM1 SOL1 SOL2 SW2 CST1 SW3 REA SW4 CST2 IC2 1 3 IC1 1 3 L H R1 SFR1 TO FRONT C B CN202 FC202 CN1 1 3 5 7 9 11 2 4 6 8 10 W1 M1 TAPE MOTOR L H H DECK C B ...

Страница 23: ... 23 FL BJ815GNK GRID ASSIGNMENT AND ANODE CONNECTION GRID ASSIGNMENT ANODE CONNECTION ...

Страница 24: ... 24 IC BLOCK DIAGRAM ...

Страница 25: ...nput 1 21 I KEY2 I Key A D input 2 22 I KEY3 I Key A D input 3 23 I PANEL SW I Panel OPEN CLOSE detect switch AD input 24 I JOG I Dial jog rotary encoder input 25 I SPEANA I Spectrum analyser level detection 26 I CDSW I CD mehca switch input 27 I WRQ I CD WRQ input 28 I TM BASE I Reference clock input for timer switch 29 I RMC I System remote control signal input L ACTIVE 30 41 G12 G1 O FL grid G1...

Страница 26: ...P9 output 71 CAM2 P8 I O DECK2 CAM switch data input L ON FL segment P8 output 72 VDD4 Digital power supply pin 73 REB P7 I O DECK2 side B recordable switch L REC LH only FL segment P7 output 74 CST2 P6 I O DECK2 cassette detection switch data input L ON FL segment P6 output 75 M GEO P5 I O Manual GEQ diode input Not used FL segment P5 output 76 R 1 P4 I O DECK R 1 diode input Not used FL segment ...

Страница 27: ...CE O CD data chip enable output 98 I STEREO I DRF I Tuner stereo detect input RF radio frequency detect 99 O P DATA O Panorama IC data output Not used 100 O CLK O PLL IC clock output Description Pin No Pin Name I O ...

Страница 28: ... DC Balance TP5 Lch TP6 Rch Distortion Adjustment location L801 Input level 60dBµV Method Set to FM 98 0MHz and adjust L801 so that the voltage between TP3 and TP4 becomes 0V 300mV Then check that the distortion is less than 1 2 TUNER SECTION ADJUSTMENT TUNER DECK FRONT DECK SECTION 3 PB Frequency Response Check DECK 1 DECK 2 Settings Test tape TTA 330 Test point TP5 Lch TP6 Rch Method Play back t...

Страница 29: ...ration STOP button Play button PAUSE button FF button RWD button REC REC MUTE button Display All indicators light READING Normal Normal CD TEST CD TEST All indicators light Function All FL indicators light LD illuminates all the time Focus search continuous operations 1 Spindle motor continuous kick Normal playback If TOC cannot be read focus search is continued Tracking servo OFF ON Each time PAU...

Страница 30: ...RTH MIC FL401 NAJ700 U NSZ700 LH NSZ705 LH G A 42 11 43 8 12 10 9 7 15 I I A C 55 1 2 3 4 5 6 a a 22 D A 17 13 14 14 20 21 40 36 37 37 39 38 38 A A G B A 16 GUIDE ECO 18 19 23 21 27 24 41 56 58 55 57 26 25 A A A A A A A 28 29 31 32 34 33 35 30 B b b A 44 45 46 47 49 60 E E 59 F 48 51 52 C C C A A H H H H G G 50 50 53 A PLATE PT 85 54 A A A A c c ...

Страница 31: ...DR STOP 42 8A NF8 007 010 PANEL LEFT V 2 43 8B NF7 039 010 PANEL TOP V 2 BNFK 44 87 CE3 023 010 BADGE AIWA 30N SILV 45 8B NF7 035 010 WINDOW TRAY 46 8B NF7 005 010 PANEL TRAY 47 8A NF8 206 010 HLDR PWB M 48 8B NF7 239 010 HLDR TR U EXCEPT U 48 8B NF7 239 010 HLDR TR U U 49 87 NF6 616 010 CONN ASSY 8P RPB EXCEPT U 50 8B NF7 208 010 HLDR PT 76 60 U 50 8A DB8 209 010 HLDR PWB PT EXCEPT U 51 87 085 18...

Страница 32: ...9 9 10 11 10 11 12 12 13 13 14 14 15 15 16 16 18 18 19 19 20 20 21 21 30 22 23 24 25 26 27 28 22 23 24 25 26 27 28 29 31 32 33 34 35 36 37 37 38 38 39 39 40 41 42 43 44 51 52 45 46 47 48 49 50 53 54 54 17 55 30 35 29 31 32 33 52 51 44 45 43 42 IC EW732 IC EW732 b a a b c c 40 41 46 47 48 49 PWB ...

Страница 33: ... 25 8Z ZM3 226 010 SPR C FR M3 26 8Z ZM3 250 010 GEAR SLIP F R A M3 27 8Z ZM1 269 010 FELT FF REW 2 28 8Z ZM1 238 110 GEAR SLIP FF REW B 2 29 8Z ZM3 220 010 LEVER FR M3 30 8Z ZM3 205 010 LEVER PLAY M3 31 8Z ZM3 233 010 SPR T BRG M3 32 84 ZM2 227 310 SPR C AZIMUTH 33 87 A90 403 110 HEAD RPH MS15R 34 87 A90 404 010 HEAD EH LE15B 35 8Z ZM3 239 010 SPR E FR 36 8Z ZM3 211 010 LEVER EJECT R 37 8Z ZM3 22...

Страница 34: ...13 14 14 15 15 16 16 17 17 18 18 19 19 19 20 20 21 21 GEAR PLAY GEAR PLAY 23 23 24 24 26 28 28 PWB PWB 27 29 43 58 29 30 29 43 32 31 29 30 31 32 22 38 10 33 33 34 35 35 36 57 37 37 39 39 40 40 58 41 42 42 44 45 46 47 48 49 50 51 52 53 54 55 47 48 49 50 51 44 46 9 52 53 54 55 A C B A C B D D E 56 PWB 22 25 59 59 YPR9NM ...

Страница 35: ...ZM3 339 110 SHAFT COUPLER N3 28 82 ZM1 255 310 SPR E LVR DIR 29 82 ZM1 217 410 REEL TABLE 30 82 ZM1 285 410 SPR C BT L 31 82 ZM1 333 210 PLATE LINK2 32 82 ZM1 222 310 LVR PLAY 33 82 ZM3 307 010 CUSH G DIA3 7 8 3 2 34 87 045 347 010 MOT SHU2L 70 35 82 ZM1 257 010 SPR T CAS 36 82 ZM3 340 010 SH BELT D2 37 82 ZM1 242 010 LVR CAS 38 82 ZM3 329 410 BELT SBU R2 39 82 ZM1 243 010 LVR STOP 40 82 ZM1 240 1...

Страница 36: ...stall it turning to clockwise direction until click sound comes out Remove the grill frame and four pieces of rubber caps by pulling out with a flat bladed screwdriver Remove the screws from hole where installed rubber caps Insert a flat bladed screwdriver into the position indicated by the arrows and remove the panel Re move the screws of each speaker unit and then remove the speaker units TOOLS ...

Страница 37: ... SX NAJ702 YUSC SX NSZ705 YLSC 1 8B NSJ 001 010 PANEL FR 2 8B NSJ 003 010 PANEL DUCT 3 8B NSJ 004 010 PROTECTOR 4 8B NSJ 602 010 SPKR W 160 5 8B NSJ 604 010 SPKR TW 60 6 8B NSJ 612 010 CORD SPKR DESCRIPTION REF NO KANRI NO PART NO SPEAKER PARTS LIST SX WNSZ703 YLSL 1 8B NS8 001 010 PANEL FR 2 8B NS8 002 010 PANEL SP A 3 8B NS8 003 010 PANEL SP B 4 8B NS8 004 010 PANEL DUCT 5 8B NS8 007 010 PROTECT...

Страница 38: ...2 11 IKENOHATA 1 CHOME TAITO KU TOKYO 110 JAPAN TEL 03 3827 3111 Printed in Singapore 2000058 0251431 ...

Отзывы: