background image

En

ENGLISH

 15

AI EDIT RECORDING

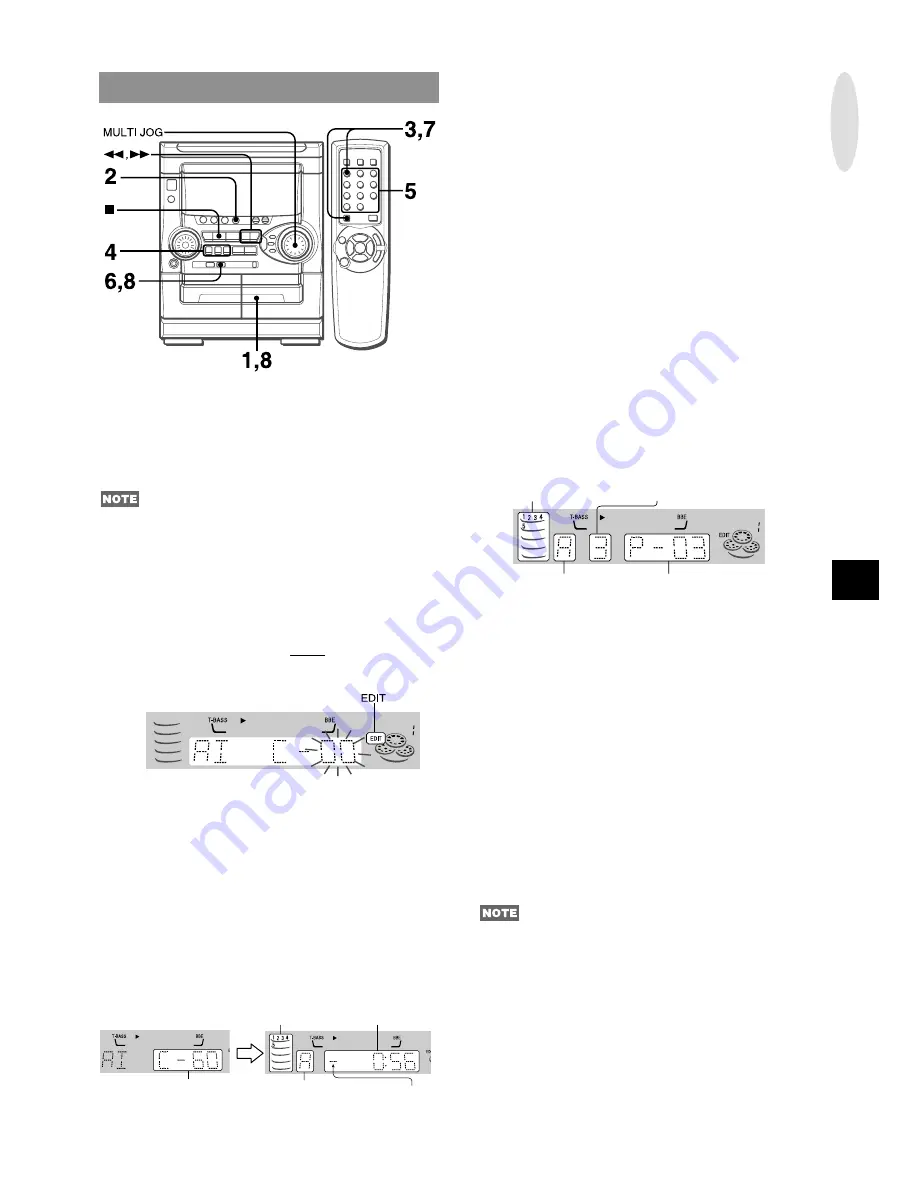
The AI edit recording function enables CD recording without
worrying about tape length and track length.  When a CD is
inserted, the unit automatically calculates the total track length.
If necessary, the order of tracks is rearranged so that no track is
cut short.
(AI: Artificial Intelligence)

AI edit recording will not start from a point halfway into the tape.
The tape must be recorded from the beginning of either side.

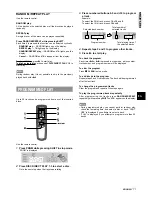
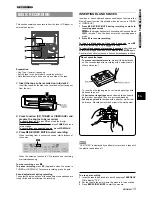
1 Insert the tape into deck 2.

Insert the tape with the side to be recorded on first facing out
from the unit.

2 Press CD and load the disc(s).

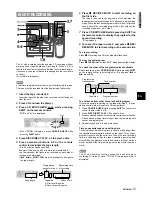
3 Press CD EDIT/CHECK once while pressing

SHIFT on the remote control.

“EDIT” and “AI” are displayed.

• When “PRGM” is displayed, press CD EDIT/CHECK while

pressing SHIFT again.

4 Press DISC DIRECT PLAY 1-3 to select a disc.

5 Press numbered buttons 0-9 on the remote

control to designate the tape length.

10 to 99 minutes can be specified.
Example:  When using a 60-minute tape, press 6 and 0.
In a few seconds, the tracks to be recorded on each side of
the tape are determined.

f

g

 or MULTI JOG are also available to designate

the tape length.

6 Press 

w

 REC/REC MUTE to start recording on

the first side.

The tape is rewound to the beginning of the first side, the
lead segment is played through for 10 seconds, and recording
starts. When the last track programmed for side A is finished,
deck 2 enters the recording stop mode. After entering the
recording stop mode, go to step 7.

7 Press CD EDIT/CHECK while pressing SHIFT on

the remote control to display the program for the
second recording.

“B” is displayed.

8 Turn over the tape in deck 2 and press 

w

 REC/

REC MUTE to start recording on the second side.

To stop recording

Press 

s

. Recording and CD play stop simultaneously.

To clear the edit program

Press 

s

 CLEAR twice so that “EDIT” disappears on the display.

To check the order of the programmed track numbers

Before recording, press CD EDIT/CHECK while pressing SHIFT
on the remote control to select side A or B, and press 

f

 or

g

 repeatedly.

To add tracks from other discs to the edit program

If there is any time remaining on the tape after step 5, you can
add tracks from other discs in the CD compartment .
Press CD EDIT/CHECK while pressing SHIFT on the remote

control to select side A or B.

Press DISC DIRECT PLAY 1-3 to select a disc.
Press numbered buttons on the remote control to select tracks.

A track whose playing time is longer than the remaining time
cannot be programmed.

Repeat steps 2 and 3 to add more tracks.

Time on cassette tapes and editing time

The actual cassette recording time is usually a little longer than
the specified recording time printed on the label.  This unit can
program tracks to use the extra time.  When the total recording
time is a little longer than the tape’s specified recording time
after editing, the display shows the extra time (without a minus
mark), instead of the time remaining on the tape (with the minus
mark).

The AI edit recording function cannot be used with discs
containing 31 tracks or more. “TR OVER” is displayed if this is
attempted.

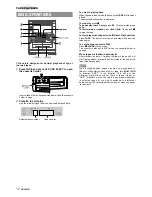
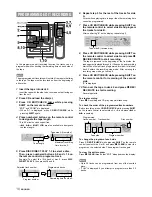
Track number

Programmed
tracks number

Program number

Tape side

Tape length

Remaining time
of recording

Programmed
tracks for side A

Tape side
A: First recording side
B: Second recording side

Minus mark

RECORDING

Содержание NSX-AJ20

Страница 1: ...U En English E Español 8A NF9 903 11 000404BKH U 9 F Français For assistance and information call toll free 1 800 BUY AIWA United States and Puerto Rico Owner s record For your convenience record the model number and serial number you will find them on the rear of your set in the space provided below Please refer to them when you contact your Aiwa dealer in case of difficulty Model No Serial No ...

Страница 2: ...oom The unit is cooled by an air conditioner When this unit has condensation inside it may not function normally Should this occur leave the unit for a few hours then try to operate again 8 Wall or ceiling mounting The unit should not be mounted on a wall or ceiling unless specified in the Operating Instructions Electric Power 1 Power sources Connect this unit only to power sources specified in th...

Страница 3: ...mended in the Operating Instructions Damage Requiring Service Have the units serviced by a qualified service technician if The AC power cord or plug has been damaged Foreign objects or liquid have gotten inside the unit The unit has been exposed to rain or water The unit does not seem to operate normally The unit exhibits a marked change in performance The unit has been dropped or the cabinet has ...

Страница 4: ...minals and the AM antenna to AM LOOP terminals 3 3 3 3 3 Connect the AC cord to an AC outlet The DEMO will begin when the AC cord is plugged into an AC outlet for the first time To deactivate the DEMO set the clock 1 1 1 1 1 Connect the right and left speakers to the main unit Connect the right speaker cord to SPEAKERS R terminals and left to SPEAKERS L terminals The speaker cord with the white st...

Страница 5: ...ontrol cannot be used on this system If the remote control is not going to be used for an extended period of time remove the batteries to prevent possible electrolyte leakage The remote control may not operate correctly when The line of sight between the remote control and the remote sensor inside the display window is exposed to intense light such as direct sunlight Other remote controls are used...

Страница 6: ...or turn VOLUME or MULTI JOG The display dimmer mode is set to the dimmest the button illumination lights off and the volume is set to the minimum 0 when the unit turns on by timer recording ECO AUTO In addition to the three operations of ECO ON the unit automatically turns itself off if you do not operate it and the sound source is mute for 10 minutes ECO OFF The power economizing mode does not fu...

Страница 7: ... display is in the display Press CLOCK while pressing SHIFT on the remote control The time is displayed for 4 seconds and then the original display reappears However the clock cannot be displayed during recording To switch to the 24 hour standard Press CLOCK while pressing SHIFT on the remote control and then press s within 4 seconds Repeat the same procedure to restore the 12 hour standard In the...

Страница 8: ...d tone of the speakers or headphones are freely varied without affecting the recording AUDIO ADJUSTMENTS VOLUME Turn VOLUME on the main unit or press VOL on the remote control The volume level is displayed as a number from 0 to MAX 31 The volume level is automatically set to 16 when the power is turned off with the volume level set to 17 or more SUPER T BASS SYSTEM The T BASS system enhances the r...

Страница 9: ... in the band with higher numbers are also decreased by one RADIO RECEPTION MANUAL TUNING 1 Press TUNER BAND repeatedly to select the desired band FM AM When TUNER BAND is pressed while the power is off the power is turned on directly To select a band with the remote control Press BAND while pressing SHIFT 2 Press f DOWN or g UP to select a station Each time the button is pressed the frequency chan...

Страница 10: ...IFT on the remote control The amount of time remaining until all tracks finish playing is displayed To restore the playing time display repeat the above Selecting a track with the remote control 1 Press DISC DIRECT PLAY 1 3 to select a disc 2 Press numbered buttons 0 9 and 10 to select a track Example To select the 25th track press 10 10 and 5 To select the 10th track press 10 and 0 The selected t...

Страница 11: ...xt step when the tray stops rotating 3 Press numbered buttons 0 9 and 10 to program a track Example To select the 25th track press 10 10 and 5 To select the 10th track press 10 and 0 4 Repeat steps 2 and 3 to program other tracks 5 Press c to start play To check the program Each time f or g is pressed in stop mode a disc number track number and program number will be displayed To clear the program...

Страница 12: ...t play when the power is off Direct Play Function Press TAPE The power is turned on and play of the inserted tape begins To set the tape counter to 0000 Press s CLEAR in stop mode The counter is also set to 0000 when the cassette holder is opened When tapes are loaded in both decks After playback on deck 1 finishes the tape in the deck 2 will start to play without interruption and will stop at the...

Страница 13: ...reak off the plastic tabs on the cassette tape after recording with a screwdriver or other pointed tool To record on the tape again cover the tab openings with adhesive tape etc 120 minute or longer tapes are extremely thin and easily deformed or damaged They are not recommended Take up any slack in the tape with a pencil or similar tool before use Slack tape may break or jam in the mechanism INSE...

Страница 14: ...MUTE to start recording Playing and recording start simultaneously To stop dubbing Press s DUBBING THE WHOLE TAPE This function allows you to make exact copies of the original tape Dubbing does not start from a point halfway in the tape Note that recording is done on only one side of the tape 1 Press TAPE 2 Insert the original tape into deck 1 and the tape to be recorded on into deck 2 Insert each...

Страница 15: ...ogram for the second recording B is displayed 8 Turn over the tape in deck 2 and press w REC REC MUTE to start recording on the second side To stop recording Press s Recording and CD play stop simultaneously To clear the edit program Press s CLEAR twice so that EDIT disappears on the display To check the order of the programmed track numbers Before recording press CD EDIT CHECK while pressing SHIF...

Страница 16: ...while pressing SHIFT on the remote control to select side B and program the tracks for side B After confirming B on the display repeat step 5 8 Press CD EDIT CHECK while pressing SHIFT on the remote control to select side A and press w REC REC MUTE to start recording The tape is rewound to the beginning of the front side the lead segment is played through for 10 seconds and recording starts When t...

Страница 17: ...ep 1 by pressing one of the function buttons before pressing ENTER or a in step 3 To check the timer setting Press TIMER The timer on time the selected source and the duration for the timer activated period will be displayed for 4 seconds To change any of the previous setting Carry out from step 1 However if you do not change the timer on time in step 3 just press ENTER twice and continue from ste...

Страница 18: ...s off To activate the demo or the game demo press c when the power is off To deactivate the demo or the game demo press a To play the game demo 1 To start the game demo press c when the power is off Three numbers on the display start to run 2 Press s once The number on the left side stops 3 Press s twice to stop the remaining two numbers Scoring 20 points are given to start the game If all the num...

Страница 19: ...S This unit can input analog sound signals through these jacks Use a cable with RCA phono plugs to connect audio equipment turntables LD players MD players VCRs TV etc Connect the red plug to the VIDEO AUX R jack and the white plug to the VIDEO AUX L jack When connecting a turntable Use an Aiwa turntable equipped with a built in equalizer amplifier CD DIGITAL OUT OPTICAL JACK This unit can output ...

Страница 20: ...hile pressing s CLEAR Everything stored in memory after purchase is canceled If the power cannot be turned off in step 1 because of a malfunction reset by disconnecting the AC cord and connect it again Then carry out step 2 TROUBLESHOOTING GUIDE If the unit fails to perform as described in these Operating Instructions check the following guide GENERAL There is no sound Is the AC cord connected pro...

Страница 21: ... Compact disc player section Laser Semiconductor laser λ 780 nm D A converter 1 bit dual Signal to noise ratio 85 dB 1 kHz 0 dB Harmonic distortion 0 05 1 kHz 0 dB General Power requirements 120 V AC 60 Hz Power consumption 75 W Power consumption in standby mode Dimensions W H D 260 328 335 mm 101 4 13 131 4 in Weight 6 4 kg 14 lbs 2 oz Speaker system SX NAJ22 Speaker System 3 way bass reflex magn...

Страница 22: ...2 15 18 t t t t t g g g g gUP 7 9 12 15 18 DISC DIRECT PLAY1 3 10 11 15 16 DISC CHANGE 10 z z z z zOPEN CLOSE 10 Name Nombre Nom Page Página Page 0 0 0 0 0 DISC DIRECT PLAY1 3 10 11 15 16 0 9 10 9 11 15 16 1 CD EDIT CHECK 10 15 16 2 PRGM 11 3 RANDOM REPEAT 11 4 GEQ 8 6 T BASS 8 7 TIMER 17 8 SLEEP 18 9 CLOCK 7 0 MONO TUNER 9 10 BAND 9 SHIFT 5 POWER 6 FUNCTION 5 a a a a aSET 6 7 9 10 12 13 17 18 r r...

Страница 23: ...re de 10 cm por la parte posterior y superior de la unidad y 5 cm por cada lado No ponga la unidad sobre una cama una alfombra o superficies similares que podrían tapar las aberturas de ventilación No instale la unidad en una librería mueble o estantería cerrada herméticamente donde la ventilación no sea adecuada 5 Entrada de objetos y líquidos Tenga cuidado de que objetos y líquidos no entren en ...

Страница 24: ...puesta a tierra apropiada del mástil de la antena la estructura de apoyo y el cable de bajada a la unidad de descarga de la antena así como también del tamaño de la unidad de puesta a tierra la conexión de los terminales de puesta a tierra y los requisitos para conectar a tierra los mismos terminales Mantenimiento Limpie la unidad sólo como se recomienda en el manual de instrucciones Daños que nec...

Страница 25: ...e el cable del altavoz derecho a los terminales SPEAKERS R y el cable del altavoz izquierdo a los terminales SPEAKERS L El cable de altavoz con la franja blanca deberá conectarse al terminal 0 y el cable negro al terminal 9 Asegúrese de conectar correctamente los cables de los altavoces Las conexiones mal hechas podrían causar cortocircuitos en los terminales SPEAKERS 2 2 2 2 2 Conecte las antenas...

Страница 26: ...control remoto y el sensor de señales de la unidad principal deberá ser de 5 metros aproximadamente Cuando disminuya esta distancia reemplace las pilas por otras nuevas Para utilizar SHIFT del control remoto Los botones 1 tienen dos funciones diferentes Una de estas funciones se indica en el botón y la otra en la placa situada encima del botón Para utilizar la función del botón pulse simplemente e...

Страница 27: ...ador se pone al mínimo la iluminación de los botones se apaga y el volumen se ajusta al mínimo 0 cuando la unidad se enciende mediante la función de grabación con temporizador ECO AUTO Además de las tres operaciones de ECO ON la unidad se apagará automáticamente si usted no la utiliza y la fuente de sonido permanece silen ciada durante 10 minutos ECO OFF El modo de ahorro de energía no funciona DI...

Страница 28: ...ión en el visualizador Pulse CLOCK mientras pulsa SHIFT del control remoto La hora se visualizará durante 4 segundos y luego volverá a aparecer la visualización original Sin embargo el reloj no podrá visualizarse durante la grabación Para cambiar al modo de 24 horas Pulse CLOCK mientras pulsa SHIFT del control remoto y luego pulse s antes de que pasen 4 segundos Repita el mismo procedimiento para ...

Страница 29: ...ltavoces o auriculares podrán cambiarse libremente sin afectar en absoluto a la grabación AJUSTES DE AUDIO CONTROL DE VOLUMEN Gire VOLUME de la unidad principal o pulse VOL del control remoto El nivel de sonido se visualiza mediante un número del 0 al 31 MAX El nivel de sonido se ajusta automáticamente a 16 cuando se desconecta la alimentación estando el nivel ajustado en 17 o más SISTEMA SUPER T ...

Страница 30: ...nda disminuirán también en uno SINTONIZACION MANUAL 1 Pulse repetidamente TUNER BAND para seleccionar la banda deseada FM AM Cuando se pulse TUNER BAND mientras la alimentación esté desconectada la alimentación se conectará directamente Para seleccionar una banda con el control remoto Pulse BAND mientras pulsa SHIFT 2 Pulse f DOWN o g UP para seleccionar una emisora Cada vez que pulse el botón la ...

Страница 31: ...ulsa SHIFT en el control remoto El tiempo restante hasta que se reproduzcan todas las canciones se visualizará Para reponer la visualización del tiempo de reproducción repita el procedimiento anterior Selección de una canción con el control remoto 1 Pulse DISC DIRECT PLAY 1 3 para seleccionar un disco 2 Pulse los botones numerados 0 9 y 10 para seleccionar una canción Ejemplo Para seleccionar la c...

Страница 32: ...iguiente cuando la bandeja deje de girar 3 Pulse los botones numerados 0 9 y 10 para programar una canción Ejemplo Para seleccionar la canción número 25 pulse 10 10 y 5 Para seleccionar la canción número 10 pulse 10 y 0 4 Repita los pasos 2 y 3 para programar otras canciones 5 Pulse c para iniciar la reproducción Para comprobar el programa Cada vez que se pulse f o g en el modo de parada se visual...

Страница 33: ...cinta Para iniciar la reproducción cuando la alimentación esté desconectada función de reproducción directa Pulse TAPE La alimentación se conectará y la reproducción de la cinta insertada empezará Para poner el contador de cinta a 0000 Pulse s CLEAR en el modo de parada El contador también se pone a 0000 cuando se abre el portacasete Cuando haya cintas introducidas en ambas platinas Después de ter...

Страница 34: ...RABAR La inserción de espacios sin grabar de 4 segundos permite la activación de la función del sensor musical Puede aplicarse cuando la fuente de sonido sea TUNER o VIDEO AUX 1 Pulse w REC REC MUTE durante la grabación o en el modo de pausa de grabación 4 parpadeará el visualizador durante 4 segundos y se creará un espacio sin grabar de 4 segundos Luego la platina entrará en el modo de pausa de g...

Страница 35: ...tas se rebobinarán hasta el principio de las caras delanteras y empezará la grabación Para detener el copiado Pulse s COPIADO MANUAL DE UNA CINTA Ponga la cinta en el punto donde vaya a empezar la grabación Tenga en cuenta que la grabación sólo se realiza en una cara de la cinta 1 Pulse TAPE DECK 1 2 2 Inserte la cinta original en la platina 1 y la cinta que vaya a grabar en la platina 2 Inserte l...

Страница 36: ... Se visualiza B 8 Dé la vuelta a la cinta de la platina 2 y pulse w REC REC MUTE para iniciar la grabación de la segunda cara Para detener la grabación Pulse s La grabación y la reproducción del disco compacto pararán simultáneamente Para borrar el programa de edición Pulse s CLEAR dos veces para que EDIT desaparezca del visualizador Para comprobar el orden de los números de las canciones programa...

Страница 37: ...IFT del control remoto para seleccionar la cara A y pulse w REC REC MUTE para iniciar la grabación La cinta se rebobina hasta el principio de la cara delantera el segmento guía avanza durante 10 segundos y empieza la grabación Cuando termine la última canción programada para la cara A la platina 2 entrará en el modo de parada de grabación Después de entrar en el modo de parada de grabación vaya al...

Страница 38: ...sar ENTER o a en el paso 3 Para comprobar el ajuste del temporizador Pulse TIMER La hora de encendido del temporizador la fuente seleccionada y la duración del periodo activado mediante temporizador se visualizarán durante 4 segundos Para cambiar cualquiera de los ajustes anteriores Empiece desde el paso 1 Sin embargo si no cambia la hora de encendido del temporizador en el paso 3 pulse dos veces ...

Страница 39: ...a demostración del juego pulse c cuando la alimentación esté desconectada Para desactivar la demostración o la demostración del juego pulse a Para disfrutar del juego 1 Para iniciar la demostración del juego pulse c cuando la alimentación esté desconectada En el visualizador empezarán a moverse tres números 2 Pulse una vez s El número del lado izquierdo se para 3 Pulse dos veces s para detener los...

Страница 40: ...ales de sonido analógico a través de estas tomas Utilice un cable con clavijas fono RCA para conectar equipos de audio giradiscos reproductores de discos láser reproductores de minidiscos vídeos televisores etc Conecte la clavija roja a la toma VIDEO AUX R y la blanca a la toma VIDEO AUX L Cuando conecte un giradiscos Utilice un giradiscos Aiwa con amplificador ecualizador incorporado TOMA CD DIGI...

Страница 41: ...esarios para optimizar las prestaciones de su unidad Para limpiar la caja Utilice un paño blando y seco Si las superficies están muy sucias utilice un paño suave humedecido un poco en una solución de detergente suave No utilice disolventes fuertes tales como alcohol bencina o diluyente porque éstos podrían estropear el acabado de la unidad Para limpiar las cabezas magnetofónicas Cuando las cabezas...

Страница 42: ...ión Platina 2 1 cabeza de grabación reproducción 1 cabeza de borrado Sección del reproductor de discos compactos Láser Láser de semiconductor λ 780 nm Convertidor D A 1 bit doble Relación señal a ruido 85 dB 1 kHz 0 dB Distorsión armónica 0 05 1 kHz 0 dB Generalidades Alimentación 120 V CA 60 Hz Consumo 75 W Dimensiones An x Al x Prof 260 328 335 mm Peso 6 4 kg Sistema de altavoces SX NAJ22 Sistem...

Страница 43: ...t un espace de 5 cm de chaque côté Ne pas mettre l appareil sur un lit un tapis ou sur une surface similaire qui pourrait obstruer les orifices de ventilation Ne pas mettre l appareil dans une bibliothèque un coffret ou un meuble complètement fermé où l aération serait insuffisante 5 Entrée d objets et de liquide Faire attention à ce que aucun corps étranger ou liquide ne pénètre dans l appareil p...

Страница 44: ...upport et du conducteur arrivant à l unité de décharge d antenne et au sujet des dimensions des conducteurs de mise à la terre de la connexion aux électrodes de mise à la terre et des exigences concernant ces électrodes Mise à la terre d une antenne selon le code national d électricité NEC Entretien Nettoyer l appareil uniquement comme recommandé dans le mode d emploi Dommage nécessitant une répar...

Страница 45: ...le cordon de l enceinte droite aux bornes SPEAKERS R et celui de l enceinte gauche aux bornes SPEAKERS L Le cordon d enceinte rayé de blanc doit être connecté à la borne 0 et le cordon noir à la borne 9 Faire attention à connecter les cordons d enceinte correctement Des connexions incorrectes peuvent provoquer des courts circuits dans les bornes SPEAKERS 2 2 2 2 2 Connecter les antennes fournies C...

Страница 46: ...e entre cette dernière et le capteur situé sur l appareil principal doit être d environ cinq mètres Lorsque cette distance diminue remplacer les piles par des neuves Utilisation de SHIFT de la télécommande Les touches 1 possèdent deux fonctions différentes Une de ces fonctions est indiquée sur la touche et l autre sur la plaque se trouvant au dessus de la touche Pour utiliser la fonction indiquée ...

Страница 47: ...té de l affichage est réglé sur le niveau minimal l éclairage des touches s éteint et le volume est réglé sur le minimum 0 quand l appareil se met sous tension du fait de l enregistrement commandé par minuterie ECO AUTO En plus des trois opérations de ECO ON l appareil se met automatiquement hors tension si on ne l utilise pas et si la source sonore est muette pendant dix minutes ECO OFF Le mode é...

Страница 48: ...orloge quand un autre affichage est en service Appuyer sur CLOCK tout en appuyant sur SHIFT de la télécommande L heure est affichée pendant quatre secondes puis l affichage initial réapparaît Toutefois l heure ne peut pas être affichée pendant l enregistrement Pour passer au format de 24 heures Appuyer sur CLOCK tout en appuyant sur SHIFT de la télécommande puis appuyer sur s dans les quatre secon...

Страница 49: ...e sortie et la tonalité des enceintes ou du casque sans affecter l enregistrement REGLAGES AUDIO VOLUME Tourner VOLUME de l appareil principal ou appuyer sur VOL de la télécommande Le niveau du volume est affiché sous la forme d un nombre de 0 à MAX 31 Quand on coupe l alimentation alors que le niveau du volume est réglé à 17 ou plus ce niveau est automatiquement réglé à 16 SYSTEME SUPER T BASS Le...

Страница 50: ...de toutes les autres stations de la gamme sont aussi diminués d une unité RECEPTION RADIO ACCORD MANUEL 1 Appuyer sur TUNER BAND à plusieurs reprises pour sélectionner la gamme souhaitée FM AM Quand on appuie sur TUNER BAND alors que l alimentation est coupée l appareil est mis sous tension directement Pour sélectionner une gamme avec la télécommande Appuyer sur BAND tout en appuyant sur SHIFT 2 A...

Страница 51: ...st affiché Pour rétablir l affichage du temps de lecture procéder de la même façon Sélection d une plage avec la télécommande 1 Appuyer sur une des touches DISC DIRECT PLAY 1 3 pour sélectionner un disque 2 A l aide des touches numériques 0 9 et 10 sélectionner une plage Exemple Pour sélectionner la vingt cinquième plage appuyer sur 10 10 et 5 Pour sélectionner la dixième plage appuyer sur 10 et 0...

Страница 52: ...ammer plus de 30 plages LECTURE ALEATOIRE REPETEE Utiliser la télécommande Lecture aléatoire Toutes les plages du disque sélectionné ou tous les disques peuvent être lues dans un ordre aléatoire Lecture répétée Un seul disque ou tous les disques peuvent être lus à plusieurs reprises Appuyer sur RANDOM REPEAT tout en appuyant sur SHIFT A chaque pression sur ces touches la fonction est sélectionnée ...

Страница 53: ... s pour arrêter le défilement Pour démarrer la lecture quand l alimentation est coupée fonction de lecture directe Appuyer sur TAPE L appareil est mis sous tension et la lecture de la cassette en place commence Pour mettre le compteur à 0000 Appuyer sur s CLEAR dans le mode arrêt Le compteur est aussi mis à 0000 quand le porte cassette est ouvert Quand il y a une cassette dans chacune des deux pla...

Страница 54: ...aces blancs de quatre secondes permet l utilisation de la fonction senseur de musique Applicable quand la source est TUNER ou VIDEO AUX 1 Appuyer sur w REC REC MUTE pendant l enregistrement ou pendant le mode pause d enregistrement 4 clignote sur l affichage pendant quatre secondes et un espace blanc de quatre secondes est fait Ensuite la platine passe au mode pause d enregistrement 2 Appuyer sur ...

Страница 55: ... lecture et l enregistrement démarrent simultanément Pour arrêter la duplication Appuyer sur s DUPLICATION DE LA TOTALITE D UNE CASSETTE Cette fonction permet de faire des copies exactes de la cassette originale La duplication ne démarre pas à un point situé au milieu d une face Remarquer que l enregistrement n est fait que sur une face de la cassette 1 Appuyer sur TAPE 2 Insérer la cassette origi...

Страница 56: ...our afficher le programme du deuxième enregistrement B est affiché 8 Retourner la cassette de la platine 2 puis appuyer sur w REC REC MUTE pour démarrer l enregistrement sur la deuxième face Pour arrêter l enregistrement Appuyer sur s L enregistrement de la cassette et la lecture du disque compact s arrêtent simultanément Pour effacer le programme du montage Appuyer deux fois sur s CLEAR de manièr...

Страница 57: ...nnée Ensuite reprogrammer des plages Pour effacer le programme du montage Appuyer deux fois sur s CLEAR de manière que EDIT disparaisse de l affichage On peut programmer un maximum de 30 plages de n importe lequel des disques en place FULL est affiché si on tente de programmer plus de 30 plages ENREGISTREMENT AVEC MONTAGE PROGRAMME La fonction enregistrement avec montage programmé permet de progra...

Страница 58: ...ler le réglage de la minuterie Appuyer sur TIMER L heure de la mise sous tension par la minuterie la source sélectionnée et la durée de la mise sous tension par la minuterie sont affichées pendant quatre secondes Pour changer un réglage Recommencer à partir de l étape 1 Toutefois si on ne change pas l heure de la mise sous tension par la minuterie appuyer deux fois sur ENTER à l étape 3 et continu...

Страница 59: ...ration ou le jeu appuyer sur c quand l alimentation est coupée Pour désactiver la démonstration ou le jeu appuyer sur a Utilisation du jeu demo 1 Pour démarrer le jeu appuyer sur c quand l alimentation est coupée Trois chiffres se déplacent sur l affichage 2 Appuyer une fois sur s Le chiffre de gauche s arrête 3 Appuyer deux fois sur s pour arrêter les chiffres restants Marque des points On dispos...

Страница 60: ...numériques de disque compact par cette prise Utiliser un câble optique pour connecter un appareil audio numérique platine DAT enregistreur de minidisque etc Enlever le capuchon antipoussière a de la prise CD DIGITAL OUT OPTICAL Ensuite connecter la fiche d un câble optique à cette prise Quand la prise CD DIGITAL OUT OPTICAL n est pas utilisée Mettre en place le capuchon antipoussière fourni PRISES...

Страница 61: ...y a peut être un court circuit dans les bornes d enceinte Débrancher le cordon secteur puis corriger les connexions d enceinte Une touche de fonction incorrecte n est elle pas en service Le son ne sort que par une enceinte L autre enceinte n est elle pas déconnectée Un affichage ou un fonctionnement erroné se produit Réinitialiser l appareil comme indiqué ci dessous L appareil s éteint quand l ali...

Страница 62: ...tête d effacement platine 2 Partie lecteur de disques compacts Laser Laser à semi conducteurs λ 780 nm Convertisseur N A 1 bit double Rapport signal bruit 85 dB 1 kHz 0 dB Distorsion harmonique 0 05 1 kHz 0 dB Généralités Alimentation électrique Secteur 120 V 60 Hz Puissance absorbée 75 W Dimensions L H P 260 328 335 mm Poids 6 4 kg Enceintes acoustiques SX NAJ22 Enceinte acoustique 3 voies bass r...

Отзывы: