background image


Adjust The Focus And Keystone 

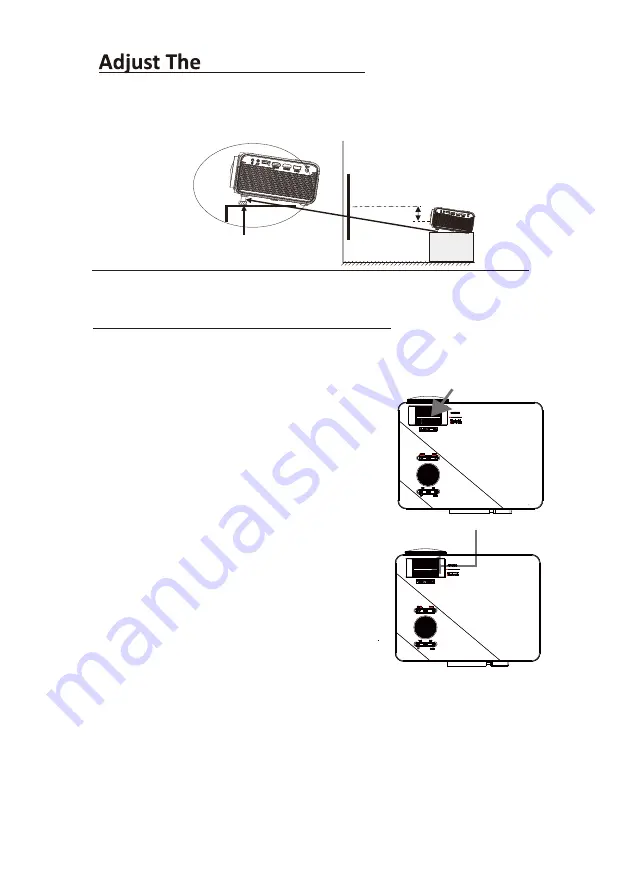
Follow below picture to adjust the focus and trapezoidal screen. 

Adjust  the  focus  by  turning  the  knob  while 

observing the image pixels near the center of the 

screen.  Optimal  focus  is  obtained  when  the 

pixels  are  clearly  visible.  Depending  on  the 

projected screen size, the focus near the screen 

edges may be less sharp than the screen center. 


Keystone  image  is  created  when  the  projector 

beam  is  projected  to  the  screen  in  an  angle. 

Keystone  correction  will  restore  the  distorted 

image to a rectangular or square shape. 


6

FOCUS ADJ. KNOB

Then sharpen the image

by rotating focus knob.

TRAPEZOIDAL ADJ. KNOB

Note: This does not apply for ceiling mounted projectors.To adjust the vertical angle 

of the image, adjust the Height Adjustment Peg on the bottom of the projector as 

shown. Turn this Peg clockwise or anticlockwise to adjust the vertical angle.


SCREEN

PROJECTOR

Height Adjustment Peg

Vertical Angle

Содержание ALP580

Страница 1: ...ALP580 WI FI MULTIMEDIA PROJECTOR ...

Страница 2: ...ame 8 Avoid using the device near strong magnetic fields 9 Electrostatic discharge can disturb normal usage of this device If so simply reset and restart the device following the instruction manual During file transmission please handle with care and operate in a static free environment 10 Warning Never insert an object into the product through the vents or openings High voltage flows through the ...

Страница 3: ...s formatting or transferring files Otherwise data may be corrupted or lost 25 If the unit has USB playback function the USB memory stick should be plugged into the unit directly Don t use a USB extension cable because it can cause interference resulting in failing of data 26 The apparatus shall not be exposed to dripping or splashing and make sure that no objects filled with liquids such as vases ...

Страница 4: ...el Servicing is required when the apparatus has been damaged in any way such as the power supply cord or the plug when liquid has been spilled or objects have fallen into the apparatus when the apparatus has been exposed to rain or moisture does not operate normally or has been dropped 41 Do not use a damaged power cord or plug or a loose outlet Doing so may result in fire or electric shock 42 Pro...

Страница 5: ... Ceiling Select this location with the projector suspended upside down from the ceiling in front of the screen NOTE A projector mount is required to install the projector in a ceiling Rear Table Select this location with the projector placed near the floor behind the screen NOTE A special rear projection screen is required Rear Ceiling Select this location with the projector suspended upside down ...

Страница 6: ...or in the ceiling please purchase a projector mount recommended by an installation professional and follow the instructions that come with the mount Before installing the projector in the ceiling please check to make sure the ceiling structure can support the weight of the projector and the mount If in doubt please ask the advice from an installation professorial NOTE Projector mount and screw s n...

Страница 7: ... center Keystone image is created when the projector beam is projected to the screen in an angle Keystone correction will restore the distorted image to a rectangular or square shape 6 FOCUS ADJ KNOB Then sharpen the image by rotating focus knob TRAPEZOIDAL ADJ KNOB Note This does not apply for ceiling mounted projectors To adjust the vertical angle of the image adjust the Height Adjustment Peg on...

Страница 8: ...vel Source Press to select media source AV PC HDMI MEDIA Exit Press to exit menus Zoom Press to zoom display image in or out Remove the battery compartment cover on the back of your remote by carefully sliding to open The battery cover can then be lifted away Fit the correct batteries 2 X AAA batteries included referring to the polarity markings Finally replace the cover NOTES Batteries shall not ...

Страница 9: ...tone Adj OK EAR PHONE Jack AV IN jack MicroSD Card Slot 12 13 14 17 POWER on Indicator 15 DC IN jack 18 IR Window Rear Side 19 IR Window Front Side 20 Height Angle Adjustment Peg HDMI Port 1 USB Port 1 16 VGA Port HDMI Port 2 1 3 4 5 6 7 8 2 17 21 22 21 USB port 2 only for charging 22 HDMI port 3 RETURN NAVIGATION ...

Страница 10: ...eenmenus and make selections Back Presstoreturn to a previous page or setting in the on screenmenus Power Press to power on the projector Press and hold to power OFF Install Power Adapter Follow below picture to connect power adapter Connect small end of adapter FIRST Plug the adapter body to power outlet Mains Socket Controls ...

Страница 11: ...4 connection iOS Cast Step1 Select iOS Cast on the home page Step2 iOS devices and projectors must be connected to the same network or connect the iOS device to the wireless network issued by the projector Step3 Open the control center of iOS device Choose Screen Mirroring Step4 Choose the name of the projector device Attention ...

Страница 12: ... signal interface In the HDMI mode the video from the connected device will be 4 Press the button to turn off unit power HDMI CABLE CABLE NOT INCLUDED In rare cases if the projector s speaker has no sound when playing a DVD movie in a player through the HDMI input please check the player s digital audio settings and make sure it is set to Auto mode or PCM mode Note For HD signal input through HDMI...

Страница 13: ...rom the 5 Press the button to turn off unit power 12 LEFT CHANNEL RIGHT CHANNEL VIDEO CABLE VIDEO PLAYER VIDEO CABLE YELLOW AUDIO LEFT CHANNEL WHITE AUDIO RIGHT CHANNEL RED CABLE INCLUDED Using the HDMI Interface Please select the HDMI the projector could be connected with DVD player Game box HDD player etc Connecting to PC Step1 Connect projector and device with HDMI cable Step2 Select the HDMI s...

Страница 14: ...icator will light GREEN 4 Press the SOURCE button to switch to VGA mode the video from the 5 Press the button to turn off unit power Please refer to the following table to adjust the output signal from computer PC VGA 640x480 31 5 60 34 7 70 37 9 72 37 5 75 SVGA 800x600 31 4 50 35 1 56 37 9 60 46 6 70 48 1 72 46 9 75 XGA 1024x768 40 3 50 48 4 60 56 5 70 To VGA PORT NOTE BOOK DESKTOP OR C OMPUTER C...

Страница 15: ...he external device to the projector 3 Turn on the projector and the external device Now the projector sound will be 4 Turn off both the projector and the external device after use Install USB Device And microSD Card Connect your USB device or microSD card to the respective slots Turn off the projector when inserting 14 MICRO SD CABLE NOT INCLUDED Station Amplifier Audio cable played on the externa...

Страница 16: ...o enter If necessary use the button to select microSD card or USB and press the button to enter 6 Use buttons to search the correct file and press the button to preview playback file and press the button of unit or button of remote to start playback 7 Press button to fast search forward and rewind 8 Press button to search next or previous file 9 During playback press the button to pause and press ...

Страница 17: ...nnect Devices such as smartphones tablets or computers are not Bluetooth receivers and will not connect to the projector To eliminate confusion you should disable Bluetooth on all receivers to which you do not wish to connect 2 Power on the projector and make sure the projector s Bluetooth is ON see note above The projector will begin searching for nearby Bluetooth devices to connect to and will a...

Страница 18: ...or image setup Use buttons to select manual page 1 Image Mode 2 Aspect Ratio 3 Brightness 4 Contrast 5 Color 6 Sharpness Aspect Ratio 4 3 The signal in a 4 3 aspect ratio projection image 16 9 The signal in a 16 9 aspect ratio projection image Bluetooth Turn Bluetooth ON or OFF ...

Страница 19: ...jector Menu 2 0 Use buttons to select manual page 1 Sound Mode 2 Bass 3 Treble 4 Balance 5 Equalizer Sound Mode User Parameter Treble 0 100 Bass 0 100 18 Press source of the home page to enter projector sound setup ...

Страница 20: ...i Esky Polski Svenska Dansk Romnete Suomi Model ALP580 SN EV0386 1 LOGO AIWA BT V4 1 V4 2 19 Setup Set submenu function Network Scan Auto IP Static IP Projection Projection Mode Front Desktop Front Ceiling Advanced Language Boot Source Sleep Timer Local update Online update Restore Factory Default INFO Display the unit information as below ...

Страница 21: ...ating 133W Standby 0 8W Power Input Connect Included Adapter DC 19V 7 0A Included Adapter Connect DC input of unit Input AC100 240V 50 60Hz Output DC19V 7 0 A Display Color 7000 8000K Projection Size 30 165 inch Signal Port AV VGA HDMI USB Port Support USB device up to 1TB Support format mpeg1 Mpeg2 mpeg4 mp3 Jpeg SD Card Support SD card up to 32GB Support format mpeg1 Mpeg2 mpeg4 mp3 Jpeg Weight ...

Страница 22: ...he Source button on the Control Panel or the Remote to select the correct setting 5 Check in the Menu section under Video input signal to make sure that has been set correctly The Lamp Bulb switches off after a period of time 1 Leave the projector to cool for a few moments 2 Once cooled check if anything is blocking the ventilation vents 3 Check the air filter is clean and clean if 4 Turn on the p...

Страница 23: ...e Turn off the projector and unplug from the supply before cleaning Do not use any harsh detergents or solvents for cleaning If the projector is still overheated after cleaning or if there is any damage to the filter it must be replaced before further use Make sure the air filter is not obstructed and that it is fitted properly after cleaning To clean 1 Open the filter cover and remove the filter ...

Страница 24: ......

Отзывы: