background image

Users Guide

Page

108

of

127

Printed for Reference Only on November 15, 2006
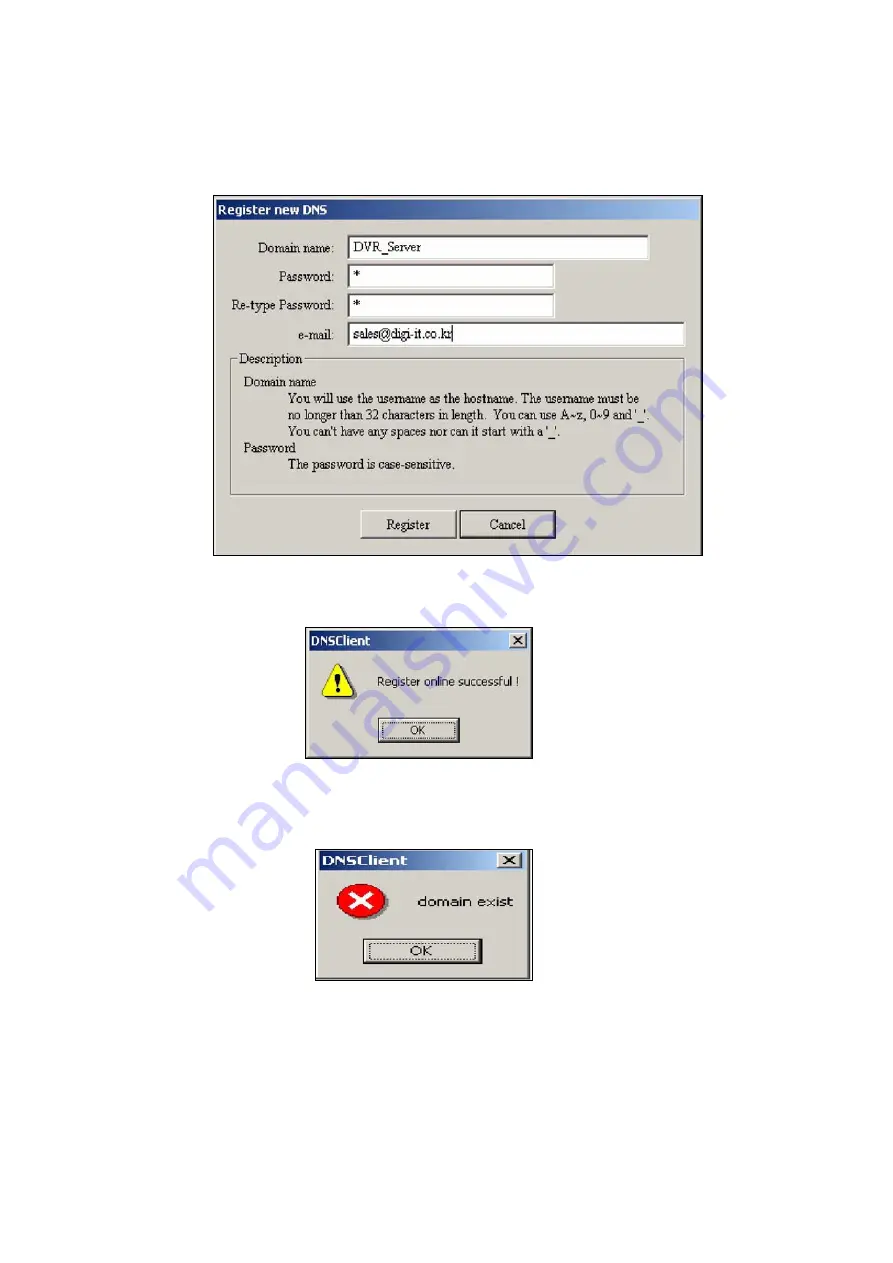
-

New Domain button

 : click to register a new domain name on the DNS Server.

- If you complete the necessary information, click “ register”
- If your on-line register is successful, following window is showing up.

- If your domain name is already duplicated on the DNS server, following window will be

showing up and you must use different new domain name.

Содержание DIAI3XX

Страница 1: ...Users Guide Page 1 of 127 Printed for Reference Only on November 15 2006 DVR User s Guide Version ID 2 60 01 Date May 20 2006 ...

Страница 2: ...g 29 3 7 Network Setting 30 3 8 Audio Setting 39 3 9 Notification Setting 44 3 10 User Setting 46 4 PLAYBACK Server Search 47 4 1 PLAYBACK Default Screen 48 5 PLAYBACK using Removable HDD 56 5 1 Export DVR System Side 56 5 2 Import 3rd PC Side 58 6 Remote Surveillance 62 6 1 Start Remote Program Single Mode 62 6 2 Connect Main System 62 6 3 Setup Site 63 6 4 Remote Navigation 65 6 5 Options 69 6 6...

Страница 3: ... 8 4 Font Setup 94 8 5 Action Code Setup 95 8 6 Transaction Search 96 9 DNS Service 107 9 1 DNS Client Setting In DVR Main 107 9 2 RMS Setting In RMS 111 10 Log Viewer 112 10 1 Event 112 10 2 System 113 10 3 Login 114 10 4 Network 115 10 5 Pos 116 10 6 Filter 117 10 7 Setting 119 11 Image Authentication 120 12 Web RMS for End User 123 12 1 Setting for Web RMS Connection 123 12 2 Connect to Server ...

Страница 4: ... to recover the related Recording data automatically when the recording data would have a problem by abnormal operation or system shut down by interruption of electric power l Remote Access You can connect to multiple sites and each site can be connected with multiple users at the same time l User Friendly Operation Settings and menus are designed for non expert users so anybody can navigate the w...

Страница 5: ...ystem from 4 cameras input system like DIT 4 DIT 4 PRO you can get a 8ch DVR system after installation of one more DIT 4 or DIT 4 PRO capture card in the existing 4ch DVR system l DVR Server RMS You can use both RMS and DVR Server on the same PC at once 1 3 Warning l CE Communaut European This is a class A product In a domestic environment this product may cause radio interference in which case th...

Страница 6: ...program by clicking of StartèProgramsèDVRèMain èFile Manager 2 2 1 Logon to File System When User starts the file manager fsutil exe program this program will ask Account and Password The system has Default Account which is 1 and the Password is nothing After entering account click OK button to start the File Utility System Instead of using Keyboard User can logon only with mouse When User clicks ...

Страница 7: ... will be used as the system s Database name Max Camera User can specify the maximum number of cameras that will be used for this DVR system The file system will generate the Database based on this number of cameras Basket Size Select the size of a basket a basket is the unit to handle the image data The default basket size is 64MB Double click the hard disk drive If user wants to use all hard driv...

Страница 8: ...cts a hard disk drive File System Utility will ask the rate of space usage for specified hard disk drive User can select from 0 to 100 of a hard disk drive After selecting the rate Click OK button When the File System finished the Database setup this utility will show the following screen ...

Страница 9: ...er 15 2006 This example uses hard disk drive D 100 Require Space of disk space will be used The name of Database in this example is DVRDB This example has 16 cameras In this example the total size of Database is 103 499 MB 2 Click Modify button to add more baskets ...

Страница 10: ...Users Guide Page 10 of 127 Printed for Reference Only on November 15 2006 3 Click Delete button to delete all baskets in Disks ...

Страница 11: ...signed to recover the related Recording data automatically when the recording data would have a problem by abnormal operation or system shut down by interruption of electric power When the system is rebooting the system will check the status of the DB and recover the recording data DB You can see following active window It would be taken about 10 minutes per size of the database ...

Страница 12: ...for full file systems DB If you do not tick the system will do DB recovery for the damaged file systems DB only Start Start to scan and DB recovery Stop Stop DB recovery Exit Exit from the process 2 3 Start System 2 3 1 Start Application From the Windows Desk Top double click the DVR Viewer icon or run the DVR exe program in C Program Files DVR Main folder 2 3 2 Monitoring Camera Screens 1 Default...

Страница 13: ... box means camera only capture the current real time image The Red box means that image from the specified camera is recording The White box means that no camera installed If the cameras are 16 ch over the camera box will be displayed as follows 3 Action Buttons There will be four action buttons When user clicks this button Backup program will be running and display the Backup screen ...

Страница 14: ...Mode Display 6 captured image from 6 different cameras Multi Screen Mode Display 9 captured image from 9 different cameras Multi Screen Mode Display 10 captured image from 10 different cameras Multi Screen Mode Display 13 captured image from 13 different cameras Multi Screen Mode Display 16 captured image from 16 different cameras Multi Screen Mode Display 25 captured image from 25 different camer...

Страница 15: ...ons Relay Off Relay On When user clicks this button One channel Search program will be running You can play back 1ch on the viewer while you are monitoring the live display Search Button If you click this button below box will be displayed Exit If you click this button this program will exit ...

Страница 16: ...u want to return previous the mode of recording click this button 5 System Status Window System Status Window will show the status or events of the system Events Motion Detected including camera number and time Logs System Setting Information ALARM icon if occur input signal from extern sensors will flicker the icon NETWORK icon if connect to this system from remote system will flicker the icon 6 ...

Страница 17: ...on for saving of selected the preset after setting Delete Use delete selected the preset position 1 1 How to setup preset Firstly please move the PTZ camera on the desired position and then please select the number of the preset position and enter the location Click the button of Save for preset 2 Tour function independent of device No Number of the Touring 1 64 Program Specify procedure for move ...

Страница 18: ...ual of PTZ camera for the details MENU Appear disappear setting menu of PTZ camera ENT You can use this button when you select an item from the displayed menu mode CLR ESC Use when you cancel a selected item from the displayed menu mode U Move up camera or move up cursor D Move down camera or move down cursor L Move left camera or move left cursor R Move right camera or move right cursor H Go to h...

Страница 19: ...arrangement for display on the viewer If you want to arrange freely the display screen please catch up the desired camera by click the left button of your mouse on the camera screen and draw to other camera screen Then the each camera screen would be re arranged 8 Oldest data time If you click this area you can see this box ...

Страница 20: ...on To modify the System Configuration User must have proper accessibility Enter LOGON ID and password The system has Default Account ID which is 1 and the password is nothing After entering Account ID and password Click OK button to start the Setting Menu Instead of using Keyboard User can configure the system only with mouse When User click the keyboard button which is left bottom below the tree ...

Страница 21: ... from 10 different cameras 13 Split Default Screen will display 13 different image from 13 different cameras 16 Split Default Screen will display 16 different image from 16 different cameras 25 Split Default Screen will display 25 different image from 25 different cameras 32 Split Default Screen will display 32 different image from 32 different cameras Full Screen Without any menu or buttons the S...

Страница 22: ...d Time Time Hour and Minute User can configure the Time when the system will be shut down 8 Auto Reboot Use When User selects the Use system will be automatically rebooted at the specified Time Auto Reboot setting button You can set up schedule of time date a day of the week Apply Same Value You can set up other days such as setting of Sunday 9 Watchdog Use H W In case of abnormal status System wi...

Страница 23: ...e check box system could be recorded by the captured image frame with maximum capacity and distributed image frame to each cameras Frame Rate User can define the frame rate Time Event Interval User can select the interval max 30 sec for the recording at normal 3 Compression Mode Mode Select one of the compression modes from M JPEG M MPEG If image size is 640 480 you can select Interlaced Mode Imag...

Страница 24: ... Area Mode Motion will be detected in the defined area by the User ADD If User want to defined the area Click this ADD button and define the range through the clicking the area at the displayed screen at the setting menu After User add a area system will show the red box see the sample picture below Delete If User want to delete the area that was defined or added Click this DEL button Test When Us...

Страница 25: ...erval 1 100 sec default 3sec View on TV Monitor After motion or sensor event is occurred it will be displayed on TV monitor if user can see the image at the connected TV Screen in camera tab Message If sensor event is occurred ALERT message box will be popup Interval 1 100 min default 3min Recording to force After sensor event is occurred all camera will be recording normally If you want to stop r...

Страница 26: ...es whether audio is detected or sensor does 3 Event Normal Mode The system will be recorded each one frame per each setting second 1 2 3 20 30 max But the system will be recording maximum frame rate when there is motion detection or sensor If you select Event Audio system will record the images whether audio is detected or sensor or motion does 4 Motion Mode In this mode system will record the ima...

Страница 27: ...only if any motion is detected Sunday Saturday 16 00 18 00 System will record with Motion and Sensor Mode System will record captured image any sensor event is detected or any motion is detected Sunday Saturday 22 00 24 00 System will record with Audio Mode System will record captured image any audio event is detected Note User can copy existing camera setting value to some cameras or all cameras ...

Страница 28: ...tness of image Contrast Configure the Contrast of image Saturation Configure the Saturation of image Hue Configure the Hue of image 2 Transaction Data Control If capture board supports POS function this button to active refer POS Manual 3 Pan Tilt Use User can configure all options for a Pan Tilt Camera Receive Port Speed Parity Stop Bits Flow Bits Type ...

Страница 29: ...Sensor Output Use Relay Output If User wants to send the Output Click this check box Additional equipment is required to send the Output Output Port User can define the port that will be used to send the Output User can select port 1 2 3 4 Relay Time User can define the relay time of the Output from 1 second to 10 second If User select 5 second the Output will be sent every 5 seconds 4 Sensor Test...

Страница 30: ...mote access through the network TCP IP Port TCP IP port number Auto set to 9871 2 Compression Mode Choose the Mode User can choose M JPEG or M MPEG Image Quality User can control the quality of image that will be sent to the remote site 3 BandWidth limits 0 kb s bytes Default 0 This is Max Bandwidth unit kbytes sec User input User can adjust the transmission bandwidth unit kbytes sec ...

Страница 31: ...r Reference Only on November 15 2006 System setting for Modem Dial up Connection h Setting in the Server system Windows XP Control Panelè Network Connections è Create a new connection When the New Connection Wizard shows please click Next ...

Страница 32: ...e 32 of 127 Printed for Reference Only on November 15 2006 Select Setup an advanced connection as Network Connection Type and click Next Select Accept incoming connections as Advanced Connection Options and click Next ...

Страница 33: ...nce Only on November 15 2006 Select a correct connection device to corresponding with Incoming Connections and click Properties Please check if the port speed is same as installed Modem If yes please return to New Connection Wizard and click Next ...

Страница 34: ... 15 2006 Tick on the Do not allow virtual private connection and click Next Please click Add to register of new user for Dial up Networking connection Please enter User ID Password and click OK Then new user will be created Please tick on the new user and click Next ...

Страница 35: ...uide Page 35 of 127 Printed for Reference Only on November 15 2006 Select Internet Protocol TCP IP and click Properties Please specify TCP IP address for remote connection You can allocate a proper IP address ...

Страница 36: ...e Page 36 of 127 Printed for Reference Only on November 15 2006 Click Finish then the setting is completed If you check the window of Network Connections you can see new connection setting as Incoming Connections ...

Страница 37: ... is using Windows98 SE please correct a connection setting as follows don t need setting in Windows XP StartèProgramsèAccessoriesèCommunicationsèDial Up Networking When Make New Connection is showing up please insert computer name and select a proper Modem and click Next Insert telephone number and click Next Click Finish ...

Страница 38: ... Only on November 15 2006 Again StartèProgramsèAccessoriesèCommunicationsèDial Up Networking New icon for new connection was created If you double clicking of new icon following window is showing up Select Server Types and check if TCP IP was ticked ...

Страница 39: ...an configure an Audio to the specific camera Note Model DIT 4 PRO DIT 1200 will support 4 channels of audio recording If the DVR system has a separate sound card the system will support 5 channels of audio recording If you want to communicate remote site for using Audio you have a sound card And In case of two way audio sound card cannot record audio in server That is you must use 4 channels for r...

Страница 40: ...Please check if other recording program is running in the system firstly If other recording program is ON running in the system the recording function on the DVR system will not work h Case 2 Please check if the path for input signal will be select as Microphone Please take following steps OS Windows XP Run Sounds and Audio Devices in the Control Panel ...

Страница 41: ...Users Guide Page 41 of 127 Printed for Reference Only on November 15 2006 Click Advanced in the window of Sounds and Audio Devices Properties Select OptionsèProperties ...

Страница 42: ...ly on November 15 2006 Select Recording and click OK Tick on the box of Select in the Microphone If not audio recording would not work sometimes If you want to playback the data with audio in the remote site you need to take above steps in the remote PC ...

Страница 43: ...ng please test if the setting is correct or not StartèProgramèAccessoriesèEntertainmentèSound Recorder h Note When you playbacks the recording data including sound please set the playback speed to 1x Also please check there was no tick on the Mute all and proper level of volume control ...

Страница 44: ...pe of the connection Lan Modem ISDN Choose a way of transmission Password of IUSER_NOTIFY If you select MODEM or ISDN insert password of IUSER_NOTIFY that is exist in the Remote Surveillance System Events Check that event about notification from DVR Sever to Remote System E Mail Service E Mail Check to send e mail on event To Type a manager s e mail address to receive Outgoing mail SMTP Type Outgo...

Страница 45: ... added remote sites and User can delete a site 4 Schedules Camera Select a specific camera Notify After push a button Notify make a schedule draw a zone for remote notification Eraser Erase selected time zone Copy All Apply to all cameras 5 Notify Info l Modem can t notify from DVR Server to Multi RMS ...

Страница 46: ...ied user Screen File System Setup Search Backup Remote Control Pan Tilt Exit AutoPass If you tick this function you need not type Id password to execute programs This function is adjusted after DVR restarting Information Account User ID this will be used when a User logon to the system Information Password Password this will be used when a User logon to the system Detail Information Detail Informa...

Страница 47: ...e recorded image User needs to execute the Search program User can run the Search program through clicking the PLAYBACK button at the Action Button When User starts the Search program this program will ask LOGON ID and password After entering Account ID and password click OK button to start the file Search program ...

Страница 48: ...can select a camera from the Record Table Multi Screen Mode Display 4 recorded image from 4 different cameras Multi Screen Mode Display 9 recorded image from 9 different cameras Multi Screen Mode Display 16 recorded image from 16 different cameras Panorama Mode Recorded image will be displayed as panorama style Regular Size Mode Recorded image will be displayed just same as captured image Double S...

Страница 49: ...mage Type of Image Show the type of captured image Size of Image Show the size of captured image 4 1 3 Calendar Window This calendar will show the dates when image is recorded If the color of a date is RED there are some recorded images in that date If the color of a date is black there is no recorded image in that date When User clicks the specific date in this calendar Record Table will show the...

Страница 50: ...BRIGHT control brightness CONTRAST control contrast 4 1 5 Utility Menu User can control the speed save the image record displayed images and print the displayed image SAVE save the captured image into Floppy Diskette or able to back up specific recording data by AVI file QUICK BACKUP It can help you to backup Data quickly on CD Select Cameras User select No of cameras to back up Start Time User ca...

Страница 51: ... captured image SOUND able to adjust play back volume SPEED able to adjust play back speed 4 1 6 Play Menu User can select forward backward play and stop The first image Backward One image frame Support only compression mode is M JPEG Stop Forward One image frame The last Image Backward Play Support only compression mode is M JPEG Forward Play 1 2 3 4 5 6 1 Min Speed 2 1 2x Speed 3 1x Speed 4 2x S...

Страница 52: ...ble Minutes Bar When User selects a Time Cell system will show the recording information in an hour 4 1 9 Exit Button When User clicks this EXIT button PLAYBACK Search program will be stopped 4 1 10 Bookmark You can make a bookmark of some specific images for reference or review it again later 1 Review previous book marked image 2 Review next book marked image 3 Make a bookmark for existing image ...

Страница 53: ...k Delete Item Delete selected item Delete All Delete all items Modification Add note for the selected item 4 1 11 Motion Object Search You can make a setting of motion detection for the specific object from the existing recording data and make a data file for the sorted image data by the motion object search If you click the following window will show up ...

Страница 54: ... range through the clicking the area at the displayed screen at the setting menu Delete If user wants to delete the area that was defined or added Click this Delete button Add to the bookmark with result data If you click this box the sorted image data will be book marked automatically Sensitivity Define the Rate of Sensitivity the default value is 10 3 Find All Find all image data during setting ...

Страница 55: ...s only on playback If you want to search some cameras only you can add or remove the play back camera s by clicking the time table of the right button of your mouse You can also re arrange the display screen by the mouse drawing Catch up ch 1 and draw to ch 3 then each display position will be exchanged ...

Страница 56: ...You can play back the recording data from original hard disk of DVR server in the 3rd PC 5 1 Export DVR System Side 1 Run FsUtil exe Start Programs DVR Main File Manager and click Delete 2 Select HDD which will be removable form the DVR System to 3 rd PC and click Delete Y and Z will be one hard disk drive ...

Страница 57: ...57 of 127 Printed for Reference Only on November 15 2006 3 Choose Delete Disk Information Only from Delete Option window and click OK 4 Confirm the hard disk which will be remain and used as DB Data Base and click Exit ...

Страница 58: ...vided CD CD Playback DISK1 setup exe Note You need to install the imported hard drive in the 3 rd PC firstly Please follow up below Installation of imported hard drive 2 Run FsUtil exe Start Programs Playback Main File Manager and click Add 3 Select desired driver for playback from the list of Dest Drive and click Append Disk EMPTY ...

Страница 59: ...nted for Reference Only on November 15 2006 4 Please confirm the hard drive which added as DB data base and click Exit 5 Run Search exe Start Programs Playback Main Playback and then you can search imported DB from other DVR server ...

Страница 60: ...llation of imported hard drive 1 Click Right Mouse Button on My Computer Manage Computer Management Storage Disk Management select Place your mouse on the Disk 1 as below and click right button of your mouse and choose Import Foreign Disks 2 Select Disk group as below and click OK ...

Страница 61: ...Users Guide Page 61 of 127 Printed for Reference Only on November 15 2006 3 After checking the disk volumes information as below and click OK 4 The hard drive is added in the system ...

Страница 62: ... Remote icon or run the DVRHost exe program in C Program Files DVR Remote folder 6 2 Connect Main System The first screen of DVR Remote program is almost same as the DVR Main screen Remote Screen has CONNECT button to connect the DVR Main System When User clicks Connect button the Connection window will be displayed and ask User select the Site that User wants to connect to After select the Site c...

Страница 63: ...w will be displayed as follows 1 ADD User can add a new Site When User Click ADD button Site Information Window will be displayed as follows Site Name Enter the Name of a Site User can define any name that User can remember or recognize easily IP Address Enter the IP address of a Site that User wants to connect Port Enter TCP IP Port number the default port number is 9871 ...

Страница 64: ...p you can see following window and make your own group table out of the open server and cameras 3 Delete At the Site Information Window Click any Site that User wants to delete from the list and Click Remove button 4 Modify At the Site Information Window Click any Site that User wants to modify from the list and Click Modify button The Site Information Window will be displayed and User can modify ...

Страница 65: ...t same as Main s PLAY BACK Menu Note User can see action button of If user click this icon during the remote search the icon will be changed to green and the transmitting image data will be recorded at the remote PC SETTING User can configure any system parameters from the Remote system When User click this SETTING button the Setting Menu Window will be displayed and operate just same as Main s Se...

Страница 66: ...use on the camera button at the bottom of the screen 3 Screen Mode Icons Beside the capture image there are 14 different display type buttons Single Screen Mode Multi Screen Mode Multi Screen Mode Multi Screen Mode Multi Screen Mode Multi Screen Mode Multi Screen Mode Multi Screen Mode Full Screen Mode Next Screen Mode Auto Rotation Mode Local Save If user click this icon the icon will be changed ...

Страница 67: ...ons Relay Off Relay On When user clicks this button One channel Search program will be running You can play back 1ch on the viewer while you are monitoring the live display Search Button If you click this button below box will be displayed Exit If you click this button this program will exit ...

Страница 68: ...speed Display transmission speed of image 5 Pan Tilt Control Box If Pan Tilt camera is installed User can control Focus Zoom Light and Camera directions through this control box 5 Free arrangement for display on the viewer If you want to arrange freely the display screen please catch up the desired camera by click the left button of your mouse on the camera screen and draw to other camera screen T...

Страница 69: ...will show Camera Information of DVR Server 6 5 Options If User click right button of mouse on the display window follow setting window is showing up 1 Network When User clicks the Network Menu the Site Information Window will be displayed as follows refer 5 3 setup site in p 33 ...

Страница 70: ...ect the check box all REMOTE services will be shut down when user close the remote viewer program Use buffering space for data receiving If You use local LAN for data receiving if would be better to use the buffering space so the data transferring will be faster Recommend to set 4096KB Auto switching time interval Display switching time for auto unit second default 5sec max 30 sec Startup with rem...

Страница 71: ...word user can access systems without separate Login during remote notification 3 Two way Audio If you select Sound you can see following sub menu box and you can send receive the sound and enjoy two way audio communication between server and remote sites Duplex two way audio between server and remote client using micro phone and speaker Out Send a sound data to server by microphone In Receive a so...

Страница 72: ...rinted for Reference Only on November 15 2006 6 6 Multi Remote Monitoring After run Remote program if you select Multi Channel on the screen you can monitor max 16 cameras which are installed at the each different server location ...

Страница 73: ...le to connect max 16 cameras server 1 Connection to Sever 1 1 Server connection per each camera partitioned screen Please select desired channel screen by clicking mouse and click CONNECT then a window will be showing up and you can select a target site registered Above shows No 1 camera was selected Insert ID and password for the server which can be connected ...

Страница 74: ... After log on the system showing up following window and it shows the cameras status which were connected at the server Please select desired camera No which you want to monitor at the remote site If the connection is done you can see image data on the No 2 screen of client ...

Страница 75: ...mber 15 2006 You can connect other channels as above 1 2 Using Group table When you select Multi Channel and click CONNECT you can see following window If you select desired group from group table and click OK you can connect each grouped cameras 2 Action Button ...

Страница 76: ...er can configure selected system parameters from the Remote system When User click this SETTING button the Setting Menu Window will be displayed and operate just same as Main s Setting Menu except that User can not use USER setting from the remote site L PLAYBACK User can Search the recorded images from Client System When User click this L PLAYBACK button the PLAY BACK Window will be displayed and...

Страница 77: ...ages from Remote System When User click this L PLAYBACK button in the DVR Remote program the PLAY BACK Window will be displayed and operate just same as Main s PLAY BACK Menu Site If User select Site button following window will be shown and User can select the desired site for search of the recording data from remote system ...

Страница 78: ...d a transmitting image from Server system through remote search If User click this button User can search those image data refer to section 5 4 1 Action Buttons Remote Search REMOTE User can record current transmitting image from Server system through Remote Viewer If User click this button User can search those image data refer to section 5 4 3 System Status Window ...

Страница 79: ... such as HDD DAT DVD ONSTREAM CD RW etc by manual or automatically For data back up please run Windows keyèStartèProgramsèDVRèImage Back up dvBackup exe or Click a button of BACKUP from monitoring screen The initial Account is 1 and no password Please insert 1 as Account and click OK 7 2 Structure of Back Up screen After log on it shows following set up screen for BACK UP ...

Страница 80: ...ual back up 3 Backup to exe File See section 6 4 4 Quick Backup Start button for Quick back up 5 Stop stop or pause button on the back up 6 Option Setting Manual Back Up or Schedule Back up 7 Viewer Viewer button of Back up data 8 To be added later 7 2 2 Processing Bar Time Shows sec second information under the current back up Processing ratio Shows processing ratio of the current back up 7 2 3 M...

Страница 81: ...ws exiting recording data of the DVR server User can select a desired recording data by per camera hour minute minimum data unit is minute If user select a data on the tick box it will be change with red color 7 3 2 Select device or folder for Back up 7 3 3 Start Manual Back Up After setting of the desired recording data and device or folder the start button will be activated with a blue color Cli...

Страница 82: ...127 Printed for Reference Only on November 15 2006 If the back up is done successfully bottom window shows a message of Back up exited normally with code 0 Processing bar shows Not working and new folder of BACKUP was created ...

Страница 83: ...B it would be a problem 7 4 1 Select desired recording data for Back up Please refer to section 6 3 1 7 4 2 Make a Backup exe file If you select the data please click icon of EXE out of tool bar as below Then you can see a window and select a folder and put the file name xxx exe and click SAVE If the backup is completed you can see a screen as section 6 3 3 and you can find a named exe file in the...

Страница 84: ...yed Select Cameras User select No of cameras to back up Start Time User can select a desired start time of recording data End Time User can select a desired end time of recording data Directory Media Files saved from backup app will be put in this folder Above picture shows the recording data 09 00 15 00 of the No of 1 8 9 10 14 15 16 cameras could be backed up into F at now ...

Страница 85: ...elect which you want Run this program when Windows starts Allow this program to run in the background 7 6 2 Setting of Concurrent Back Up Click a tab of Scheduled backup and setting the schedule back up Disable means that the Back Up is not working Note If the Backup program is running the program is hidden and you can see following icon on the Task bar ...

Страница 86: ...Disable Stop schedule back up Concurrent Recording and Back up could be done nearly concurrent time Schedule Weeks Back up by daily or weekly Files saved from backup app will be put in this folder Device or folder for schedule back up Above picture shows the recording data of the No of 4 6 13 14 15 16cameras could be backed up into F Note If user want to setting all cameras for concurrent back up ...

Страница 87: ...esired back up Time Starting time for back up operation Above picture shows user wanted to back up all data except the data of Sunday Note 1 If user wants to set all cameras please click a Day cell If user wants to back up the data at same time of the day for all cameras please click a Time cell Note 2 If the back up would be increased the performance of the system would be slower and the recordin...

Страница 88: ...D R DVD RW and so on Nero program should be installed in your system before Disc space You can choose the space of the CD which you want to backup default max 680MB If Disc space is 0 MB there is no space to write So you must insert a writable CD Auto Burning If you select this function burning on CD or DVD will be automatically 1 Click Save button ...

Страница 89: ...kup on CD or DVD click Burn button Abort if you want to stop backup on CD or DVD click Abort button Exit if CD burning is ended click exit button Application Messages this will show the processing of burning If data size to be back up is more than 650MB in CD you should insert writable CD continuously It is possible that you burn the data by multi session mode on CD DVD ...

Страница 90: ...tton of Viewer the Backup Viewer program could be run and showing following window for back up viewer Please refer to Play Back for operation of Back Up Viewer Browse If User click Browse button following window will be shown and User can select the desired directory for search of the back up data from DVR system User can search data of backup by multi viewer ...

Страница 91: ...ected Device Name Transfer Device Choose the cash register type ex Casio610001 Camera Choose the camera number to display the cash register data Action Count Count of action code command Port Choose Port these ports have to differ per cash register Speed 9600 default Flow Bits 8 default Stop Bits 1 default Parity NONE default Add the selected Cash Register Update the selected Cash Register Delete ...

Страница 92: ...r type ex Fuijits1S Camera Choose the camera number to display the cash register data Add Add the selected camera Delete Delete the selected camera Can select multi camera for CR Action Count Count of action code command Port Choose Port these ports have to differ per cash register Speed 9600 default Flow Bits 8 default Stop Bits 1 default Parity NONE default Add the selected Cash Register Update ...

Страница 93: ...he selected Device Name Device Choose the cash register type ex Fuijits1S Camera Choose the camera number to display the cash register data Add Add the selected camera Delete Delete the selected camera Can select multi camera for CR Action Count Count of action code command Port Type Port no except 9876 Add the selected Cash Register Update the selected Cash Register Delete the selected Cash Regis...

Страница 94: ... font if the entire embedded transaction data is not displayed on screen Use Motion Display è Transaction Data Control Button to change the font If displayed data on screen is still cut after you change the font size now there is no way to display entire data except change the resolution Save the frames using 640 480 resolution ...

Страница 95: ... the transaction data for specialize Pre set pre recording frames when the action code is activated Post set post recording frames when the action code is activated Save Path designate the folder name for the recording Text Color set the color for the designated action code Popup If action code is activated corresponding camera will be popup Interval 1 100 sec Beep If action code is activated corr...

Страница 96: ...Users Guide Page 96 of 127 Printed for Reference Only on November 15 2006 8 6 Transaction Search These buttons are used to query transaction data ...

Страница 97: ...lay screen when you click the POS button E A B C D F G H Transaction List Header meaning No Transaction list sequence Number Time DVR save time of the transaction CAM Camera Number Register Cash Register Type Register Time Cash Register Time EpsonCR Cash register don t have Receipt No Cash Register Receipt Number EpsonCR Cash register don t have Total Total Price per transaction ...

Страница 98: ...uery Extend Search F Report Show the statistical graph G Popup Show an enlarged receipt data H Font You can change font font size and color Refresh If you requery the transaction list use the Refresh button If you click the Transaction list the right dialog displays the original receipt data When you click the Play button you can see the video clips of the selected transaction ...

Страница 99: ...erence Only on November 15 2006 If you want to go back to the original search program click the POS button again POS CR Button If you want to query all transaction list after selected video clip by time of the day use this button Time 12 30 28 ...

Страница 100: ...Users Guide Page 100 of 127 Printed for Reference Only on November 15 2006 Time 12 30 30 POS Button and POS CR Button is toggle button ...

Страница 101: ...k this button Below is the display screen when you click the Query button A D B E C F A Start Day Time Choose start day time B End Day Time Choose end day time C Camera Choose camera number D Item Edit the Item to search E Code Choose the Action Code to search F Value Choose the Query Query Search about the condition ...

Страница 102: ...Users Guide Page 102 of 127 Printed for Reference Only on November 15 2006 Ex C Select Camera Number 4 ...

Страница 103: ...Users Guide Page 103 of 127 Printed for Reference Only on November 15 2006 Ex D Edit the Item MDSE ST ...

Страница 104: ...Users Guide Page 104 of 127 Printed for Reference Only on November 15 2006 Ex E Code Select Action Code Tax ...

Страница 105: ...Users Guide Page 105 of 127 Printed for Reference Only on November 15 2006 Ex E Value Edit the value 0 11 ...

Страница 106: ...rs Guide Page 106 of 127 Printed for Reference Only on November 15 2006 F Report If you want to see statistical graph click this button Your computer has installed MS Excel program when you see this report ...

Страница 107: ... 9 DNS Service 9 1 DNS Client Setting In DVR Main Run DNSClient exe in C Program Files DVR Main l General Domain name insert the name of the domain within 32 characters Password create your password within 16 characters E Mail insert E Mail address for informing of the events ...

Страница 108: ...ister a new domain name on the DNS Server If you complete the necessary information click register If your on line register is successful following window is showing up If your domain name is already duplicated on the DNS server following window will be showing up and you must use different new domain name ...

Страница 109: ...27 Printed for Reference Only on November 15 2006 Check Domain button check if your domain name is registered on the DNS server or not Domain name is registered on the DNS server Domain name is not registered on the DNS server ...

Страница 110: ...or Reference Only on November 15 2006 l Connection DNS Server insert DNS server IP Port insert Port No Time out Waiting time for connection with server Apply button click Apply button for running You must restart the System for application ...

Страница 111: ...127 Printed for Reference Only on November 15 2006 9 2 RMS Setting In RMS DNS server insert DNS server IP the same DVR Main Port insert Port No IP Address insert the name of your domain registered on the DNS server in DVR Main ...

Страница 112: ...th the event Event 1 Motion This means motion event occurred 2 Sensor This means sensor event occurred 3 Video Loss This means video loss occurred Information 1 Information This shows information occurred 2 Warning This shows warning occurred 3 Error This shows error occurred Double click on the log list will allow you to view related video in Playback If you view the Logon window to run Playback ...

Страница 113: ...am Start DVR Main Program Exit DVR Search Program Start DVR Search Program Exit DVR Backup Program Start DVR Backup Program Exit DVR Color Control Start PlugIn Load Load Values Set Values Service Restart Device Load Video Initialize Mode This column shows whether events are being taken in local side or remote side 1 Local 2 Lan Information 1 Information This shows information occurred 2 Warning Th...

Страница 114: ...he system event occurs Process Name Program Name User Login This column shows the ID of the login user User Loggout This column shows the ID of the logout user Status This column shows whether login or logout attempts were successful or failed Mode This column shows whether events are being taken in local side or remote side ...

Страница 115: ...umn shows whether RMS is connected or disconnected 1 RMS Connect 2 RMS Disconnect Address This column shows the IP Address of RMS connected Mode This column shows whether events are being taken in local side or remote side 1 Local 2 Lan Information 1 Information This shows information occurred 2 Warning This shows warning occurred 3 Error This shows error occurred ...

Страница 116: ... shows the following messages TranMain Start TranMain Exit OpenDatabase Success OpenDatabase Fail Device started Driver This column shows the name of the driver to be loaded Port This column shows the Port no associated with Driver Information 1 Information This shows information occurred 2 Warning This shows warning occurred 3 Error This shows error occurred ...

Страница 117: ...lect the type to search 10 6 2 System Time Select Start time and End Time to search Event Select the event to search Mode Select the mode to search Information Select the type to search 10 6 3 Login Time Select Start time and End Time to search Process Select the Program name to search Login Type the ID of login to search Logout Type the ID of logout to search Status Select the status to search Mo...

Страница 118: ...nt Select the event to search Address Type the IP Address of RMS to search Mode Select the mode to search Information Select the type to search 10 6 5 Pos Time Select Start time and End Time to search Event Select the event to search Driver Select the driver to search Port Select the Port no to search Information Select the type to search ...

Страница 119: ...ays Save logfile period of 7 days Save logfile period of 15 days Save logfile period of 30 days Change Search s user and password Type User and Password to run Search exe Set to tray icon on exit If you check this this program is set to tray icon when you click exit button Auto startup LogServer service If you uncheck this you must run LogServer exe manually ...

Страница 120: ...ogram for authentication of recorded JPG or BMP image in Search program User can start the Image Tool program by clicking of StartèProgramsèDVRèTools èImage Authentication or run the ImgAuth exe program in C Program Files DVR CommonFiles Tools folder 1 Click Open button to find a image file 2 Select a image file ...

Страница 121: ...a original image recorded in DVR system A Recording Date Recorded date in DVR System B Camera Number Camera No C Data Size a Real image size D Image Save Date Saved date in Search or Backup Viewer program E Computer Name Computer name of DVR System F OS Product ID OS Product ID of DVR System ...

Страница 122: ...Users Guide Page 122 of 127 Printed for Reference Only on November 15 2006 This is a modified image ...

Страница 123: ...End User 12 1 Setting for Web RMS Connection Set the system as below before using of HTTP WebRMS service 1 Server Side From DVR server go to start Settings Control Panel Windows Firewall and set to Off 2 Remote Side 2 1 Run Internet Explorer Tools Internet Option Security Custom Level select ...

Страница 124: ...Users Guide Page 124 of 127 Printed for Reference Only on November 15 2006 2 2 set Download unsigned ActiveX controls to Enable and click OK ...

Страница 125: ...de Page 125 of 127 Printed for Reference Only on November 15 2006 12 2 Connect to Server 1 run Internet Explorer and insert IP server Note If following window is showing up please recheck 13 1 2 2 and try again ...

Страница 126: ...Users Guide Page 126 of 127 Printed for Reference Only on November 15 2006 2 Click CONNECT 3 Connect ...

Страница 127: ... Page 127 of 127 Printed for Reference Only on November 15 2006 4 If you want to connect two different server please type IP Address muti html like 210 121 206 205 multi html 5 You can connect with two DVR servers ...

Отзывы: