background image

M061703V10 

23 


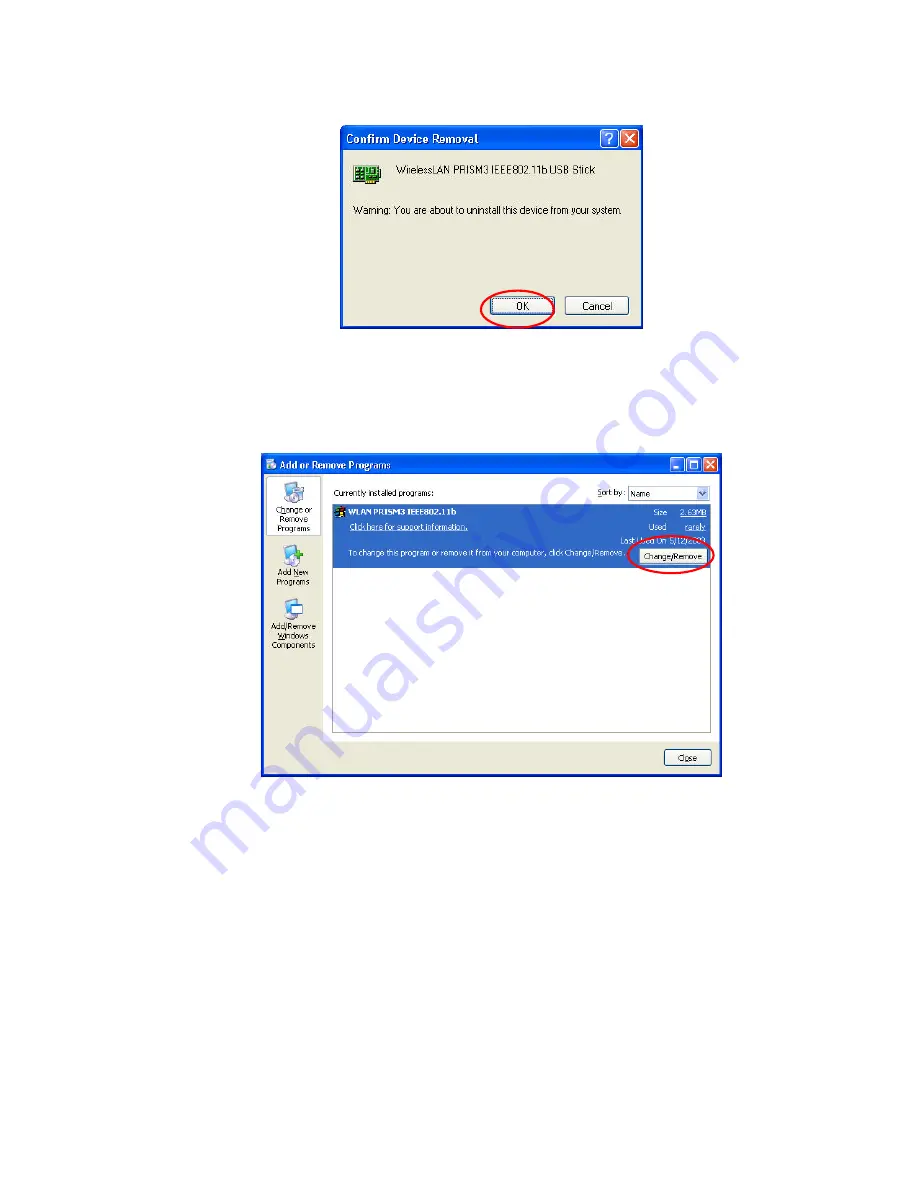
Figure 5 -2: The

 Confirm Device Removal 

Message Box 

5. 

Click 

Start 

on the taskbar and choose 

Control Panel

 from the 

Settings

 menu. 

6. 

Select 

Add or Remove Programs

 to open the dialog box shown as below. 


Figure 5-3: The

 Add or Remove Programs 

Dialog Box 

7. 

Click the 

Change/Remove

 button under 

WLAN PRISM3 IEEE802.11b

8. 

In the prompted 

WLAN PRISM3 IEEE802.11b 

window, choose the 

Remove

 option to 

uninstall the program. Then click 

Next

Содержание WN220

Страница 1: ...8 80 02 2 1 11 1b b W WL LA AN N U US SB B S St ti ic ck k User Manual Version 1 0...

Страница 2: ...are designed to provide reasonable protection against harmful interference in a residential installation This equipment generates uses and can radiate radio frequency energy and if not installed and u...

Страница 3: ...M061703V10 2 Caution Changes or modifications not expressly approved by the party responsible forcompliance could void the user s authority to operate the equipment...

Страница 4: ...ork via Wireless Zero Configuration 9 To Configure the Wireless Networks Properties 10 To Access to Certain Wireless Network Type 12 4 WLAN PRISM3 IEEE802 11bBASICS 14 4 1 Tray Icon 14 4 2 Right Click...

Страница 5: ...0 Use WEP Key 21 Create Keys with Passphrase 21 The About Tab 21 Network Driver 21 Configuration Utility 21 NIC Firmware 21 APPENDIX A TROUBLESHOOTING 22 Uninstall WLAN PRISM3 IEEE802 11b and the Stic...

Страница 6: ...ONNECTION PROPERTIES DIALOG BOX 10 FIGURE 3 5 THE WIRELESS NETWORK PROPERTIES DIALOG BOX 11 FIGURE 3 6 ENTER WEP 12 FIGURE 3 7 SETTING UP WIRELESS NETWORK CONFIGURATION 12 FIGURE 3 8 THE ADVANCED DIAL...

Страница 7: ...pped computers and the later the so called infrastructure network allows you to communicate with wired LAN via an access point To obtain most benefits your 802 11b Wireless LAN USB Stick provides plea...

Страница 8: ...s 32 MB RAM or above A CD ROM drive 300 MHz processor or higher Microsoft Windows 98 Second Edition Me 2000 or Windows XP USB Port version 1 1 1 4 The 802 11b Wireless LAN USB Stick Your 802 11b Wirel...

Страница 9: ...priately please read and go along with the instructions below carefully 2 1 Installing the WLAN Driver a Plug your 802 11b WLAN USB Stick into your PC s USB port b Your system will detect your 802 11b...

Страница 10: ...in the WLAN PRISM3 IEEE802 11b window to proceed The system will start to copy the drivers found Figure 2 1 3 The WLAN PRISM3 IEEE802 11b Window f On the Reboot screen choose Yes I want to restart my...

Страница 11: ...ning Windows XP you shall find that two tabs are contained in the PRISM Wireless Settings dialog box after you ve followed the instructions above and successfully installed the drivers However normall...

Страница 12: ...pen the Wireless Network Connection Status dialog box and then select Properties Figure 2 2 3 The Wireless Network Connection Status Dialog Box b Choose the Wireless Networks tab in the Wireless Netwo...

Страница 13: ...XP to configure the WLAN USB Stick 2 3 Verifying a Successful Installation To confirm that your 802 11b Wireless LAN USB Stick is properly installed please go along with the procedures below 1 Right...

Страница 14: ...Adapter item to which a red or yellow icon is attached beside in the Device Manager dialog box Then restart your system and go through the installation procedures again The following picture indicates...

Страница 15: ...nnect an Available Network via Wireless Zero Configuration 1 Double click the Wireless Network Connection icon 2 In the opened Connect to Wireless Network dialog box the currently available networks a...

Страница 16: ...The Connect to Wireless Network Dialog Box After clicking Advanced you will enter into the Wireless Networks tab of the Wireless Network Connection Properties dialog box in which three other tabs are...

Страница 17: ...ks and then selecting the Add button After clicking Add the Wireless Network Properties dialog box will appear as Figure 3 5 displays Note that to delete any item under the Preferred networks area sim...

Страница 18: ...ss Network Connection Properties dialog box Figure 3 6 Enter WEP Note For more details of this tab you may click the link setting up wireless network configuration at the bottom of the Wireless networ...

Страница 19: ...Choose one of them according to your need and click Close to finish Then you will find under the A vailable networks area in the Wireless Network Connection Properties dialog box only the specified n...

Страница 20: ...oy vast advantages WLAN PRISM3 IEEE802 11b brings 4 1 Tray Icon As long as you finish installing WLAN PRISM3 IEEE802 11b on your computer system you will see the WLAN PRISM3 IEEE802 11b icon shown at...

Страница 21: ...and then choose Yes to have the icon disappeared The icon will reappear next time when you restart the computer If you intend to remove it permanently put a tick in the checkbox next to the Remove Sta...

Страница 22: ...he About tab of the PRISM Wireless Settings dialog box The About tab reveals general information on your USB Stick including the release version of driver and the WLAN PRISM3 IEEE802 11b and the USB s...

Страница 23: ...layed in the window If you wish to stop the networking connection click the Disable Radio button to stop scanning However if you are already in the disabled radio mode you will find the Enable Radio b...

Страница 24: ...e signal percentage rate gets higher It is noted that t he Signal Strength and Link Quality features only apply to the Infrastructure mode They are inapplicable in the Ad Hoc mode sincedata will be tr...

Страница 25: ...ndependent wireless LAN without the use of an access point Each station within this Ad Hoc network has to define the same Network Name Peer to Peer Channel This command is only available while you are...

Страница 26: ...at you may use the identical WEP key to make a communication with the chosen access point Create Key Manually Once you set the Encryption type as 64 bit or 128 bit you may choose to edit WEP keys manu...

Страница 27: ...e After finish configuring the Encryption features remember to click the Applybutton to initiate the new settings The About Tab This tab reveals general information on your wireless LAN USB Stick incl...

Страница 28: ...the procedures below to entirely uninstall WLAN PRISM3 IEEE802 11b and the Stick driver 1 Right click the My Computer desktop icon and choose Propertiesfrom the opened menu 2 In the System Properties...

Страница 29: ...from the Settingsmenu 6 Select Add or Remove Programs to open the dialog box shown as below Figure 5 3 The Add or Remove Programs Dialog Box 7 Click the Change Remove button under WLAN PRISM3 IEEE802...

Страница 30: ...er Windows 98SE or Me choose the Device Manager tab or if your system is Windows 2000 or XP click the Hardware tab and then choose the Device Manager button 3 In the opened window find your USB Stick...

Страница 31: ...we are taking the example of Windows XP 1 Click Start on the taskbar and choose Control Panel from the Settingsmenu 2 Select System to open the System Properties dialog box and then under the Hardwar...

Страница 32: ...upgrade Figure 5 8 The Complete Screen Reset the Country Selection Since every country or region has a regulatory body that governs the use of radio channels once you go abroad with your computer you...

Страница 33: ...the Country Selector dialog box Figure 5 9 The Country Selector Dialog Box 3 Choose the country you currently stay in from the Country Name drop down list 4 Click the APPLY button to activate the new...

Отзывы: