En-2
NAME OF PARTS
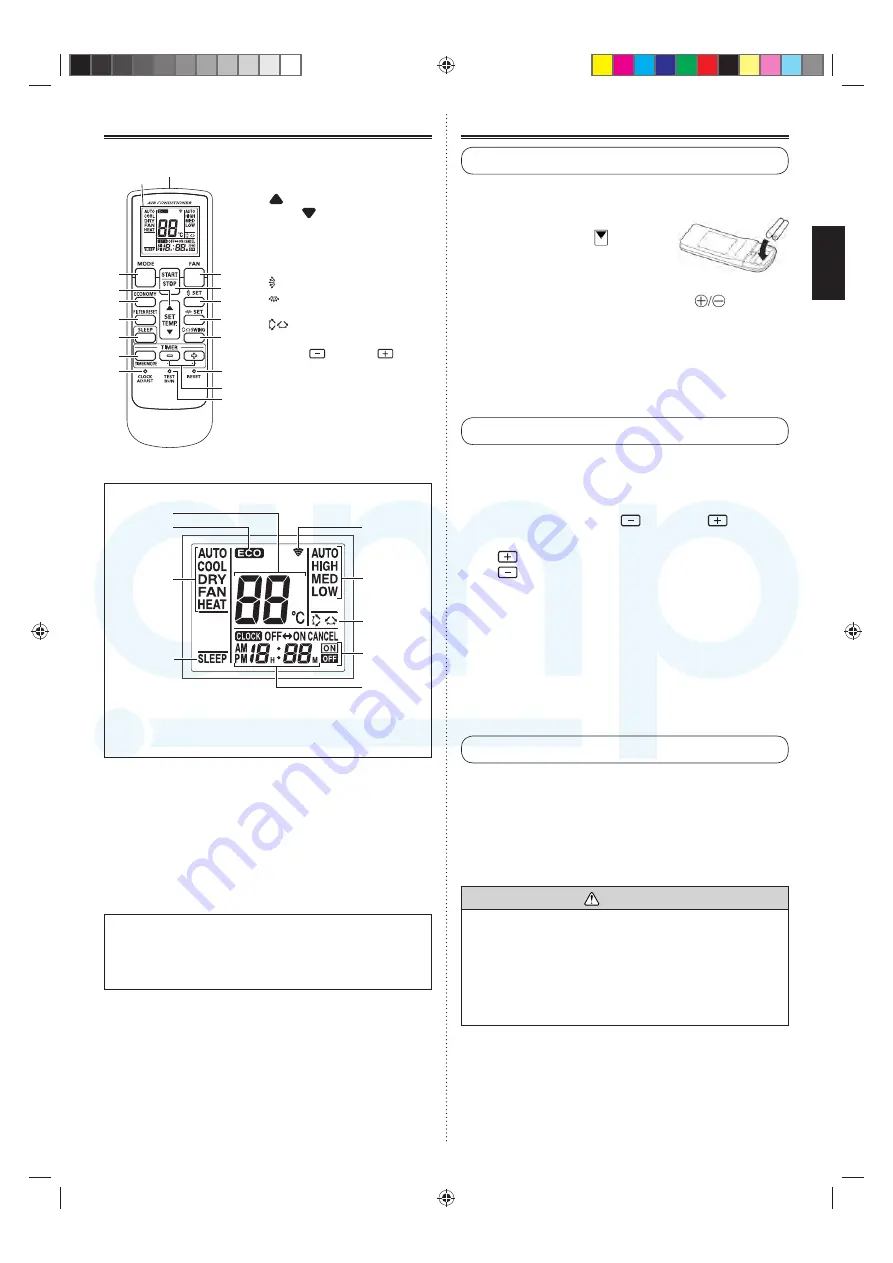
Remote control unit
F
1
2
7
4
5
6
8
9
0
A
C
D
3
E
B
Display
1
“MODE” button
2
“ECONOMY” button
3
“
SET TEMP. / SET
TEMP.
” button
4
“FILTER RESET” button
5
“SLEEP” button
6
“FAN” button
7
“START/STOP” button
8
“ SET” button (Vertical)
9
“ SET” button (Horizon-
tal)
0
“
SWING” button
A
“TIMER MODE” button
B
“TIMER
/ TIMER
”
button
C
“CLOCK ADJUST” button
D
“RESET” button
E
“TEST RUN” button
This is used during test run. For
details, refer to the installation
manual.
F
Signal Transmitter
Display panel
L
N
O
M
K
H
G
I
J
To facilitate explanation, the accompanying illustration has
been drawn to show all possible indicators; in actual operation,
however, the display will only show those indicators appropriate
to the current operation.
G
Temperature SET Indicator
H
ECONOMY Indicator
I
Operating Mode Indicator
J
SLEEP Indicator
K
Transmit Indicator
L
Fan Speed Indicator
M
SWING Indicator
N
Timer Mode Indicator
O
Clock Indicator
Notes of the operation
Functions of START/STOP, MODE, SET TEMP. and TIMER
SET may be restricted depending on the operating state of
the indoor unit.
In this case, when the signal of remote control unit is received,
it is notifi ed by the blinking of TIMER lamp.
PREPARATION
Load Batteries (AAA/LR03/R03 x 2)
1
Press and slide the battery compartment
lid on the reverse side to open it.
Slide in the direction of the arrow
while pressing the
mark.
2
Insert
batteries.
Be sure to align the battery polarities (
) correctly.
3
Close the battery compartment lid.
4
Press the “RESET” button.
Use the tip of a ball-point pen or other small object to press
the button.
Set the Current time
1
Press the “CLOCK ADJUST” button.
Use the tip of a ball-point pen or other small object to press
the button.
2
Use the “TIMER
/ TIMER
” button
to adjust the clock to the current time.
button:
Press to advance the time.
button:
Press to reverse the time.
(Each time the buttons are pressed, the time will be ad-
vanced/reversed in 1 minute increments; hold the buttons
depressed to change the time quickly in 10 minute incre-
ments.)
3
Press the “CLOCK ADJUST” button
again.
This completes the time setting and starts the clock.
To Use the Remote Control Unit
●
The Remote Control Unit must be pointed at remote control
signal receiver to operate correctly.
●
Operating Range: About 5 meters.
●
When a signal is properly received by the receiver unit control
panel, some lamp will be fl ashed.
●
If no lamp is fl ashed, press the Remote Control Unit button
again.
WARNING
Never allow the alkaline batteries to short-circuit. Never disassemble,
heat or place them in fi re.
●
Doing so can cause the strong alkaline liquid to leak and possibly
enter your eyes or cause the batteries to explode or heat up, resulting
in personal injuries, burning or mechanical breakdowns.
●
If strong alkaline liquid comes in contact with your skin or clothes,
wash it off with clean water. If it gets in to your eyes, wash them with
clean water and consult a doctor immediately.
AMP Air Conditioning
www.ampair.co.uk | [email protected]


