background image

ENGLISH

[email protected]

17

OL'S

3

MS-1

MS-1

MS-1

5

2

1

RUN

START

COMMON

START

CAPACITOR

RUN

CAPACITOR

MOTOR

L1

L2

N

1L1

1L2

T1

T2

T3

T2

T1

1T1

GRD

2

CONTROL

BREAKER

MOTOR

START

RELAY

GFCI MOTOR

BREAKER

4

GFCI

LED

LIGHTS

2

5

4

1

LIGHT TIMER

2

5

4

1

MOTOR TIMER

RED

YELLOW

BLACK

T3

T2

LT

1

LT

2

LIGHTS

- Main Disconnect Supplied and Installed by Licensed Electrician
- Input Hubs Must Comply With UL 514B

*Shall Be Provided By Installer

*

*

230V

FLA

 40A

MIN SERVICE

40A
8

AWG

COPPER

60° C

230V

28

RLA

MIN 

10

AWG

COPPER

60° C

120V

3RLA

MIN 14AWG

COPPER

60° C

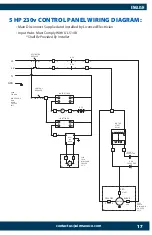
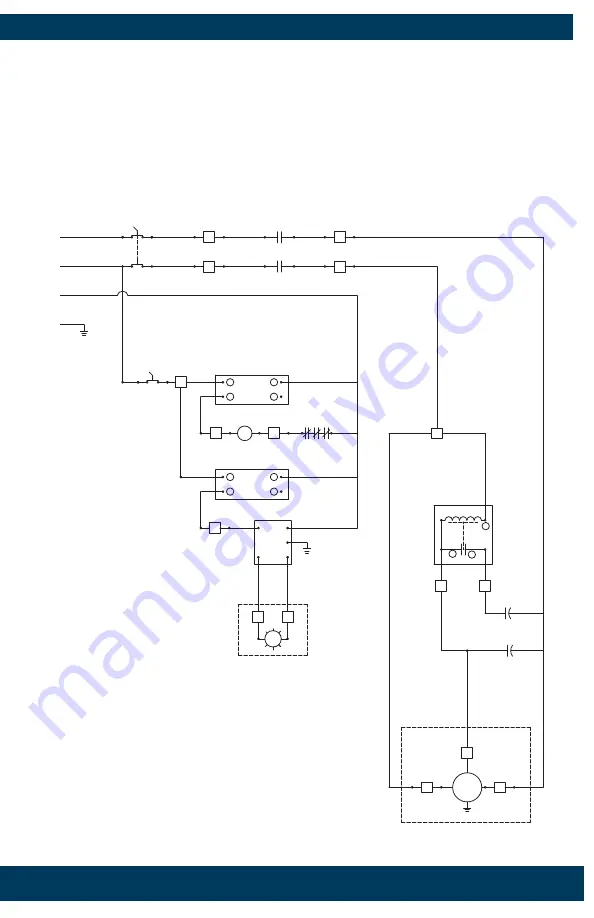
5 HP 230v


CONTROL PANEL WIRING DIAGRAM:

• Main Disconnect Supplied and Installed by Licensed Electrician
• Input Hubs Must Comply With UL 514B 

*Shall Be Provided By Installer

Содержание 651730

Страница 1: ...230v 652115 3 HP 230v 652525 5 HP 230v Control Panels ImportantInformation 2 1 2HP115vContents Installation 3 4 1 2HP115vWiringDiagram 5 1 2HP230vContents Installation 6 7 1 2HP230vWiringDiagram 8 1 5HP230vContents Installation 9 13 1 5HP230vWiringDiagram 14 17 TimerMaintenance Operation 18 19 WarrantyInformation 20 ...

Страница 2: ...tions where bodily contact is made with the water Although the control panel is designed for outdoor use it should never be submerged in water CAUTION To reduce the risk of equipment damage or failure The control panel is NOT submersible do not place the timer where it might contact or fall into the water DO NOT operate the control panel with a unit that exceeds the maximum voltage indicated by th...

Страница 3: ...SS OTHERWISE SPECIFIED SCALE 1 1 WEIGHT DWG NO C SIZE TITLE NAME DATE COMMENTS Q A MFG APPR ENG APPR CHECKED DRAWN FINISH MATERIAL INTERPRET GEOMETRIC TOLERANCING PER DIMENSIONS ARE IN INCHES TOLERANCES ANGULAR MACH 1 0 BEND TWO PLACE DECIMAL 0 010 THREE PLACE DECIMAL 0 005 PROPRIETARY AND CONFIDENTIAL THE INFORMATION CONTAINED IN THIS DRAWING IS THE SOLE PROPERTY OF THE POND GUY INC ANY REPRODUCT...

Страница 4: ...nts and to help keep the control panel clean CONNECTING ELECTRICAL WIRING CONNECT UNIT TO CONTROL PANEL WARNING Turn off electrical power before connecting units to the control panel Connect to a Fountain Plug fountain power cord into receptacle labeled FOUNTAIN Connect to Fountain Lights optional Plug light set power cord into receptacle labeled LIGHTS Connect Control panel to Power Source Plug c...

Страница 5: ...ensed Electrician Comply With UL 514B d By Installer 120V FLA 15A MIN SERVICE 15A 14AWG COPPER 60 C 120V 12RLA MIN 14AWG COPPER 60 C 120V 3RLA MIN 14AWG COPPER 60 C I I I I 1 2 HP 115v CONTROL PANEL WIRING DIAGRAM Main Disconnect Supplied and Installed by Licensed Electrician Input Hubs Must Comply With UL 514B Shall Be Provided By Installer ...

Страница 6: ...SCRIPTION PART 1 Breaker Base 651970 5 Terminal Blocks Green 651941 2 Control Breaker 15 Amp 651976 6 Light GFCI 651952 3 Motor GFCI Breaker 15 Amp 651971 7 MotorTimer 651112 4 1 2 HP Contactor 230v 651962 8 LightTimer 651112 5 Terminal Blocks Gray 651940 Airmax TIMER Airmax TIMER 1 2 3 5 4 7 8 2 3 6 1 2 HP 230v PRODUCT CONTENTS ...

Страница 7: ...CTRICAL WIRING CONNECT UNIT TO CONTROL PANEL WARNING Turn off electrical power before connecting units to the control panel Connect to a Fountain Black lead to T1 on the terminal strip White lead to T2 on the terminal strip Green lead to the grounding terminal Connect to Fountain Lights optional Black lead to LT1 on the terminal strip White lead to LT2 on the terminal strip Green lead to the groun...

Страница 8: ...IGHTS LT 1 LT 2 LIGHTS 2 5 4 1 LIGHT TIMER 2 5 4 1 MOTOR TIMER 120V 3RLA MIN 14AWG COPPER 60 C 230V 6RLA MIN 14AWG COPPER 60 C 230V FLA 15A MIN SERVICE 15A 14AWG COPPER 60 C 1 2 HP 230v CONTROL PANEL WIRING DIAGRAM Main Disconnect Supplied and Installed by Licensed Electrician Input Hubs Must Comply With UL 514B Shall Be Provided By Installer ...

Страница 9: ...trol Breaker 15 Amp 651976 9 Terminal Blocks Gray 651940 3 Motor GFCI Breaker 20 Amp 651068 9 Terminal Blocks Green 652125 4 1 HP Contactor 230v 651963 10 MotorTimer 651112 5 1 HP Overload Relay 651883 11 LightTimer 651112 6 1 HP Start Capacitor 651980 12 Light GFCI 651952 7 1 HP Run Capacitor 651981 1 HP 230v PRODUCT CONTENTS 4 2 6 1 5 Airmax TIMER Airmax TIMER 6 1 2 3 5 9 4 7 8 10 11 2 3 12 ...

Страница 10: ... Terminal Blocks Gray 651940 3 Motor GFCI Breaker 20 Amp 651068 9 Terminal Blocks Green 652125 4 2 HP Contactor 230v 651965 10 MotorTimer 651112 5 2 HP Overload Relay 651967 11 LightTimer 651112 6 2 HP Start Capacitor 651984 12 Light GFCI 651952 7 2 HP Run Capacitor 651985 2 HP 230v PRODUCT CONTENTS Airmax 230v Control Panel 2 HP 4 2 6 1 5 Airmax TIMER Airmax TIMER 6 1 2 3 5 9 4 7 8 10 11 2 3 12 ...

Страница 11: ...Terminal Blocks Gray 651940 3 Motor GFCI Breaker 30 Amp 651882 9 Terminal Blocks Green 652125 4 3 HP Contactor 230v 651966 10 MotorTimer 651112 5 3 HP Overload Relay 651967 11 LightTimer 651112 6 3 HP Start Capacitor 651986 12 Light GFCI 651952 7 3 HP Run Capacitor 651987 3 HP 230v PRODUCT CONTENTS Airmax 230v Control Panel 3 HP 4 2 6 1 5 Airmax TIMER Airmax TIMER 6 1 2 3 5 9 4 7 8 10 11 2 3 12 ...

Страница 12: ...erminal Blocks Gray 651762 3 Motor GFCI Breaker 40 Amp 651975 9 Terminal Blocks Green 651763 4 5 HP Contactor 230v 651966 10 MotorTimer 651112 5 5 HP Overload Relay 651969 11 LightTimer 651112 6 5 HP Start Capacitor 652221 12 Light GFCI 651952 7 5 HP Run Capacitor s 652222 5 HP 230v PRODUCT CONTENTS Airmax 230v Control Panel 5 HP 4 2 6 1 5 Airmax TIMER Airmax TIMER 6 1 2 3 5 9 4 7 8 10 11 2 3 12 ...

Страница 13: ...G CONNECT UNIT TO CONTROL PANEL WARNING Turn off electrical power before connecting units to the control panel Connect to a Fountain Black lead to T1 on the terminal strip White lead to T2 on the terminal strip Red lead to T3 on the terminal strip Green lead to the grounding terminal Connect to Fountain Lights optional Black lead to LT1 on the terminal strip White lead to LT2 on the terminal strip...

Страница 14: ...T TIMER 2 5 4 1 MOTOR TIMER RED YELLOW BLACK T3 T2 Main Disconnect Supplied and Installed by Licensed Electrician Input Hubs Must Comply With UL 514B Shall Be Provided By Installer 230V FLA 20A MIN SERVICE 20A 12AWG COPPER 60 C 230V 10RLA MIN 12AWG COPPER 60 C 120V 3RLA MIN 14AWG COPPER 60 C 1 HP 230v CONTROL PANEL WIRING DIAGRAM Main Disconnect Supplied and Installed by Licensed Electrician Input...

Страница 15: ...TOR TIMER RED YELLOW BLACK T3 T2 LT 1 LT 2 LIGHTS Main Disconnect Supplied and Installed by Licensed Electrician Input Hubs Must Comply With UL 514B Shall Be Provided By Installer 230V FLA 20A MIN SERVICE 20A 12AWG COPPER 60 C 230V 15RLA MIN 12AWG COPPER 60 C 120V 3RLA MIN 14AWG COPPER 60 C 2 HP 230v CONTROL PANEL WIRING DIAGRAM Main Disconnect Supplied and Installed by Licensed Electrician Input ...

Страница 16: ...OTOR TIMER RED YELLOW BLACK T3 T2 LT 1 LT 2 LIGHTS Main Disconnect Supplied and Installed by Licensed Electrician Input Hubs Must Comply With UL 514B Shall Be Provided By Installer 230V FLA 30A MIN SERVICE 30A 10AWG COPPER 60 C 230V 17RLA MIN 12AWG COPPER 60 C 120V 3RLA MIN 14AWG COPPER 60 C 3 HP 230v CONTROL PANEL WIRING DIAGRAM Main Disconnect Supplied and Installed by Licensed Electrician Input...

Страница 17: ...TOR TIMER RED YELLOW BLACK T3 T2 LT 1 LT 2 LIGHTS Main Disconnect Supplied and Installed by Licensed Electrician Input Hubs Must Comply With UL 514B Shall Be Provided By Installer 230V FLA 40A MIN SERVICE 40A 8AWG COPPER 60 C 230V 28RLA MIN 10AWG COPPER 60 C 120V 3RLA MIN 14AWG COPPER 60 C 5 HP 230v CONTROL PANEL WIRING DIAGRAM Main Disconnect Supplied and Installed by Licensed Electrician Input H...

Страница 18: ...ll receive the most benefit from continual water movement We recommend running fountains at least 8 10 hours daily to maximize benefits unless a secondary aeration system is in operation Step 1 Press the TIMER button once to display 1on Step 2 Press the DAY button to scroll through the preset schedule options Mode A MONDAY SUNDAY is the default schedule Step 3 When the desired schedule is displaye...

Страница 19: ...rams running you may elect to add an additional program by following the CREATING A PROGRAM procedure Remove a Program In the event that a program needs to be removed you will need to RESET the timer and program only the desired schedules REPLACING THE BATTERY Note Timer settings will be retained for approximately 1 minute once the battery is removed Each timer uses 1 CR2032 Lithium Battery Step 1...

Страница 20: ...Y Airmax Control Panels are covered under the system warranty 3 Years EcoSeries PondSeries 5 Years LakeSeries 652090 V6 THANK YOU FOR CHOOSING Airmax Inc 15425 Chets Way Street Armada MI 48005 866 424 7629 www airmaxeco com contactus airmaxeco com ...

Отзывы: