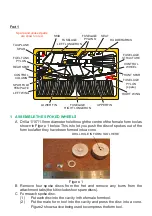
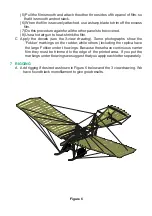
Aircraft in Miniature Limited Historic Wings Fokker Spin 1912 Скачать руководство пользователя страница 6


Figure 5

A Attach the radiator to the fuselage structure behind the fuel tank pylon.
B Attach the fuel tank to the fuel tank pylon.
C Attach the engine to the front of the fuselage structure.
D Attach the nickel-silver detail parts:

(1) Attach the pipe to the right side of the engine block.
(2) Attach the radiator hose between the engine block and the radiator.
(3) Attach the fuel pipe to the under side of the fuel tank and to the engine.

E Attach the propeller to the engine. 

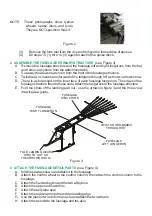
A If the airframe is to be painted, do it at this stage in the assembly. Paint the 

structure  to  resemble  a  light  to  medium  brown  wood.  If  the  model  is  to  be 
covered with Litespan film, do not paint those areas where adhesive will be 
applied.

B If the model is to be covered with Litespan film (the film), cover the fuselage 

and flying surfaces now. For each area:
(1) Cut a piece of the film which is larger than the panel.
(2) Apply a continuous   layer of cyanoacrylate  adhesive  (superglue)  to the 

structures where the film will be attached.

(3) Attach the edge of the piece of film to one long edge of the bay and press it 

down so that it is smooth, and without creases.

(4) When the superglue has attached the film securely, apply more 

superglue to the other three sides of that bay.
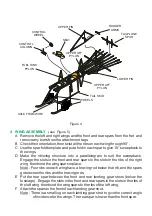
5 FINAL ASSEMBLY 


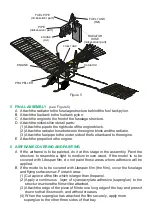
6  AIRFRAME COVERING AND PAINTING

 (see  Figure 5)

FUEL TANK

RADIATOR

PROPELLER

ENGINE

FUEL TANK

(Ref)

ENGINE

(Ref)

FUEL PIPE

(nickel-silver part)

RADIATOR

HOSE

(nickel-silver part)

PIPE

(nickel-silver part)

Содержание Historic Wings Fokker Spin 1912

Страница 1: ...Historic Wings History Notes and Assembly Instructions 1 72 Metal Kit of the 1912 Fokker Spin Copyright unknown ...

Страница 2: ... can use a pair of side cutters or put the fret on a ceramic tile and press down on each attaching tab with a sharp knife If you use the knife tile option put the attaching tab with the half etched side of the tab face down Whichever method is used itmaynecessarytoremovetheburroftheattachmenttabwithaneedlefileafterwards The wings are etched with integral ribs Hold the leading or trailing edge in a...

Страница 3: ...poke disc 1 Put each disc into the cavity in the female form tool 2 Put the male form tool into the cavity and press the disc into a cone Figure 2 shows a vice being used to compress the form tool 1 ASSEMBLE THE SPOKED WHEELS SEAT RUDDER ARMS CONTROL WHEEL FUEL TANK PYLON SKID FUSELAGE LEFT LONGERON FUSELAGE RIGHT LONGERON UPPER FIN LOWER FIN FUSELAGE STRUCTURE FRONT SPAR RIGHT WING FUSELAGE PYLON...

Страница 4: ...ure fits into these slots Attach the longerons to the fuselage structure E Fold the struts of the landing gear out use the arrows in figure 3 and the three view drawing as a guide Figure 3 see Figure 4 A fold the seat as shown and attach it to the fuselage B Attach the control wheel to the control column then attach the control column to the fuselage C Attach the fuel tank pylon and the two aft py...

Страница 5: ...ing have a bracing rod below that rib and the spars go between the ribs and the bracing rods E Put the rear spar between the front and rear landing gear struts below the fuselage Engage the slots in the front and rear spars in the slots in the ribs of the left wing then bond the wing spars to the ribs of the left wing F Attach the spars to the front of each landing gear strut Note There is a small...

Страница 6: ... be covered with Litespan film do not paint those areas where adhesive will be applied B If the model is to be covered with Litespan film the film cover the fuselage and flying surfaces now For each area 1 Cut a piece of the film which is larger than the panel 2 Apply a continuous layer of cyanoacrylate adhesive superglue to the structures where the film will be attached 3 Attach the edge of the p...

Страница 7: ...m C Apply the decals see the 3 view drawing Some photographs show the Fokker markings on the rudder while others including the replica have the large Fokker under the wings Because these have continuous carrier film they must be trimmed to the edge of the printed area If you put the markings under the wings we suggest that you apply each letter separately A Add rigging if desired as shown in Figur...

Страница 8: ...Historic Wings of 1912 Kit HW72 03 003 Fokker Spin Aircraft In Miniature Ltd 2011 Initial Issue 28th February 2011 Fokker Aéroplanbau Decals Fokker Aéroplanbau Decals Decals ...

Страница 9: ......

Страница 10: ...er parts add to or delete parts without prior notification in the interests of quality control production or product improvement This kit is manufactured in the United Kingdom by Aircraft In Miniature Limited 19 Watling Street Nuneaton Warwickshire CV11 6JJ England Email info aim72 co uk Web site www aim72 co uk ...

Отзывы: