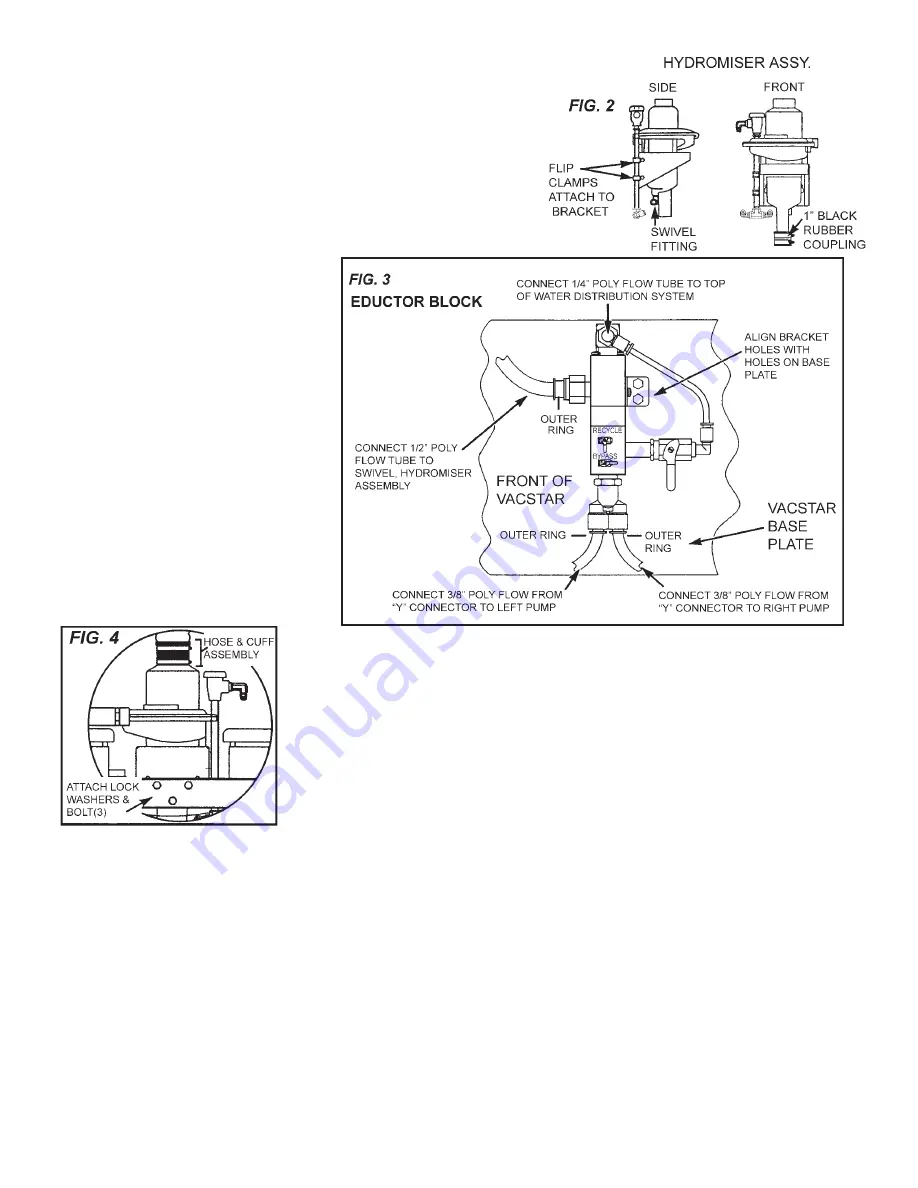
INSTALL HYDROMISER ASSEMBLY, EDUCTOR, REATTACH TUBING
A. Install the eductor; connect poly flow tubing
1. Using a 5/16” nut driver and 2 hex head screws provided,
attach the eductor block’s bracket to the base plate of the
VacStar chassis. Set the eductor on recycle mode (See Fig. 3).
2. Route the 3/8” poly flow tube from the left pump assembly
over the intake manifold to the left port of the”Y” connector
on the eductor block. Insert until the tube stops.
3. Route the 3/8” poly flow tube
from the right pump assembly
to the right port of the “Y”
connector on the eductor block.
Loop tubes; avoid kinks.
Insert until the tube stops.
4. Insert the 1/2” poly flow tube
(incl. w/kit) into the side port of
the eductor block until the tube
stops.
5. Attach 1/4” poly flow tube
(incl.w/kit) to fitting on back
of block (See Fig. 3).
C. Connect the poly flow tubing to HydroMiser Assembly
(See Fig. 5)
.
1. Reconnect the 1/4” poly flow tubes between the bottom of the water distribution system and the sole-
noids.
Note:
When reconnecting these tubes, they must be reconnected in the same way they were disconnected
as one tube is longer than the other.
2. Insert the free end of the 1/2” poly flow tube into the swivel fitting of the HydroMiser assembly until the
tube stops. (See Fig. 2).
3. Connect the 1/4” poly flow tube from the back of the eductor block, (See Fig. 3), to the elbow found
at the top of the water distribution system (See Fig. 5).
NOTE:
If, for any reason, it becomes necessary to remove a poly flow
tube held in place with a push to connect fitting, simply
push the outer ring in and pull on the tube.
B. Attach the HydroMiser assembly to the back rail of
the VacStar.
Use 3 bolts and 3 lock washers (incl. w/kit). Use a 7/16” wrench
(See Fig. 4).
3


