20
en
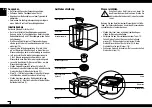
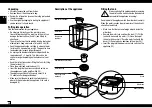
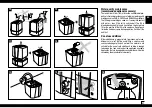
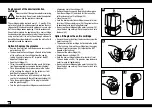
Description of the appliance
Membrane
Mist outlet (rotating)
Evaporation
chamber
Water tank
Brush
Demineralisation cartridge
Main body
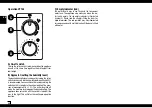
Control panel
Water tank cap
Nebuliser space
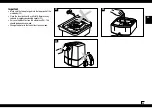
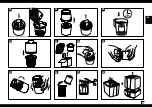
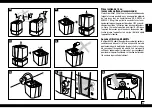
Filling the tank
Always switch off the appliance before removing
the water tank. Do not reach inside the nebuliser
space while the appliance is running!
Do not operate the appliance when the water tank is empty!
When the water reaches the minimum level, the unit swit-
ches off automatically.
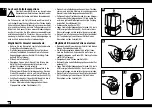
• Make sure that there are no foreign objects inside the
water tank.
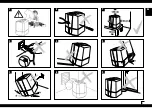
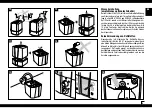
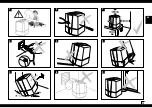
• Remove the water tank cap from the tank (11). Fill the
tank with clean, cold tap water (12). Close the cap of
the water tank securely! Place the water tank onto the
base (13). Do not add any additives to the water (14)!
• Insert the plug into the power socket and switch on the
appliance (15).
Unpacking
• Carefully remove the unit from its box.
• Remove the unit from the plastic bag.
• Review the information given on the rating plate about
the mains supply.
• Use the original packaging for storing the appliance if
you do not use it all year round.
Putting into operation
Find the ideal location for your appliance:
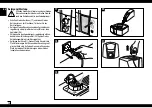
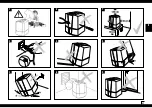
• Do not place it directly next to a radiator or on a
floor with floor heating. The moisture of the mist can
damage the floor surface (6 and 7) (see Safety In-
structions).
• The mist outlet must not be pointed directly at plants or
other objects. Keep a distance of at least 50 cm) (10).
• Soak the demineralisation cartridge in a bowl of water
for at least 24 hours before using it. The granules have
to absorb water to reach full performance.
• On average the demineralisation cartridge should be
replaced every 2 – 3 months. This interval can be
shorter or longer depending on the hardness of your
water.
• Read the instructions under «Filling the Tank» for filling
the water tank (12).
• Place the water tank onto the base (13).
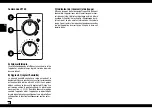
• Insert the plug into the mains socket and switch on
the appliance using the on/off switch (15).
• The appliance will reach full capacity about 10 to
15 minutes after being switched on.
• Make sure that the power cord is not pinched any
-
where (9). Do not operate the appliance if the cord is
damaged (2).
Ionic Silver Stick
®
(optional)
Содержание U7145
Страница 1: ...U7145 U7147 ...
Страница 2: ......
Страница 4: ...4 ...
Страница 5: ...5 de Gebrauchsanweisung ...
Страница 7: ...7 de 3 7 9 2 5 1 6 4 8 ...
Страница 15: ...15 de 39 29 30 31 32 33 34 36 38 35 37 40 ...
Страница 17: ...17 en Instructions for use ...
Страница 19: ...19 en 3 7 9 2 5 1 6 4 8 ...
Страница 27: ...27 en 39 29 30 31 32 33 34 36 38 35 37 40 ...
Страница 29: ...29 fr Instructions d utilisation ...
Страница 31: ...31 fr 3 7 9 2 5 1 6 4 8 ...
Страница 39: ...39 fr 39 29 30 31 32 33 34 36 38 35 37 40 ...
Страница 41: ...41 it Istruzioni per l uso ...
Страница 43: ...43 it 3 7 9 2 5 1 6 4 8 ...
Страница 51: ...51 it 39 29 30 31 32 33 34 36 38 35 37 40 ...
Страница 53: ...53 nl Gebruiksaanwijzing ...
Страница 55: ...55 nl 3 7 9 2 5 1 6 4 8 ...
Страница 63: ...63 nl 39 29 30 31 32 33 34 36 38 35 37 40 ...
Страница 65: ...65 es Instrucciones para el uso ...
Страница 67: ...67 es 3 7 9 2 5 1 6 4 8 ...
Страница 75: ...75 es 39 29 30 31 32 33 34 36 38 35 37 40 ...
Страница 77: ...77 hu Használati útmutató ...
Страница 79: ...79 hu 3 7 9 2 5 1 6 4 8 ...
Страница 87: ...87 hu 39 29 30 31 32 33 34 36 38 35 37 40 ...
Страница 89: ...89 pl Instrukcja obsługi ...
Страница 91: ...91 pl 3 7 9 2 5 1 6 4 8 ...
Страница 99: ...99 pl 39 29 30 31 32 33 34 36 38 35 37 40 ...
Страница 101: ...ru 101 Инструкция по эксплуатации ...
Страница 103: ...ru 103 3 7 9 2 5 1 6 4 8 ...
Страница 111: ...ru 111 39 29 30 31 32 33 34 36 38 35 37 40 ...
Страница 114: ...ru 114 ...
Страница 115: ...se 115 Bruksanvisning ...
Страница 117: ...se 117 3 7 9 2 5 1 6 4 8 ...
Страница 125: ...se 125 39 29 30 31 32 33 34 36 38 35 37 40 ...
Страница 127: ...fi 127 Käyttöohje ...
Страница 129: ...fi 129 3 7 9 2 5 1 6 4 8 ...
Страница 137: ...fi 137 39 29 30 31 32 33 34 36 38 35 37 40 ...
Страница 139: ...dk 139 Brugsanvisning ...
Страница 141: ...dk 141 3 7 9 2 5 1 6 4 8 ...
Страница 149: ...dk 149 39 29 30 31 32 33 34 36 38 35 37 40 ...
Страница 151: ...no 151 Bruksanvisning ...
Страница 153: ...no 153 3 7 9 2 5 1 6 4 8 ...
Страница 161: ...no 161 39 29 30 31 32 33 34 36 38 35 37 40 ...
Страница 163: ......
Страница 164: ...AIR O SWISS and BONECO are registered trademarks of PLASTON Group Switzerland V 00 www airoswiss com ...

