background image

www.airkinglimited.com

980051015 Rev B. 9-05

1 of 8

READ AND SAVE THESE INSTRUCTIONS

READ CAREFULLY BEFORE ATTEMPTING TO ASSEMBLE, INSTALL, OPERATE OR MAINTAIN THE PRODUCT DESCRIBED.

PROTECT YOURSELF AND OTHERS BY OBSERVING ALL SAFETY INFORMATION. FAILURE TO COMPLY WITH

INSTRUCTIONS COULD RESULT IN PERSONAL INJURY AND/OR PROPERTY DAMAGE!

RETAIN INSTRUCTIONS FOR FUTURE REFERENCE.

GENERAL SAFETY INFORMATION

When using electrical appliances, basic precautions

should always be followed to reduce the risk of fire,

electric shock and injury to person, including the following:

WARNING:


TO REDUCE THE RISK OF FIRE, ELECTRIC SHOCK

AND INJURY TO PERSON, OBSERVE THE FOLLOWING:

1.

Read all instructions before installing or using fan.

2.

Use this unit only in the manner intended by the manufacturer.
If you have questions, contact the manufacturer.

3.

Before servicing or cleaning the unit, switch power off at service
panel and lock the service disconnecting means to prevent
power from being switched on accidentally. When the service
disconnecting means cannot be locked, securely fasten a
prominent warning device, such as a tag, to the service panel.

4.

Installation work and electrical wiring must be done by qualified
person(s) in accordance with all applicable codes and standards,
including fire-related construction.

CAUTION:


THIS FAN MUST NOT BE USED IN POTENTIALLY

DANGEROUS LOCATIONS SUCH AS FLAMMABLE, EXPLOSIVE,
CHEMICAL-LADEN OR WET ATMOSPHERES.

5.

Make certain that the power source conforms to the electrical
requirements of the fan.

6.

The fan must be hung with at least 7 feet of clearance from the
floor to the blades.

Models: 9800, 9805,

9810, 9815

Ceiling Fan

SAVE THESE INSTRUCTIONS

7.

Completely reassemble fan according to instructions before
reconnecting to power supply.

WARNING:


TO REDUCE THE RISK OF PERSONAL INJURY,

DO NOT BEND THE BLADE BRACKETS OR BLADES WHEN
INSTALLING THE BLADES, BALANCING THE BLADES, OR CLEANING
THE FAN. DO NOT INSERT FOREIGN OBLECTS IN BETWEEN THE
ROTATING FAN BLADES.

8.

This fan is not for use in wet or damp locations.

9.

Do not use fan outdoors and never locate the fan where it may
fall into a bathtub or other water container.

10. This unit must be grounded.

11. To avoid motor bearing damage and noisy and/or unbalanced

impellers, keep drywall spray, construction dust, etc. off power
unit.

12. DO NOT install or attach decorative elements or any other objects

onto the fan or fan blades.

WARNING:


TO REDUCE THE RISK OF FIRE, ELECTRIC SHOCK,

DO NOT USE THIS FAN WITH ANY SOLID-STATE SPEED CONTROL
DEVICE.

IMPORTANT INSTRUCTIONS -

OPERATING MANUAL

Содержание Builder's Choice 9800

Страница 1: ... must be done by qualified person s in accordance with all applicable codes and standards including fire related construction CAUTION THIS FAN MUST NOT BE USED IN POTENTIALLY DANGEROUS LOCATIONS SUCH AS FLAMMABLE EXPLOSIVE CHEMICAL LADEN OR WET ATMOSPHERES 5 Make certain that the power source conforms to the electrical requirements of the fan 6 The fan must be hung with at least 7 feet of clearanc...

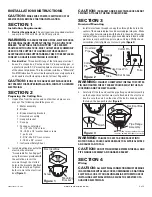
Страница 2: ...arked Acceptable For Fan Support using the screws provided with the outlet box Insert the screws through the slotted holes in the bracket and attach to the electrical box Tighten both screws to the electrical box Figure 1 Figure 1 Screw Electrical Box Mounting Bracket CAUTION IF BRACKET AND OR ELECTRICAL BOX ARE NOT SECURELY ATTACHED THE FAN COULD WOBBLE SECTION 3 Downrod Mounting 1 Install motor ...

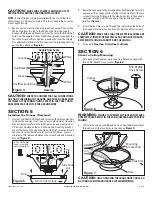
Страница 3: ...re s owner s manual for wiring This fan is adaptable to center mount light kits only 1 Make sure the electrical box is properly secured Connect the White wire from the fan to the White wire from the supply Connect the Black and Blue wires from the fan to the Black hot wire from the supply Connect the Green ground wire from the fan to the Green or Bare Copper ground wire from the supply Use approve...

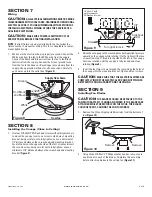
Страница 4: ...the first screw and insert the second screw being careful not to fully tighten Leave a minimum of 1 8 distance between the screw head and mounting bracket Figure 9 Ground White Hot Black and Blue Figure 8 Supply from home from fan 10 24 x 3 8 with split lockwasher Phillips head screw 1 8 Side hook slot Hole Turn right to lock Figure 9 2 Raise the canopy up to the mounting bracket Apply light press...

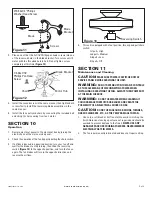
Страница 5: ...lades to stop turning then slide the reversing switch Figure 13 to the opposite position and turn the fan on again The fan blades will turn in the opposite direction and reverse the airflow Figure 13 4 This unit is equipped with a four position three speed pull chain switch 1st pull High 2nd pull Medium 3rd pull Low 4th pull Off SECTION 11 Maintenance and Cleaning CAUTION MAKE SURE POWER IS SWITCH...

Страница 6: ...s range hood grease filters charcoal filters or combination charcoal grease filters replacement light bulbs in range hoods or bathroom fan light bulb heater combinations As well any damage or failure caused by abuse misuse abnormal usage faulty installation or improper maintenance will not be covered by this warranty In order to make a claim on this warranty you must be the original consumer of th...

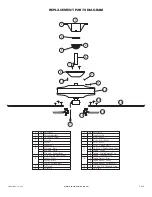
Страница 7: ...Canopy White 1 Canopy Brass 1 Canopy Antique Brass 9 1 Set Screw 10 1 Cotter Pin 1 2 3 4 7 5 8 9 11 12 13 14 15 16 17 6 10 Qty Description 11 1 Yoke Cross Pin 12 1 Motor Brass 1 Motor Brass White 1 Motor White 1 Motor Antique Brass 13 15 10 32 x 1 2 Washer Head Screw 14 5 Paddle Cherry 5 Paddle White Bleached Oak 5 Paddle Cherry Dark Oak 15 5 Paddle Bracket Brass 5 Paddle Bracket White 5 Paddle Br...

Страница 8: ...www airkinglimited com 980051015 Rev B 9 05 8 of 8 ...

Отзывы: