background image

Notice for Windows 2000/ ME/ 98SE users when using PC camera

function for the first time

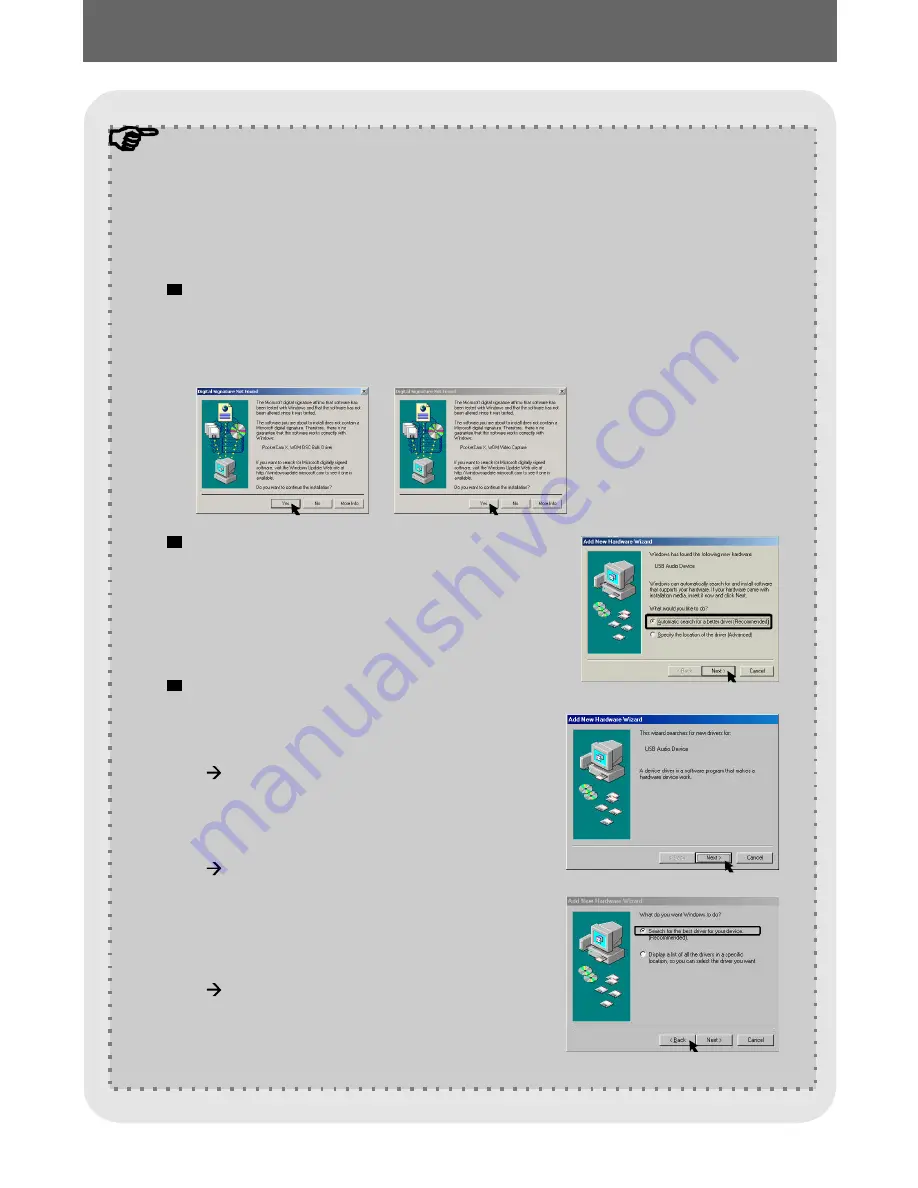
The dialog box "

" might appear twice,

please simply click "

". This camera works well for Windows

2000.

Digital Signature Not Found

Yes

When using PC Camera function (or Video Conferencing) for the first

time, please follow the steps below.

For Windows 2000 users

Please select "

" when a

window as Fig 7 appears.

Automatic search

for a better driver

For Windows ME users

Fig 7

For Windows 98SE users

Click "

" when a window as

Fig 8 appears.

Select "

" and click

"

" when a window as Fig

9 appears.

Select the position where your

Windows 98SE driver is. You

might be asked to insert the

licensed Windows 98SE CD-

ROM in your CD-ROM drive.

Follow the on-screen

instructions to complete the
installation.

Next

Search for a best driver

for your device

Next

Fig 9

Fig 8

~ 25 ~

Содержание PocketCam PocketCam X

Страница 1: ......

Страница 2: ...nc 51 Discovery Suite 100 Irvine CA 92618 USA TEL 949 585 9600 FAX 949 585 9345 http www aiptek com Online registration http www aiptek com registration registration htm Online registration entitles y...

Страница 3: ...n the camera body For your own safety avoid using the camera when there is a storm or lightning Avoid using batteries of different brands or types at the same time There is potential of explosion by d...

Страница 4: ...SD MMC card optional 4 Attaching the strap optional 3 Taking still pictures 4 Recording movies Using the Lens cover Using the Power button Focus Zoom in out The LCD display under mode The LCD display...

Страница 5: ...der mode 20 23 13 14 24 15 16 24 24 26 30 1 Installing the PocketCam X driver 17 3 Copying pictures and movies to your computer 21 Enjoying Viewing Your Images on a PC 17 Other Information 32 1 Life o...

Страница 6: ...om in Flash strobe Microphone Lens cover Focus switch USB port Lens Self Timer LED indicator Battery SD MMC card cover Tripod port MENU OK button Power button 3 10 18 19 11 12 13 14 15 16 17 18 19 20...

Страница 7: ...AA 1 5V batteries Slide the in the direction of the indication to open it battery card cover Follow the indication to load two AAA batteries Close inward the to lock it battery card cover and slide up...

Страница 8: ...rd cover Insert the card in the direction of the indicatior and push it in till the end of the card plot Close the battery card cover MENU OK Removing the card Push the card to remove it in and releas...

Страница 9: ...nd ensure optimal image quality particularly while taking self portraits longer movies or in a macro mode Attach the tripod to the port on the bottom of the camera and rotate the serrated wheel to loc...

Страница 10: ...camera is idle for over 60 seconds the LCD display will be turned off to conserve battery power press any key to wake up the camera If it is idle for over 3 minutes the camera will shut down automatic...

Страница 11: ...n Follow the steps to snap stills Also use the and the to adjust zoom in or zoom out so that you can get best result Focus switch Control buttons to set the focus Focus Adjust the focus before taking...

Страница 12: ...The strobe and self timer are provided to offer more convenient utilities when taking pictures You can use the strobe if the light is not adequate The self timer function is useful in certain situati...

Страница 13: ...itch Press the to start recording Shutter button Press the again to stop the recording Shutter button The LCD display under mode Movie mode Number of pictures and movies taken Life of battery Storage...

Страница 14: ...wing Storage mode SD MMC card Flash memory non icon Control buttons Set the to Mode switch The last image taken will be highlighted first on the LCD display Press the to select the previous or the nex...

Страница 15: ...NU OK button Pick with the then press the to complete the action of deletion Yes Control buttons MENU OK button Press the to enter the MENU OK button MENU Follow the steps if you want to delete one pi...

Страница 16: ...n Off Size Strobe Self Timer Description This item allows you to change the resolution of the picture Select the 1600x1200 or 2048x1536 type when you want to develop 4x6 photos select the 1280x960 whe...

Страница 17: ...environment This item offers four scenes of photo imaging such as the Normal no effect B W black and white Classic old picture and Solarize over exposed effects Setting See page 16 for details Auto Ba...

Страница 18: ...eleted This item allows all files stored in your built in flash memory or the SD MMC card to be deleted This item allows all files stored in your built in flash memory or the SD MMC card will be delet...

Страница 19: ...o change the number of settings Press the to confirm Control buttons MENU OK button This item determines whether the beep sounds when operating the camera This item determines whether a date stamp wil...

Страница 20: ...your computer Do not connect the USB cable to your computer at this stage Turn off other applications running on your computer Place the supplied CD into the CD ROM drive Move the mouse to and click...

Страница 21: ...show twice Please simply click This camera works well for Windows 2000 Digital Signature Not Found Yes Follow the on screen instructions and click Finish The dialog box is occurring and the automatic...

Страница 22: ...r or never install DirectX 8 0 or above click Yes If you are a Windows XP user or you already installed DirectX 8 0 or above click No Fig 2 When a window as Fig3 or Fig4 appears please click or to com...

Страница 23: ...computer Insert the USB cable to the USB port on your computer Set the on your camera to or Mode switch Insert the other end of the USB cable to the USB port on your camera 2 Connecting your camera t...

Страница 24: ...ick Open folder to view files using Windows Explorer Ok For Windows XP users For Windows 2000 ME 98SE users Fig 5 Double click then double click the new icon My computer Removable Disk For Windows XP...

Страница 25: ...to copy your picture or movie to the computer My Documents You can find the files of your pictures and movies as Fig 6 The storage positions of the pictures and movies Fig 6 For Windows XP users For W...

Страница 26: ...r Click USB Disk then click Confirm the device on the confirmation screen and click Follow the on screen instruction to disconnect your camera from your computer correctly and safely Stop PocketCam X...

Страница 27: ...never install driver please finish the installation first For details please see in the Enjoying Viewing Your Image on a PC section on page 17 PocketCam X step 1 2 Connecting your camera to your comp...

Страница 28: ...low For Windows 2000 users Please select when a window as Fig 7 appears Automatic search for a better driver For Windows ME users Fig 7 For Windows 98SE users Click when a window as Fig 8 appears Sele...

Страница 29: ...begin to capture immediate images on your computer PocketCam X OR Click the menu and go up to then go to the folder named and click it Start Programs PocketCam X 26 After the installation of driver a...

Страница 30: ...cord Stop Recordings Snapshot Format Setting Preview or Stop Preview Open Album Video Source Viewing your pictures and movies with PC camera interface Click the icon at the bottom on the PC camera pan...

Страница 31: ...ze Select one of the following functions according to your needs RGB 24 Better image quality I420 The file will be compressed to add advantage for faster speed transformation Set output size to change...

Страница 32: ...nding Filter item on the Video Setting tab to avoid noise Select 50Hz or 60 Hz until the screen stops flickering If you want to restore the default setting select Normal AE Video Setting Banding Filte...

Страница 33: ...cover Make sure that the is open The storage is full Please free some space of the SD MMC card or flash memory Check if the camera is under the status of charging batteries Check if the SD MMC card i...

Страница 34: ...other installed camera or capture device If you have any other camera or capture device completely remove the camera and its driver form the computer to avoid a driver conflict The image is too blurre...

Страница 35: ...ng the flash light will decrease the number of pictures to be taken Number Status LED indicator 2 LED indicator events Flash LED indicator Data transformation LED indicator Condition LED color Green R...

Страница 36: ...Korea 50Hz 60Hz 50Hz 50Hz 60Hz 50 60Hz 50Hz 50Hz 60Hz 60Hz America 50Hz 50Hz Memory Flash memory 16MB SD MMC card 32MB SD MMC card 64MB SD MMC card 128MB SD MMC card 256MB 2048x1536 1600x1200 1280x960...

Страница 37: ...onferencing LCD display Digital zoom Exposure White balance Image effect Lens Self Timer Interface Power saving Built in microphone Built in flash strobe Battery Dimension VGA 640x480 pixels up to 10...

Отзывы: