background image

Connecting the camcorder to TV

Please follow the below instructions to connect your camcorder and  

TV via accessory AV cables for real-time display. You can display your 

video clips and still pictures on your TV, sharing them with your friends 

and family.

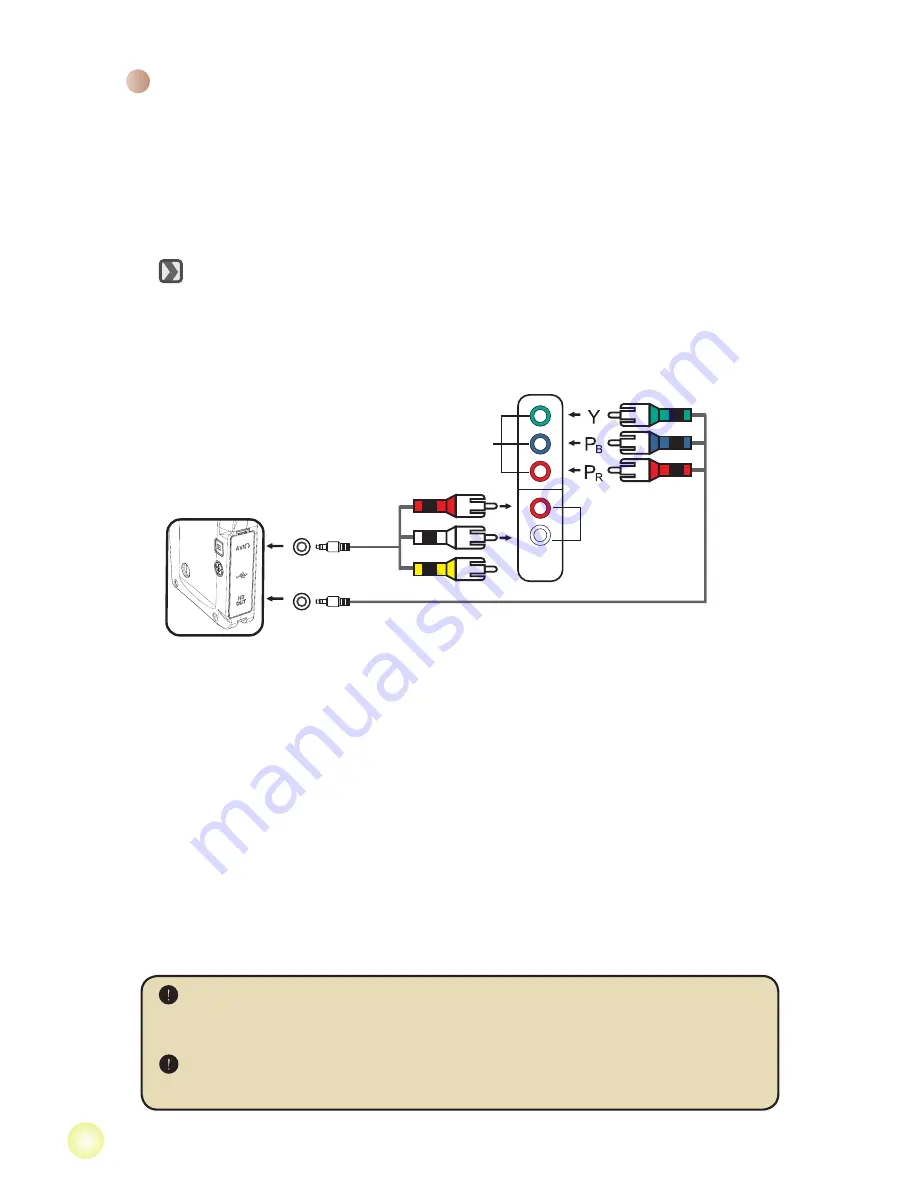
 Connecting the camcorder to HDTV


1. Turn on your HD TV.  
2. Turn on the Camcorder.
3. Plug one end of the component video cable into the (Component 

Video IN) port on the HDTV and the other end into the (HD OUT) port 

on the Camcorder. 

4. Plug one end of the other AV cable into the (Component Audio IN) port 

on the HDTV and the other end into the (AV) port on the Camcorder.  

(Please do not plug in the yellow connector to the HDTV’s AV-IN.) 

5. Press the input switch mode on the HDTV and select “Component 

Input”.   

 If you record an HD resolution clip while connected to your HD TV, the TV   

  display video resolution will down size to WVGA resolution due to data bit    

  rate, but the recorded file will remain HD with no change.


  The HD TV will display your video clips in 1080i (60 fields) resolution mode    

  although it is recorded in 1080P (30 frames) setting.

HD TV hereby means the HDTV built-in component input ports, thus can perform 

HD high resolution quality while connected.

AV

HD OUT

HD TV

Component Audio in

Component Video in

<Component Video cable>

<AV cable>

(red)

(yellow)

(white)

(green)

(red)

(blue)

(Do not plug in Yellow Cable)

Содержание Action A-V5Z5S

Страница 1: ......

Страница 2: ...that any change or modifications to the equipment not expressly approved by the party responsible for compliance could void Your authority to operate such equipment If the time arises to throw away yo...

Страница 3: ...asic Operations 4 Recording a video clip 4 Recording a voice clip 4 Taking a still picture 5 Playing back your recordings 6 Playing back your recordings on PC 7 Connecting the camcorder to TV 8 Advanc...

Страница 4: ...sh strobe Lens Internal Microphone SD MMC card slot Speaker MODE button MENU button Shutter button Record button Zoom in out button Macro mode switch AF lock switch Flash switch Resolution switch Powe...

Страница 5: ...ts 3 When the charging is interrupted or the battery pack is fully charged the charging LED will turn green When using a PC to charge the battery do not power on the camcorder or the charge will stop...

Страница 6: ...item and then Press OK to confirm 5 Move the Joystick up down to select a language 6 When done press OK to confirm the setting Reading LCD indicators 1 Mode icon Zoom ratio indicator Video resolution...

Страница 7: ...ated in HD 720P 60f WVGA 60f In HD 1080P 30f mode this function is disabled It s normal that the camcorder will feel slightly warm with continuous use recording due to its high performance Basic Opera...

Страница 8: ...ure the LCD preview and ratio of still picture capture will vary depending upon different video resolution settings The image capture of the camera is set where as video resolutions are different Vide...

Страница 9: ...ve the highlight box 2 In Full screen mode Use the Joystick to move left or right Video Audio Start playing When selected in full screen mode the file automatically starts playing Pause Resume playing...

Страница 10: ...s After the software is properly installed on your PC please follow the procedures listed below 1 Turn on the camcorder 2 Connect the camcorder with SD card inserted to your computer with the USB cabl...

Страница 11: ...her end into the AV port on the Camcorder Please do not plug in the yellow connector to the HDTV s AV IN 5 Press the input switch mode on the HDTV and select Component Input If you record an HD resolu...

Страница 12: ...mode 2 Connect the audio and video ends of the AV cable yellow white red color to the TV AV IN jacks 3 Power on the camcorder 4 Connect the other end of the AV cable to the AV port on your camcorder...

Страница 13: ...rced to fire in every shot Auto The flash automatically fires when the lighting is insufficient Off The flash is disabled NightShot On Off Enabling this setting allows you to take a photograph with a...

Страница 14: ...nued Item Option Description Continuous Shot at video resolution On Off Enable Disable continuous shot function White Balance Auto The camera automatically adjusts white balance Sunny This setting is...

Страница 15: ...lity to NTSC This option is suitable for America Taiwan Japan and Korea areas PAL Set TV system compatibility to PAL This option is suitable for Germany England Italy Netherlands China Japan and Hong...

Страница 16: ...life The flash strobe and the LED lights will be disabled Empty battery life Note To avoid sudden outage of power supply you are recommended to replace the battery when the icon indicates low battery...

Страница 17: ...lexity of your subject and surroundings System requirements are different in different video resolution settings Video Resolution PC system requirements HD 1080P 1440x1080 30fps OS Windows XP SP2 Vist...

Страница 18: ...ry SD MMC card up to 32GB SDHC LCD display 3 LCD TV out HDTV Component out NTSC PAL system supported Interface USB 2 0 Voice recorder Yes Microphone internal stereo external mic jack Speaker Yes Night...

Страница 19: ...82 486 90010 000v1 0 HD DV Camcorder...

Отзывы: