background image


2. Ozonation mode - time settings: 
-

Single mode:

 short press of the button  

In “Single mode” you can set the time of ozonation from 5 min to 2 hours. 
 

3. Ozonation time controller: 
-

The settings are divided into 8 steps:  
5min - 10min - 15min - 30min - 45min - 1h - 1,5h - 2h 
 

4. Color signaling modes (LEDs above the buttons): 
-

Ionization mode: Green - active 

-

Ozonation mode:  Red - active 

-

Aromatherapy mode: Green - active 

4.3 Control buttons 


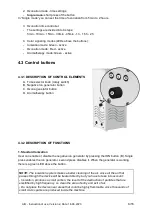
4.3.1 DESCRIPTION OF CONTROL ELEMENTS 

A. Time selector knob (rotary switch) 
B. Negative Ion generator button 
C. Ozone generator button 
D. Aromatherapy button 


4.3.2 DESCRIPTION OF FUNCTIONS 


1. Standard Ionization 

User can enable or disable the negative ion generator by pressing the ION button (B). Single 
press enables the ion generator, second press disables it. When the generator is working 
there is a green LED above the button.  


AIO - Instruction of use, Version 2, Date: 16.06.2020

8/16 

NOTE:

 The ionization system makes a better cleaning of the air, since all the air that 

passes through the device will be treated directly, but you have to take into account: 
- Ionization, produces a small carbon, the result of the destruction of particles that are 
electrified by high frequency, so clean the area of entry and exit of air.  
- Do not place the device near areas that could be highly flammable, since thousands of 
small micro sparks are produced inside the machine. 

Содержание CM1-AIO

Страница 1: ...Instruction of use Model CM1 AIO AIO Instruction of use Version 2 Date 16 06 2020 ...

Страница 2: ...ONATION 9 ITEM OZONATION 10 WATER OZONATION 11 5 Safety Regulations 13 5 1 Basic Information 13 5 2 Symptoms of ozone poisoning 13 5 3 Safety notes 13 5 4 Label description 14 6 Troubleshooting 14 7 Ozonation process 14 7 1 Room preparation before ozonation 14 7 2 Setting up the device 15 7 3 Process Monitoring 15 7 4 Finishing the Ozonation 15 7 5 General Tips 15 7 6 How long should the process l...

Страница 3: ...ing properties It kills bacteria viruses fungi allergens mites and unpleasant odors One device can provide a whole new dimension of comfort in your interior It is a portable device with 3 options Aromatherapy Ionization Ozonation What s more you can also use it as ultrasonic humidifier Thanks to this device you can ozone air and water ionize the air use a humidifier or add your favorite oils and e...

Страница 4: ...es the troublesome particles much heavier than they were before As a result these over weighted particles are no longer light enough to stay airborne and drop to the ground Once they have landed on the floor they are much less likely to be inhaled and can be easily vacuumed up 1 4 Aromatherapy Diffusers are a great way to get your home smelling absolutely lovely with the added benefit of promoting...

Страница 5: ...room The ultrasonic generally has no filter factored into its design That does save operation costs 2 Packing List 3 Technical Parameters AIO Instruction of use Version 2 Date 16 06 2020 5 16 The package includes Name Pieces Device 1 Cable with power supply 1 Silicone Hose 1 Air bubble stone 2 Aluminium box 1 Instruction of use 1 General Specification Model No CM1 AIO Input 12V 30W Ozone Output 10...

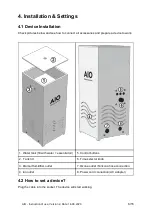
Страница 6: ... How to set a device Plug the cable into the socket The device will start working AIO Instruction of use Version 2 Date 16 06 2020 6 16 1 Water tank fill with water essential oil 5 Control buttons 2 Tank lid 6 Time selector knob 3 Aroma Humidifier outlet 7 Ozone outlet Silicone hose connection 4 Ion outlet 8 Power cord connection AC adapter ...

Страница 7: ...ubstances can cause corrosion of the system Do not exceed the amount of essences recommended by the manufacturer as the ultrasonic function may not be performed properly Keep the device away from electrical devices Remember that aromatherapy produces water fog Place the device at least 2 meters from the other objects which are not waterproof Remember Fill the water tank at the top of the device be...

Страница 8: ... OF FUNCTIONS 1 Standard Ionization User can enable or disable the negative ion generator by pressing the ION button B Single press enables the ion generator second press disables it When the generator is working there is a green LED above the button AIO Instruction of use Version 2 Date 16 06 2020 8 16 NOTE The ionization system makes a better cleaning of the air since all the air that passes thr...

Страница 9: ...nsive deep cleaning we need to generate at least 5 ppm of ozone so we will make the following calculation M3 of our room x 1 605 Min Working time AIO Instruction of use Version 2 Date 16 06 2020 9 16 Do not stick the air inlet or outlet to the wall and avoid obstructing them NOTE Follow the instructions for starting and using essential oils described in section 4 2 NOTE Ozone in high concentration...

Страница 10: ...x See below how the hose should be inserted AIO Instruction of use Version 2 Date 16 06 2020 10 16 NOTE this rule is not exact as it will depend on the temperature air pressure room layout air flow zones additional air conditioning systems etc NOTE See some of the recommended applications in Section 8 When using the water ozone function connect the hose to the air bubble stone Put a silicone hose ...

Страница 11: ...il then it acts as a powerful sterilizer and oxidizer After 20 minutes from the end of the ozone process the water can be used for drinking cooking rinsing or brushing teeth 5 Safety Regulations WARNING BEFORE STARTING THE OZONATOR PLEASE READ ALL INFORMATION BELOW REMEMBER THAT OZONE IS HARMFUL TO HUMANS PLANTS OR ANIMALS DURING THE PROCESS YOU SHOULD NOT REMAIN IN THE VICINITY OF THE DEVICE 5 1 ...

Страница 12: ...impact on the unit Never block the air outlet to affect the air ventilation 5 Do not contact your eyes or respiratory system with the air outlet to avoid uncomfortable feeling 6 When this unit is used in a non ventilated room to sterilize the air please leave the room for 30 to 40 minutes 5 4 Label description 6 Troubleshooting Dear customer When you meet any problems please try to solve them as s...

Страница 13: ...ays hermetic the ozone should not diffuse to any outside places like a staircase 7 4 Finishing the Ozonation After the generator turns off wait 30 minutes in order to utilize the prepared ozone If the space will be used after the process ventilate the room for around 15 to 20 minutes until the ozone concentration is safe 0 1ppm AIO Instruction of use Version 2 Date 16 06 2020 13 16 Defect Analysis...

Страница 14: ...old liquid After the chemical procedure the ozonation can be carried out in order to eliminate the spores from the air and neutralize the bad smell 7 8 Warnings The Ozonation mode should not be used by people with odor disorders There should be unoccupied space left around the device during the ozonation Do NOT check the ozone generation by smelling the air directly from the outlet Short term high...

Страница 15: ...urer provides a 24 month warranty period for Ozone generator AIO The warranty period is counted from the date of sale The warranty consists in repairing the device or replacing parts by an authorised service centre or manufacturer The warranty covers production defects of the device that prevent proper use It covers defects occurring due to causes inherent in the product or hidden manufacturing de...

Страница 16: ...directly to the manufacturer s premises stating the reason for the complaint After delivery of the device the product will be carefully verified by the manufacturer in terms of proper use of the ozone generator By considering a complaint we refer to notifying the customer electronically about the decision of CM International S A regarding the complaint If the device is not considered defective or ...

Отзывы: