Aigis Mechtronics NPVD A Series Скачать руководство пользователя страница 17

E x i t

B a c k L i g h t  


7 5

C S M  

N o r m a l

P S M

U s e r

B r i g h t n e s s


5 0

C o n t r a s t


5 0

C o l o u r


5 0

S h a r p n e s s

5 0

T i n t


0

E x i t

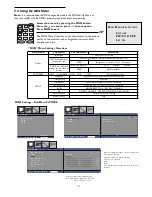
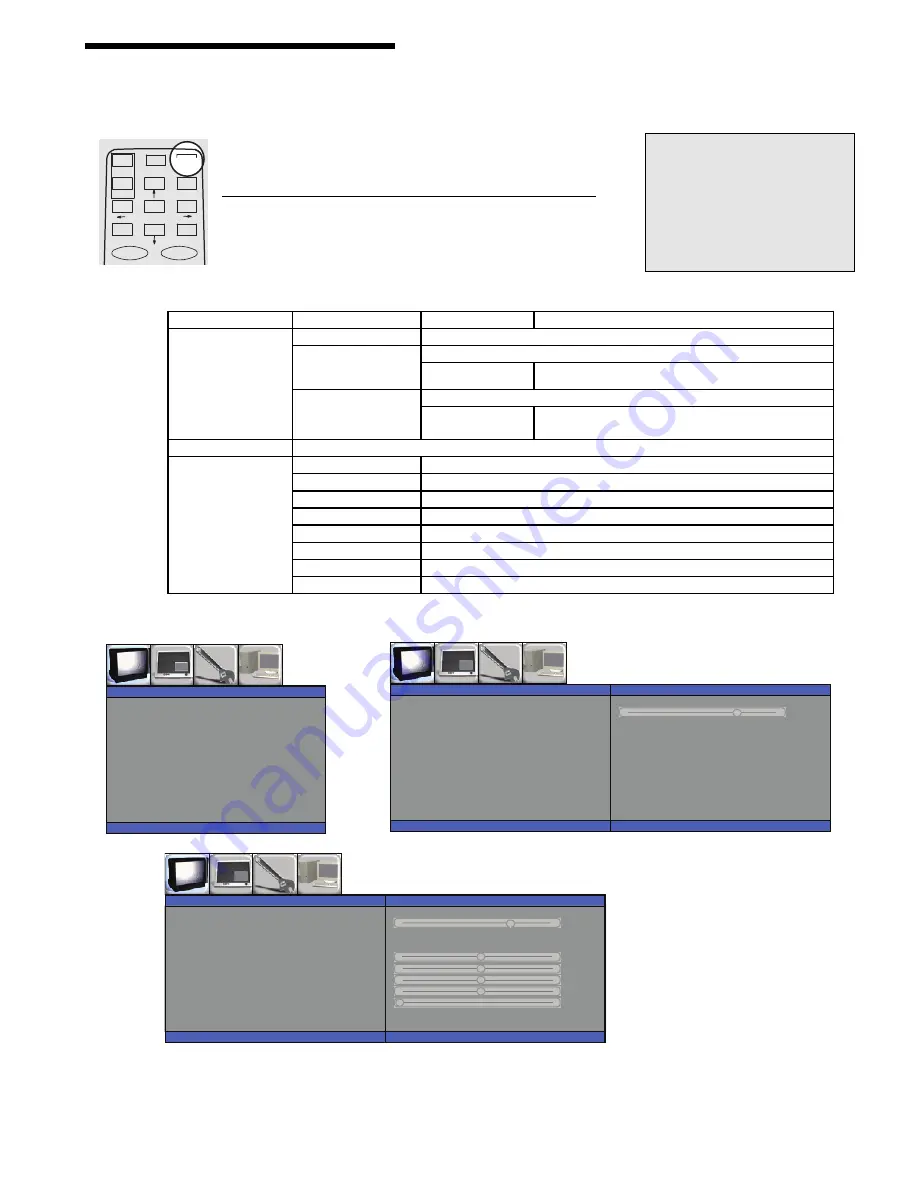
CSM - Color Warmth Settings : Factory Set to Normal
Cool / Warm1 / Warm2

PSM - Pre-Set Monitor Settings By Type:
Factory Set to : Standard
Mild
Game
User: Customized by End User has its own sub menu
Dynamic

PSM - Pre-Set Monitor Settings By Type:
User Menu Adjust: Brightness

/

Contrast/

/

Color / Sharpness / Tint

P I C T U R E

M e n u = M O N

M e n u = M O N

17

B a c k L i g h t  


C S M  
P S M

E x i t

P I C T U R E

M e n u = M O N

B a c k L i g

h

t

C S M  

N o r m a l

P S M

S t a n d a r d

E x i t

P I C T U R E

M e n u = M O N

75

“MON” Menu Settings Overview

MON Settings - Sub-Menu PICTURE

Access the menu by pressing the MON button.
Press the

to choose, press

choose option.

Press MON to exit.

CARD

MON

PVD

STOP

SEL

EXIT

OK

ON

OFF

MENU

M

O N

M

E N U

S

E L E C T I O N S

P

I C T U R E

P I P / P O P / P B P
S

E T

U

P

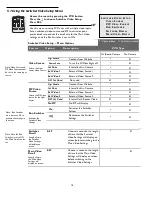
5.9 Using the MON Menu

Note:

It is recommended that NO changes be made to the MON Set Up Menu as

they may conflict with the NPVD’s preconfigured circuit board programming.

The MON Menu allows for minor adjustments to the picture
quality of the monitor such as brightness, contrast, color,
sharpness and tint.

MON MENU

SUB MENU

2nd SUB MENU

CONTROL

Picture

Backlight

Factory Set 75% 0-100

PMS (Pre-Set Monitor

Settings by Type)

Factory Set Standard - Dynamic/Standard/Mild/Game User

USER

Brightness Contrast Color Sharpness

CSM (Color Warmth

settings for the Video on

Screen)

Factory Set Normal

Cool

Warrm1

Warm2

USER

Red/Green/Blue

PIP/POP/PBP

NOT

AVAILABLE WITH

THIS

UNIT

No Settings will save.

SETUP

Language

English/Deutsch/FranÁois/Italiano/Espanol/Korean

Transparency

0 (0

100)

ISM Method

Factory Set Normal - DO NOT CHANGE

Set ID on/Off

MUST BE SET TO (ON) - DO NOT CHANGE

Set ID

MUST BE SET TO (I) - DO NOT CHANGE

Flip

DO NOT CHANGE - USE PVD MENU FOR THIS OPTION

Factory Reset

Defaults to Factory Settings

Sound Source

N/A

Содержание NPVD A Series

Страница 1: ...I N S T A L L A T I O N A N D O P E R A T I N G I N S T R U C T I O N S W W W A I G I S M E C H C O M NETWORK PUBLIC VIEW DISPLAY NPVD SYSTEMS NPVDxxA Series...

Страница 2: ...walked on or pinched by items placed upon or against them paying particular attention to cords and plugs convenience receptacles and the point where they exit from the appliance 12 Power Lines An outd...

Страница 3: ...amera have motion detection picture in picture and an additional BNC output for the internal camera All NPVD Products include the capability to connect to a website that allows a remote user to alter...

Страница 4: ...sor OSD Controls Sensitivity Action Upon Motion and Dwell Time Light Sensor OSD Controls Sensitivity Remote Controller 14 Button Remote Batteries Included Video System NTSC Speaker Power 2 Watts per C...

Страница 5: ...saging Allows images and or text to be displayed on a monitor or group of monitors within one minute of execution Event Logging Playlist on screen duration loss of signage connectivity and content dow...

Страница 6: ...e powered with the included Power Cord A by plugging directly into the power receiver B located on the back of the monitor see Figure 1a Power Cord Protection Power supply cords should be routed so th...

Страница 7: ...connector to the input of your external monitor See Figure 1b for connector locations 4 4 Network Connection Run a Cat 5e 6 network cable to the installation site Plug the cable into the RJ45 jack sho...

Страница 8: ...to the customer website using the provided login details If the customer did not supply the installer with the necessary details contact Aigis Mechtronics for instructions See Figure 2 2 Once logged i...

Страница 9: ...he network 7 Once everything is selected hit Download Initial Setup to download the USBSetup tar file generated by the server 8 Copy this file over to the USB key Make sure it doesn t get renamed if t...

Страница 10: ...n picture PIP settings and the switcher Access any advanced setup options if the unit is equipped with these features under this menu MON MENU The MON Menu allows for minor adjustments to the picture...

Страница 11: ...open on the screen pressing the SEL button will bring up the menu shown CARD MON STOP SEL EXIT OK ON OFF MENU PVD 5 3 Using the PVD Main Menu CARD PVD MON STOP SEL EXIT OK ON OFF MENU To Access the PV...

Страница 12: ...box that says No Signal followed by the current input setting i e No Signal DVI Pressing the PVD button is ineffective because the system is trying to overlay the menu over the input image which is b...

Страница 13: ...ource After motion is detected by the Motion Sensor the on screen video will switch to the Motion Sensor settings set in this menu and stay on screen for between 5 59 seconds Sensitivity Sets how sens...

Страница 14: ...x No PIP No PIP will display x Sensitivity Sets how sensitive the Light Sensor is to a change in ambient light 1 10 1 not sensitive 10 most sensitive Sensor On Off Activate or Deactivate the Light Sen...

Страница 15: ...L L MA I N VI D E O DW E L L 5 7 Using the Switcher Video Setup Menu Feature Option Description Use this menu to setup PVD units with multiple video inputs Set an additional video source and PIP to ac...

Страница 16: ...s Rotate or mirror the on screen image Set the type of video to play through the Internal Card reader Choose the source of the audio input Option Included X Option Not Included Advanced Setup Menu Opt...

Страница 17: ...ME N U SE L E C T I O N S PI C T U R E PIP POP PBP SE T UP 5 9 Using the MON Menu Note It is recommended that NO changes be made to the MON Set Up Menu as they may conflict with the NPVD s preconfigur...

Страница 18: ...that Monitor Settings should be adjusted by using the Remote Control On Screen Display Menus see 5 9 Using the MON Menu not by using the Monitor Control Buttons Adjustments to the Monitor Settings may...

Страница 19: ...n also be moved in an up and down orientation by unscrewing slightly the steering yoke and sliding the sensor up or down then retightening 4 The standard PIR detects motion by sensing left to right or...

Страница 20: ...20 Field of View in Meters 6 1 1 Motion Sensor Field of View in Meters Top View Side View...

Страница 21: ...the control board is running 4 The Camera On LED is lit when the motion detection is selected and off when the auxiliary input is selected Figure 7 Control Board Figure 7 Detail A Switches Camera On...

Страница 22: ...operation The camera module position can be adjusted both vertically and horizontally and can also be rotated for proper tilt orientation See Figures 7 for the correct camera series adjustment points...

Страница 23: ...32 21 5 3 0 27 5 15 4 12 8 25 2 9 0 3 0 30 3 32 19 0 27 5 15 4 32 CrystalVue TM No Camera 6 1 NPVDTM 32 3 25 15 91 25 88 25 98 3 25 25 98 18 91 13 0 25 88 26 CrystalVue TM No Camera NPVD 26 DIMENSION...

Страница 24: ...2010 Aigis Mechtronics 1124 Louise Road Winston Salem NC 27107 5450 Tel 336 785 7740 Fax 336 785 7744 Data subject to change without notice 100 0250 001 AIG 01 10 Draft Printed in U S A...

Отзывы: