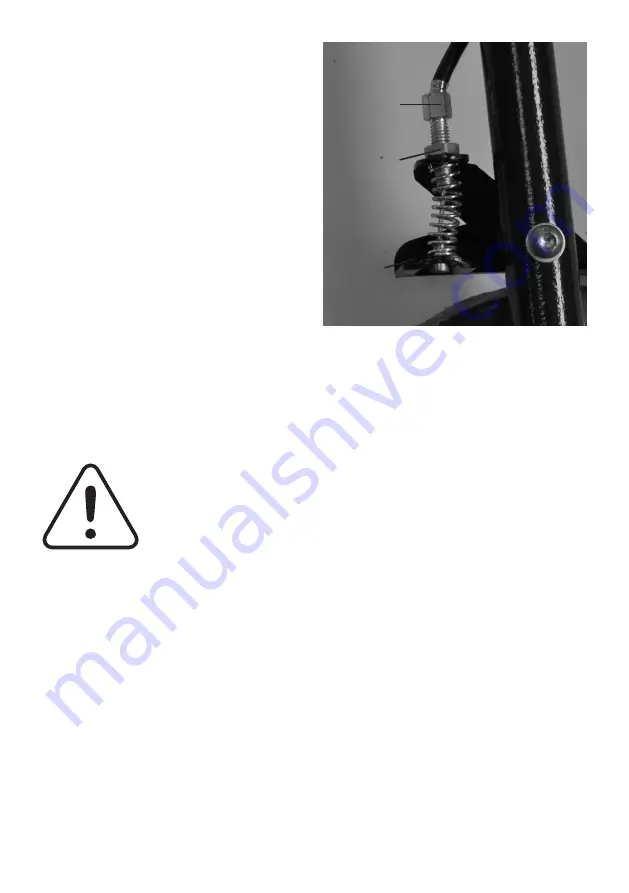
FIG 7
BRAKE
ARM
NUT D
SCREW C
BRAKE ADJUSTMENT (CONTINUED)
3. If the brake handles are fully adjusted and more
adjustment is required refer to fig. 7. Whereby
screw C is unlocked and nut D is unscrewed
anti-clockwise to tighten the cable further or
clockwise to loosen the cable.
4. Re-tighten the locking screw C (see fig. 7) and
then adjust brakes via handle notes 2 & 3.
5. After adjustment, check the park brakes by
pushing down on the brake handles, ensuring that
both brakes lock in the ‘park’ position.
6. With the ‘park’ brakes OFF lift the two ‘braked’
wheels off the ground and spin to ensure they turn
freely. If either of the braked wheels rub onto the
brake arm (see fig. 7), please check for
obstructions and repeat the brake adjustment
procedure above.
7. It is important that you check brake adjustments on a regular basis to take into account wear and tear.
However brake adjustment must be checked at least once a month and definitely prior to a change of
user.
CARE AND MAINTENANCE & YOUR OBLIGATION
1. Check that all wheels function correctly and that all wheels move freely. Pay particular attention to the
front wheels, ensuring that they rotate freely and without obstruction.
2. Monthly Checks - Check that no components are loose. Check the adjustment to your brakes. Ensure
that the brakes are correctly adjusted, check castors and wheels.
3. Do not fit any parts or accessories to your Aidapt Trolley manufactured by another company. To do so
will annul your warranty and may seriously compromise your safety.
4. We suggest that you check your Aidapt Trolley visually every day. However we recommend that you
should have your trolley serviced every three months or less if used by, or issued to, various users.
Servicing should be carried out at an approved service station or directly by Aidapt.
Withdraw your Aidapt Trolley Walker immediately if any of the wheels become
difficult to turn or if you suspect damage or any other fault.
CLEANING
Clean your Trolley using a non-abrasive cleaner or mild detergent with a soft cloth. Abrasive cleaners
e.g. AJAX and/ or abrasive cleaning pads may seriously damage the product beyond repair and should
not be used. Always ensure that you wipe dry the equipment after cleaning.
The polypropylene clip-on trays can be removed for cleaning. To remove, place your finger and thumb
on the underside of the U clip over inserted U section, push upwards and remove.
The tray can be cleaned with either a mild detergent or disinfectant, or alternatively pressure washed or
autoclaved at a temperature of up to 90ºC.
Содержание VG798WB
Страница 7: ......


